Only the standard layout is currently available. However, it is possible to overwrite the CSS of the cookie window.
In the long term, it is planned to offer different layouts for selection.

The European Court of Justice (ECJ) has ruled that cookie banners, which do not expressly require the consent of the website visitor, are not lawful under the DSGVO. To make it easier for TYPO3 developers to implement this new requirement, we have developed the sgalinski Cookie Opt-In, an easy-to-integrate module that enables embedding for cookies and tracking scripts that is compliant with GDPR (DSGVO) and ePrivacy. You can find further information in the german blog article from Dr. Schwenke.
| TYPO3 Versions | 12.4.X | 13.4.X Support of TYPO3 v9 - v11 up to Cookie Opt-In version 6, v8 up to version 4 and TYPO3 v7 & v6 up to version 3 |
| PHP Versions | 8.1.X | 8.2.X | 8.3.X | 8.4.X Support of PHP 7.2 - 8.0 up to Cookie Opt-In version 6, PHP 7.0 & 7.1 up to Cookie Opt-In version 4 |
| Tested Browsers | Evergreen Browsers |
We are looking forward to support you with the integration of our Cookie Opt-In Extension into your TYPO3 instance. Just contact us with your support request! – Everyone else who integrates and configures our Cookie Consent Tool on their own will find a Cookie Opt-In documentation on this page as support.
Cookies may be loaded due to the DSGVO (GDPR) and the ePrivacy regulation only if the respective side visitor agrees this expressly (cookie consent). This also eliminates the need for opt-out solutions in which the user must actively object in order to no longer receive cookies. For this reason, the sgalinski Cookie Consent only embeds cookies that you define as essential.
Non-essential cookies are sorted into any number of groups in the supplied backend module of the extension. These cookies are listed transparently and clearly to the visitors of your site with information such as origin, description and duration. The user can then decide which cookie groups he wants to accept and which cookies should not be loaded.
You install the extension via Composer or the TER and include it with a few lines of TypoScript in your instance. Thanks to the clearly arranged backend module and an intelligent pre-configuration, your cookie opt-in banner is ready for use with just a few clicks. Any tracking scripts can also be added in no time at all, but will only be loaded once the user has agreed to it.
In the backend module of the cookie consent extension, the color design of the cookie pop-up can be configured so that the banner integrates seamlessly into the frontend of your website. This gives you full control over the appearance of the cookie opt-in hint.
The cookie banner of the TYPO3 extension can be translated into any number of different languages and is played out accordingly on each language of your website.
In addition, different cookie groups can be configured for different language versions of your website. This ensures transparent, flexible data protection for all users.

You can insert any scripts in the settings of the sgalinski Cookie OptIn. They will be loaded as soon as the user has agreed. We have taken special care to ensure that no tracking information is lost through the OptIn consent.
Sgalinski Cookie OptIn for TYPO3 is the simplest solution to play out tracking scripts and tags as well as cookies in compliance with data protection laws. With the clear opt-in banner you create trust and transparency with your users.
The backend module helps you to quickly divide all your cookies, tags and scripts into groups that users can freely accept. Thanks to our licensing model, you will receive all updates for sgalinski Cookie OptIn as soon as they are available.

Our TYPO3-based website base is a comprehensive package for creating and managing websites of all kinds. The sgalinski Cookie Consent extension is contained in the Website-Base. Basically there is the option to create a Website at a fixed Price or to choose a Website as a Service package, which does not incur any additional costs for hosting or security and function updates. All information about the available editions of the Website-Base can be found on the pages linked below.
Content
1.1 Statistics
1.2 Consent Management
4.1 Identify Cookies
4.2 Create Cookie Consent
4.3 Edit Cookie Consent
4.3.1 Tab: Labels & Menu
4.3.2 Tab: Template
4.3.3 Tab: External Content
4.3.4 Tab: Services
4.3.5 Tab: Banner
4.3.6 Tab: Essential Scripts & Cookies
4.3.7 Tab: Other of Scripts & Cookies
4.3.8 Tab: Settings
4.4 Translate Cookie Opt-In/Consent
5 Google Tag Manager Integration with Consent Mode
6 Google Tag Manager Integration without Consent Mode
7.1 JavaScript API
7.2 JavaScript Events
7.3 PHP Symfony Commands
7.4 Modify the generated JSON file
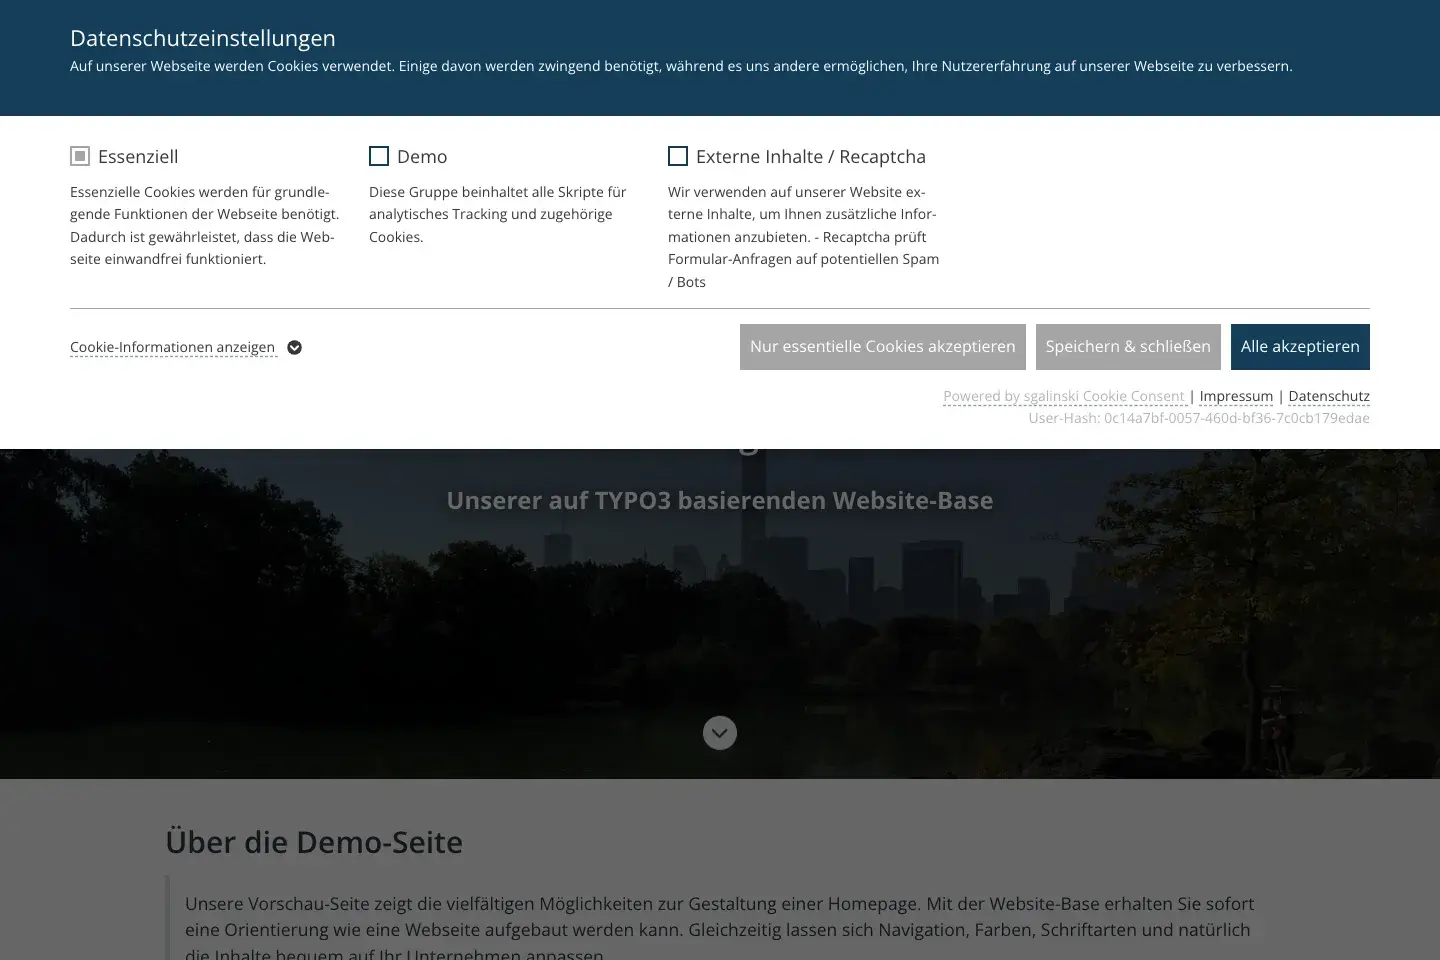
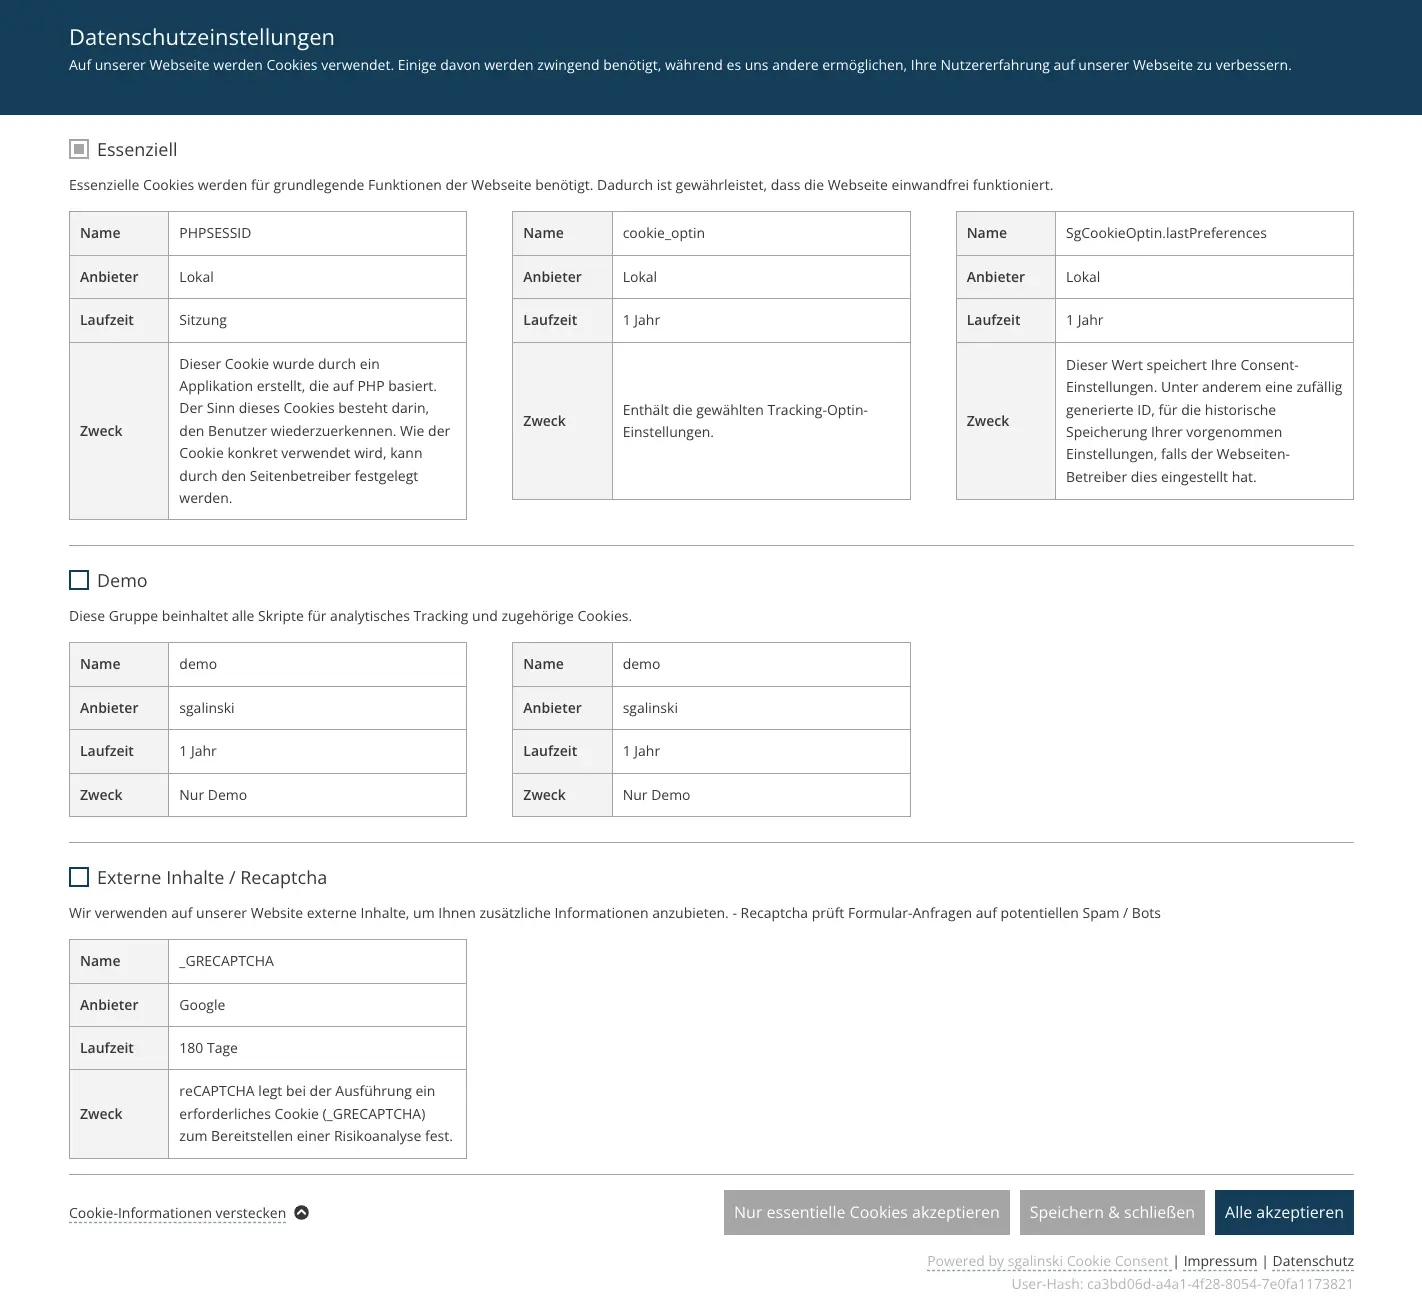
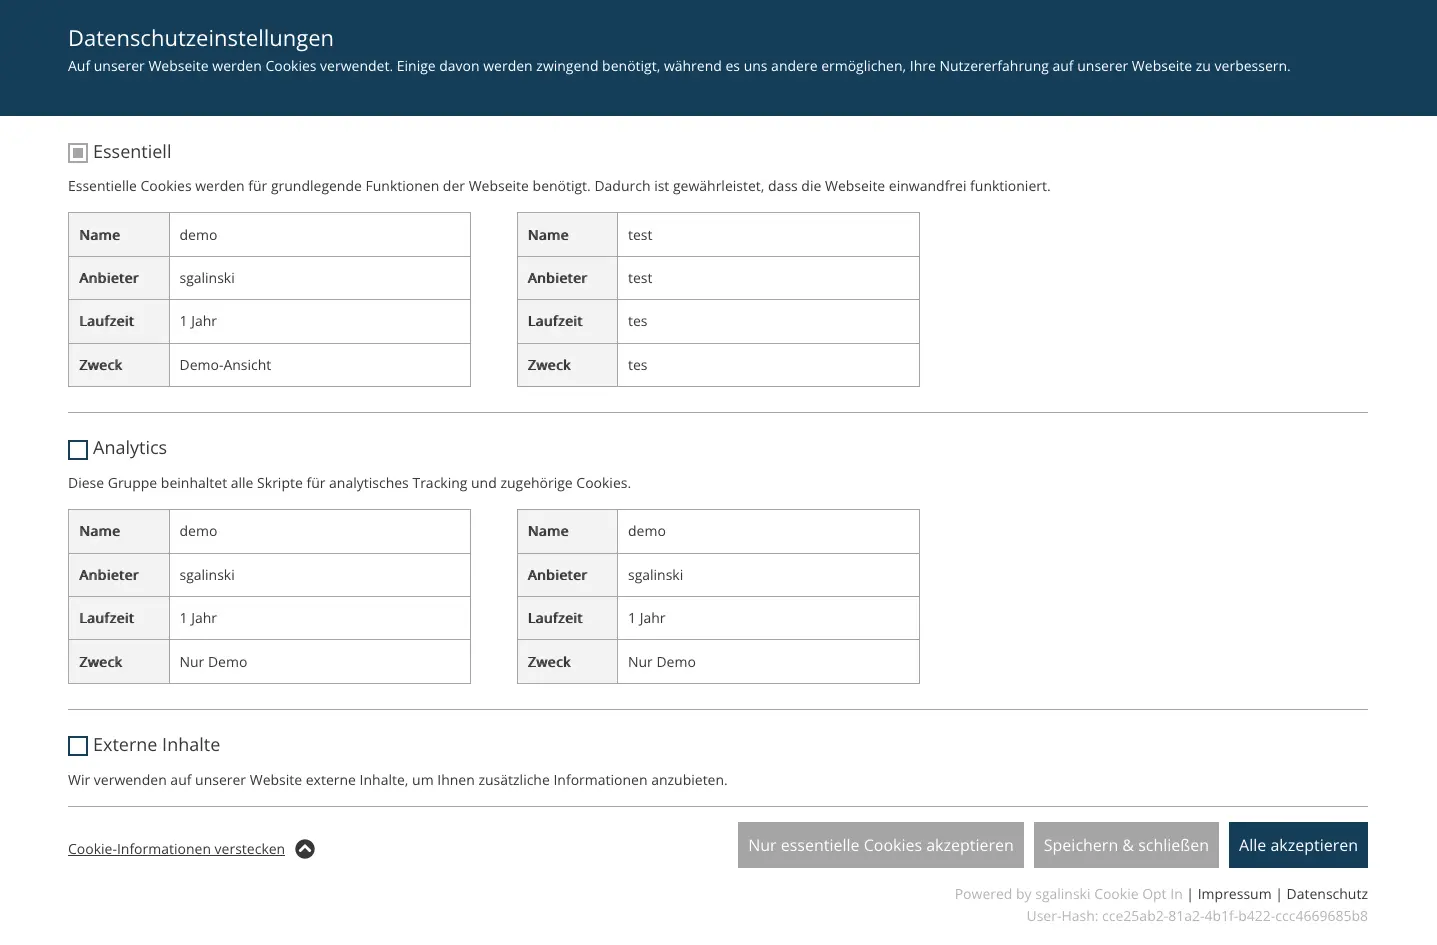
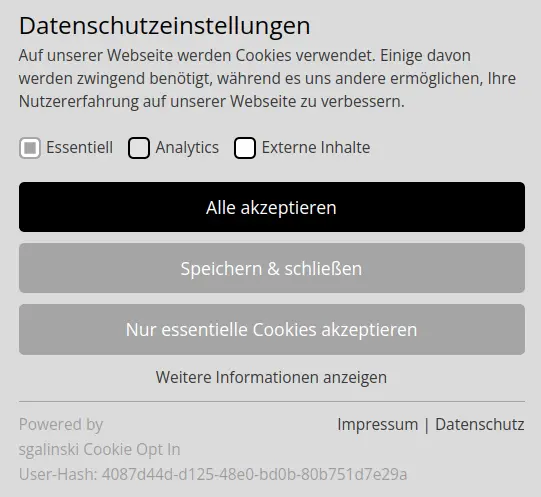
After the successful installation and configuration of the sgalinski Cookie Consent Extension, each new visitor to your website will be shown a window with the cookie consent. The user decides which cookies he chooses to allow and which not.
The following cookie groups are visible in the cookie banner (essential cookies are always accepted as they are important for the function of a website):
The user can save the individual selection or accept 'only essential cookies' or 'all cookies' with just one click. If a site visitor closes the window without making a selection, only essential cookies are automatically loaded.
You also have the option to integrate the Cookie Consent into a page after configuration. Two cookie opt-in content elements are available for this purpose: a cookie-list and a content element with which you insert the consent window directly into a page.
The Tracking / Cookies module is organized into three functional areas:
By default, you enter the Settings functional area as soon as you select the module Tracking / Cookies. To switch between the functional areas, simply click in the box above the content area where 'Settings' can be seen. In the drop-down menu you can see all three functional areas, then click on the one you need.

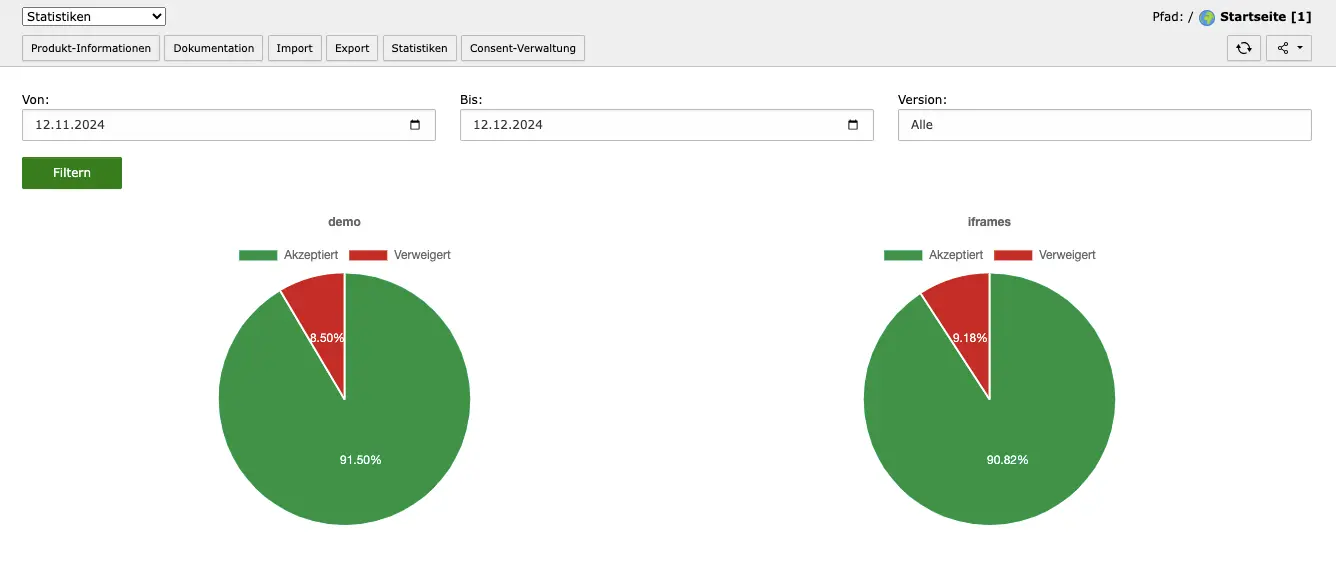
In the statistics you can see how many people have accepted or rejected your cookies. You can filter the results by the time period or by the version number. The module shows you pie charts for the different groups and represents how big the percentages of people are who have accepted or rejected the respective group. The essential cookie group is always 100% accepted, which is why it does not appear in the statistics.
If you filter by the version number, you will see only the data for the specific version. This allows you to compare different versions with each other. You can draw conclusions from this as to whether certain changes have contributed to more visitors accepting non-essential groups.
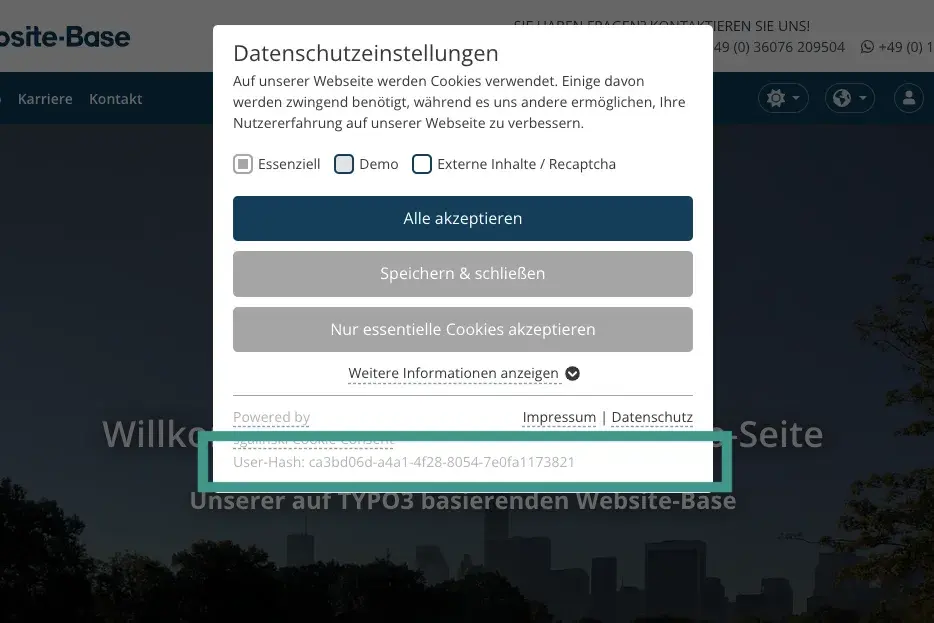
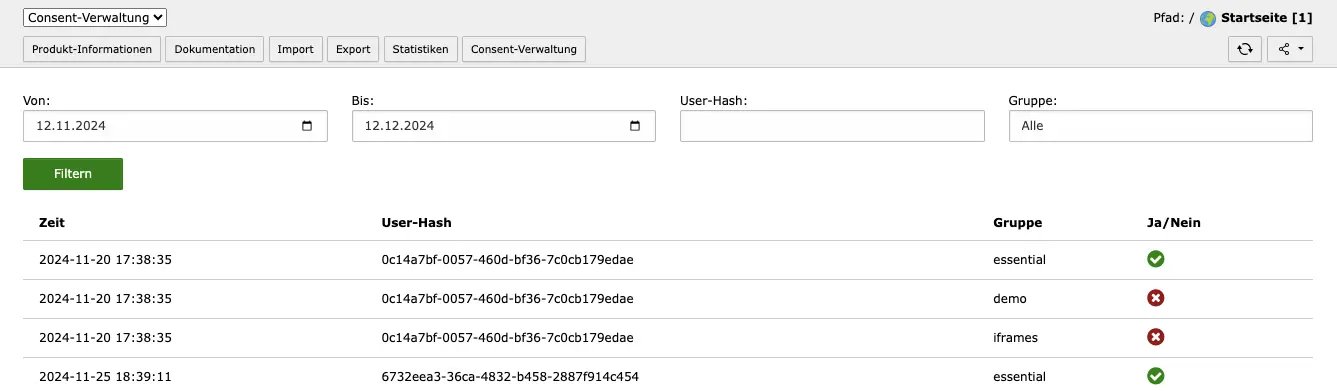
If visitors complain that they have received cookies to which they have not consented, this can be checked in Consent Management. There you can access the OptIn logs and check whether unwanted cookies were actually played.
For this purpose, visitors receive a user hash, which they can find at the bottom of the cookie banners. In Consent Management, the user hashes are listed and it shows when which cookie groups were accepted or rejected. A new user hash is assigned when browser data has been deleted.
The list can be filtered by user hash, time period or the cookie groups.
For all those who have several TYPO3 instances with our Cookie Opt-In Extension, we have implemented a practical export and import function that can be used from TYPO3 version 9. It allows you to configure the cookie consent once and transfer all settings to other instances.

When importing, you must ensure that at least the default language is present in the exported file, or that the original configuration contains the main language of the page into which the file is to be imported. If other languages do not match completely, this is not a problem. If there are too many languages in the file, they will simply not be included in the new instance. In the opposite case, if languages (other than the default language) are missing, you just need to add a new translation for the cookie opt-in in this instance.
You will be informed during the import process if the default language is missing or if the number of cookies and scripts does not match in the translations. The latter can lead to the translations not being adapted correctly. Problems that occur as a result can be fixed afterwards.
Proceed as follows when exporting & importing:
If you have already created an entry in this instance, you must delete it in order to use the imported configurations. To delete an entry, go to the Tracking / Cookies module and use the Paper Bin icon to remove the entry you don't need.
The TYPO3 extension can be easily obtained from the TER or installed via Composer. To install the extension with Composer, you need to execute composer require sgalinski/sg-cookie-optin. In both cases, the extension must then be added using the Template module and configured via the Tracking / Cookies module. Both steps are described below.
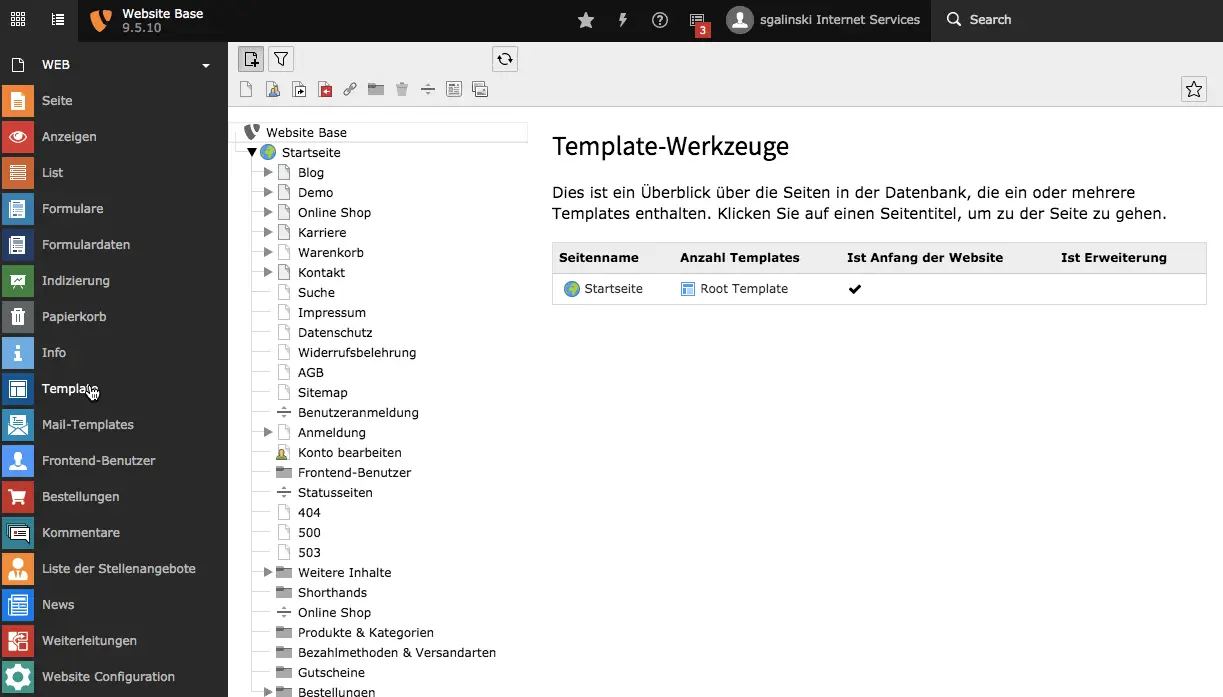
In order for the integration to work without problems, you must configure a so-called siteroot. You can see whether you have already configured a siteroot for your website by the small globe icon next to the name of the page in the page tree. If you do not see a globe there, it means you have not defined a root site yet. To configure a siteroot, proceed as follows.
Enter the licence key in the backend module Settings under Extension Configuration at sg_cookie_optin. Alternatively, you can also test our Cookie Opt-In Extension for 24 hours in demo mode.
After the installation you have to add the static TypoScript named Cookie Opt-In to your instance. To do this, proceed as follows:
Should your TYPO3 installation be located in a subdirectory e.g. www.example.com/subdirectory, you should adjust the value general.folder in your extension settings in the TYPO3 backend.
Cookie Opt-In automatically makes use of TYPO3’s CSP nonce mechanism. This ensures that scripts and styles also work with a strict Content Security Policy (CSP). If you would like to make use of it and keep your website secure, all you need to do is to change your csp.yaml accordingly:
  - mode: set
    directive: 'script-src'
    sources:
      - "'self'"
      - "'nonce-[random]'"
      ...
Important: TYPO3 replaces placeholder nonces with the real request-specific nonce just before sending the response, so this also works with cached pages. However, if a reverse proxy or CDN caches the final HTML together with the CSP header, users may see CSP errors unless you bypass proxy caching for CSP-protected pages, configure the proxy/CDN to avoid caching dynamic nonces, or rely only on TYPO3’s internal page caching.
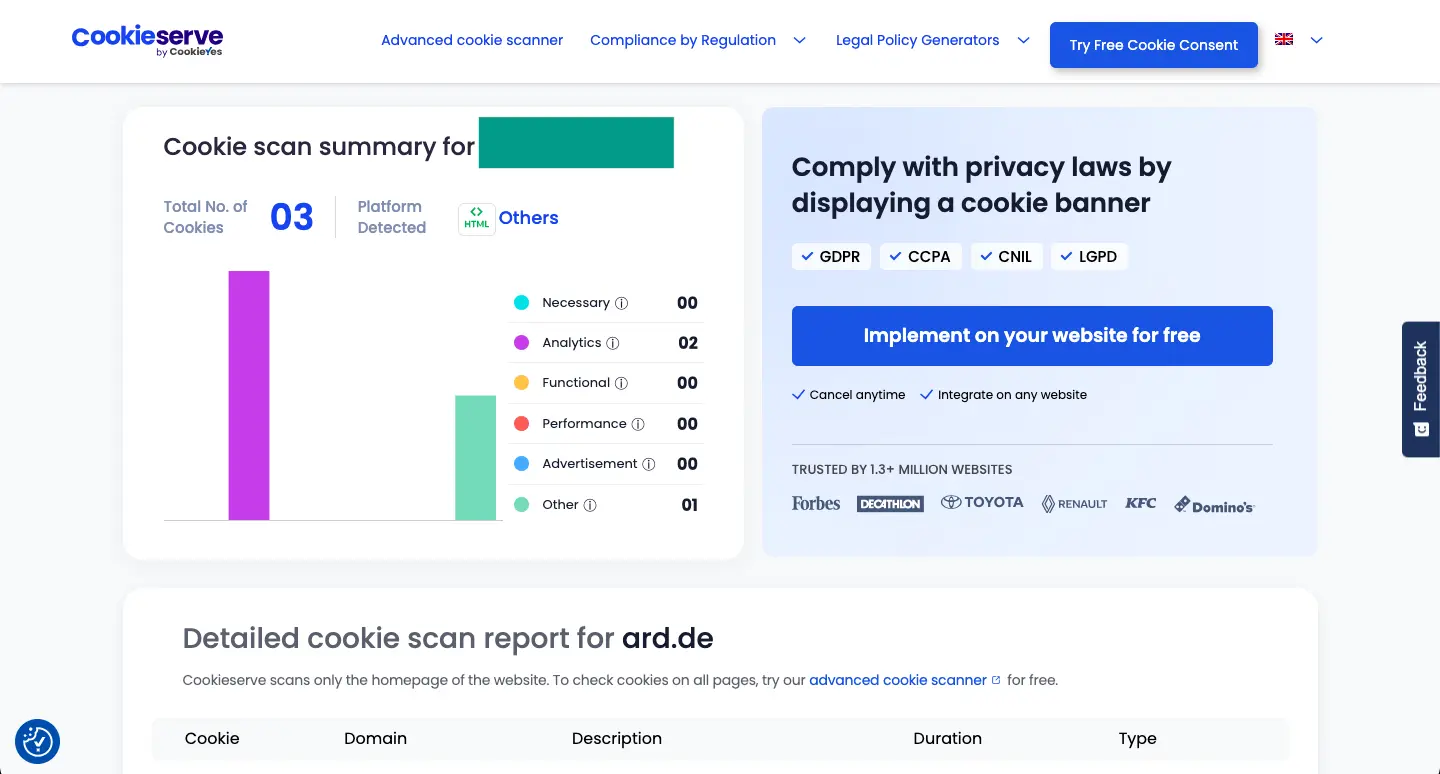
Before you set up your Cookie Opt-In Extension in the backend, you should check your website for cookies. To do this, use the following tool. As shown below, enter your homepage address and confirm your entry with Find Cookies . In addition to the tool, you also have the possibility to manually check your page for cookies. To do this, follow these instructions.

The result is a clearly arranged table, as shown below. This table contains most of the information required for configuring the extension. The section on the group of essential scripts & cookies describes which data you have to enter where.
Note that this list may not be complete.
Furthermore, it is not enough to check only the Website URL for cookies. It is important that the other main and sub pages of the website are also scanned.
Only if all cookies and tracking scripts are loaded exclusively via the Cookie Opt-In/Consent Extension is it possible to create a GDPR-compliant website. If this is the case, the tool will not be able to deliver any results after the complete configuration when re-examined. In this case you will receive the message: No Cookies Found. You must insert cookies and scripts into our Cookie Consent until the tool cannot find cookies on any of your pages.
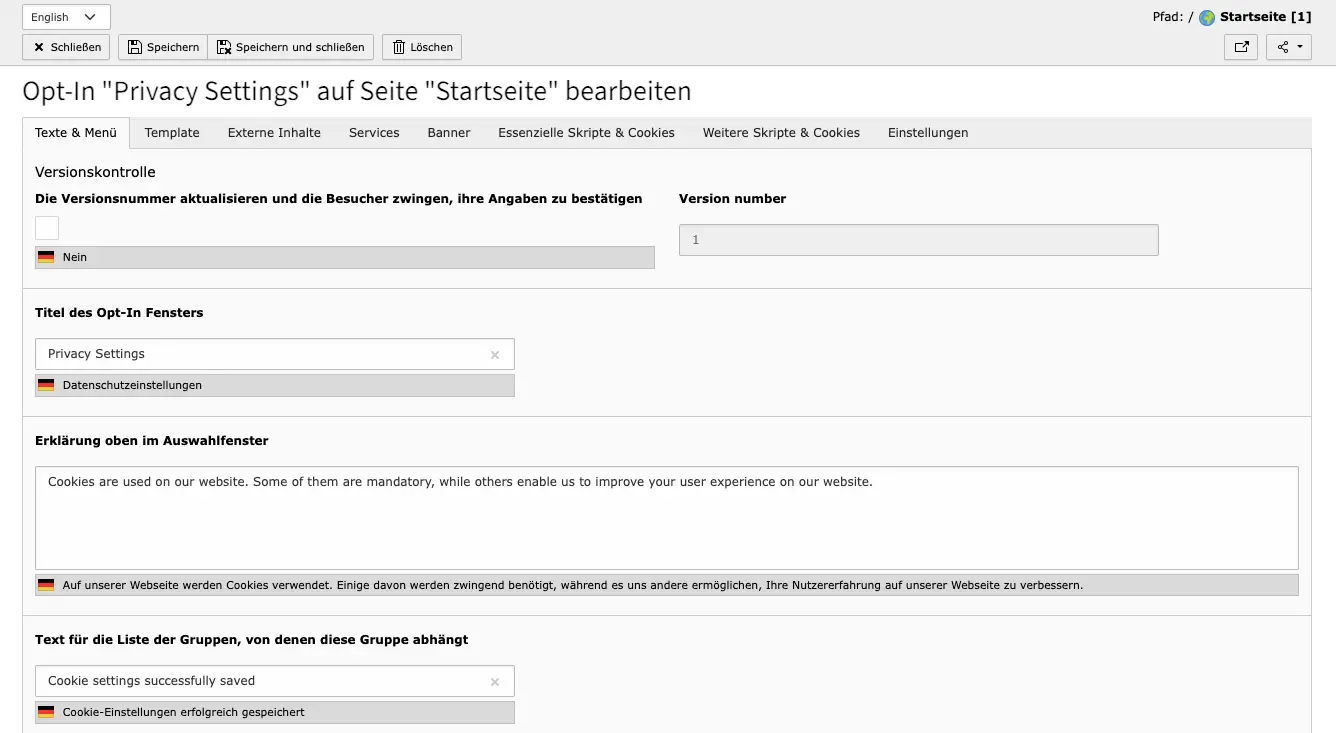
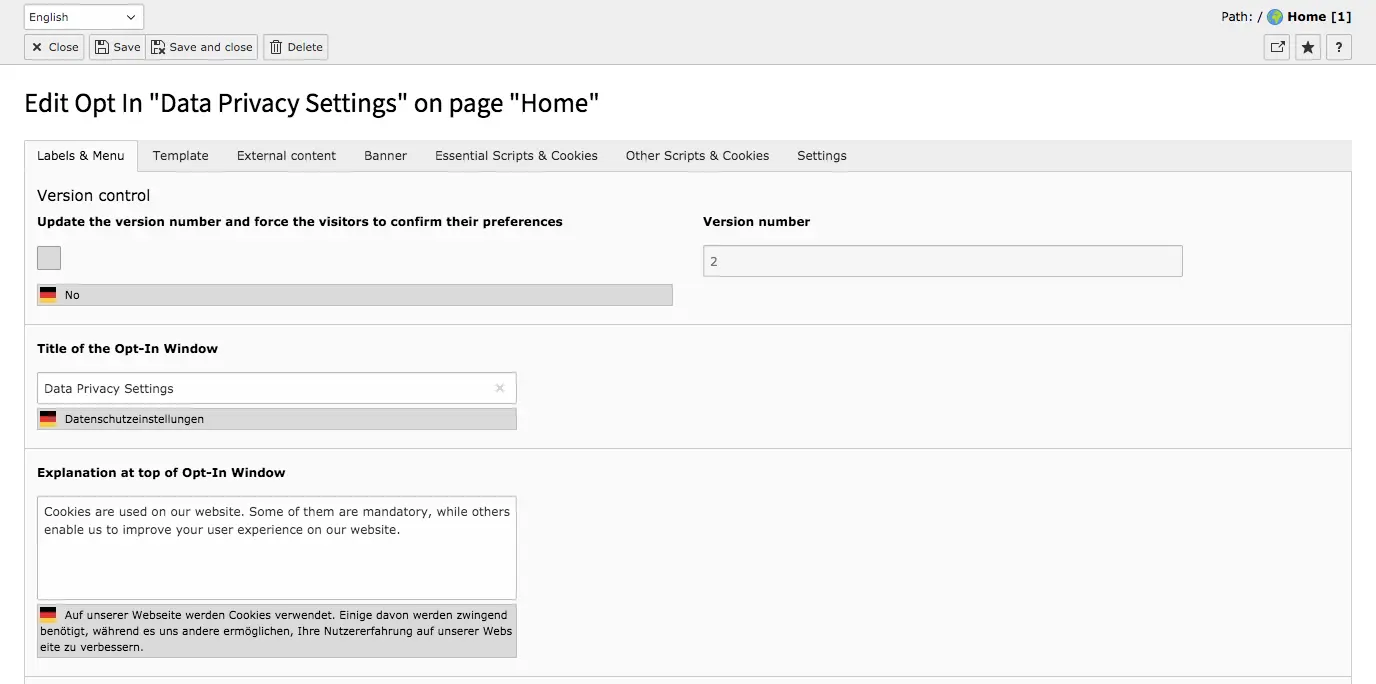
Before you start editing the Cookie Consent, you should activate the test mode in the Settings tab! - This way, no Cookie OptIn window will be displayed to the page visitors during the editing process. However, you can always display the Cookie Opt-In dialog with ?showOptIn=1 at the end of the address bar in the frontend to check appearance and functionality.
If you have made critical changes and want to ensure that visitors have to accept cookie groups again, even if they have already accepted them, enter a higher version number at this point and place a check mark before saving your changes. When the form reloads, you should see your current version number in the box on the right.
You can then track the preferences of visitors in the statistics.

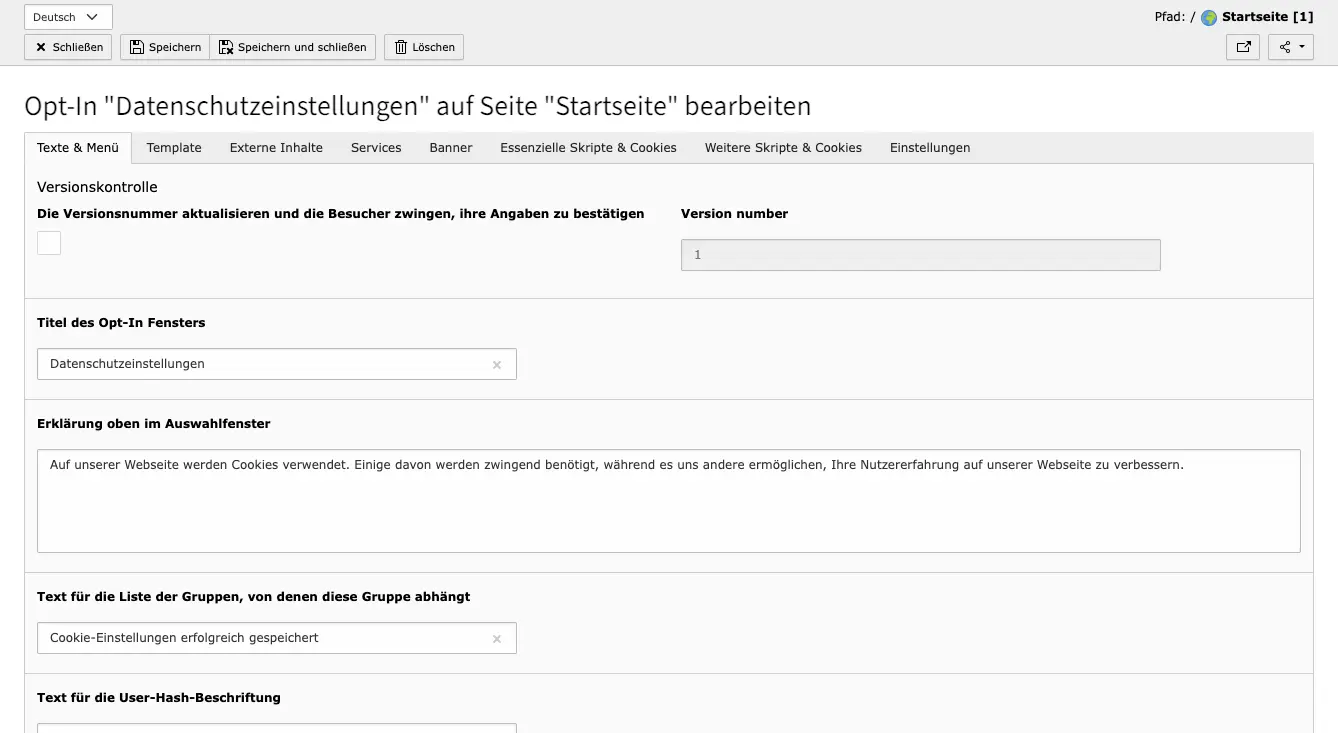
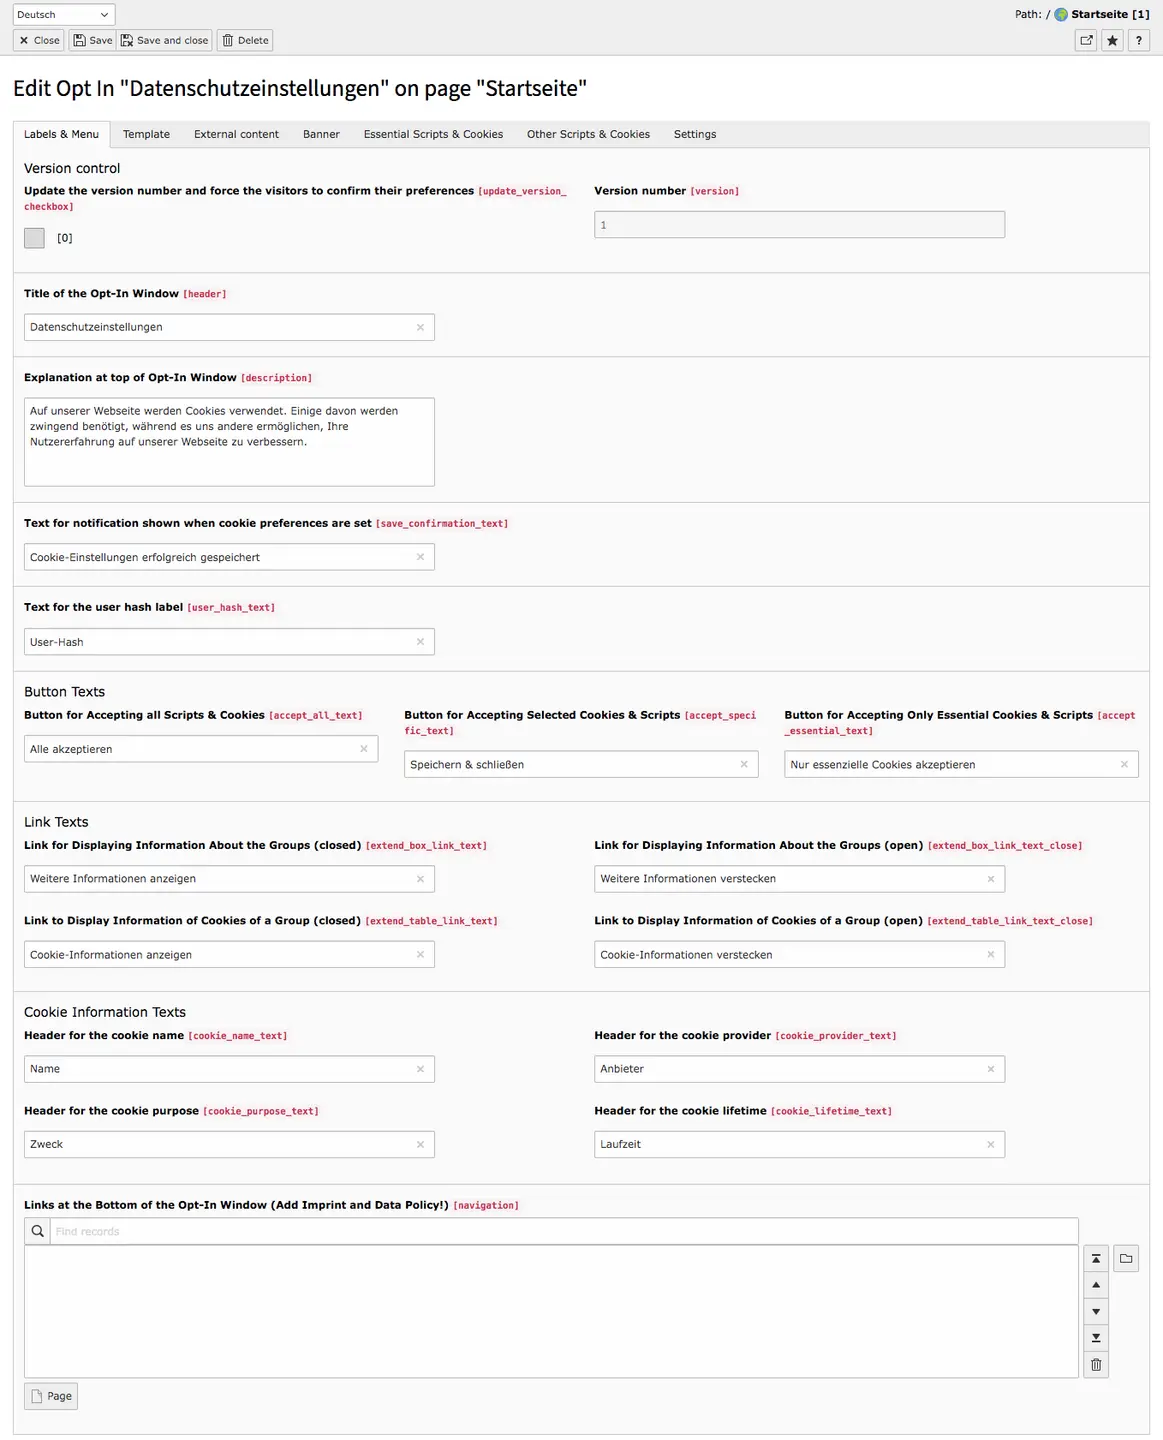
You can see in the figures below which fields will be visible at which positions in the frontend. Fill in the fields Title of Opt-In Window to Link to Display Information of a Cookie Group.
Fill in the cookie information text fields. All cookies used are broken down according to these four pieces of information. Here you only specify the label. Then link your page with the privacy policy and the imprint.
In the last step you link the imprint and the privacy policy declaration. Proceed as follows:
IMPORTANT: On the page of your privacy policy you should also add a button or link to the cookie settings OR insert the Cookie Consent content element in the data protection declaration.
If you decide to use the button/link variant, the user must access the cookie settings with a click on the button. To do this, you create an external link with the URL of your privacy policy additionally with the parameter ?showOptIn=1. The link on our site looks like this: sgalinski.de/datenschutz/?showOptIn=1. If a user has already decided which cookies he wants to load and at a later point in time reaches a page with the parameter ?showOptIn=1, the checkboxes he selected will be displayed again.
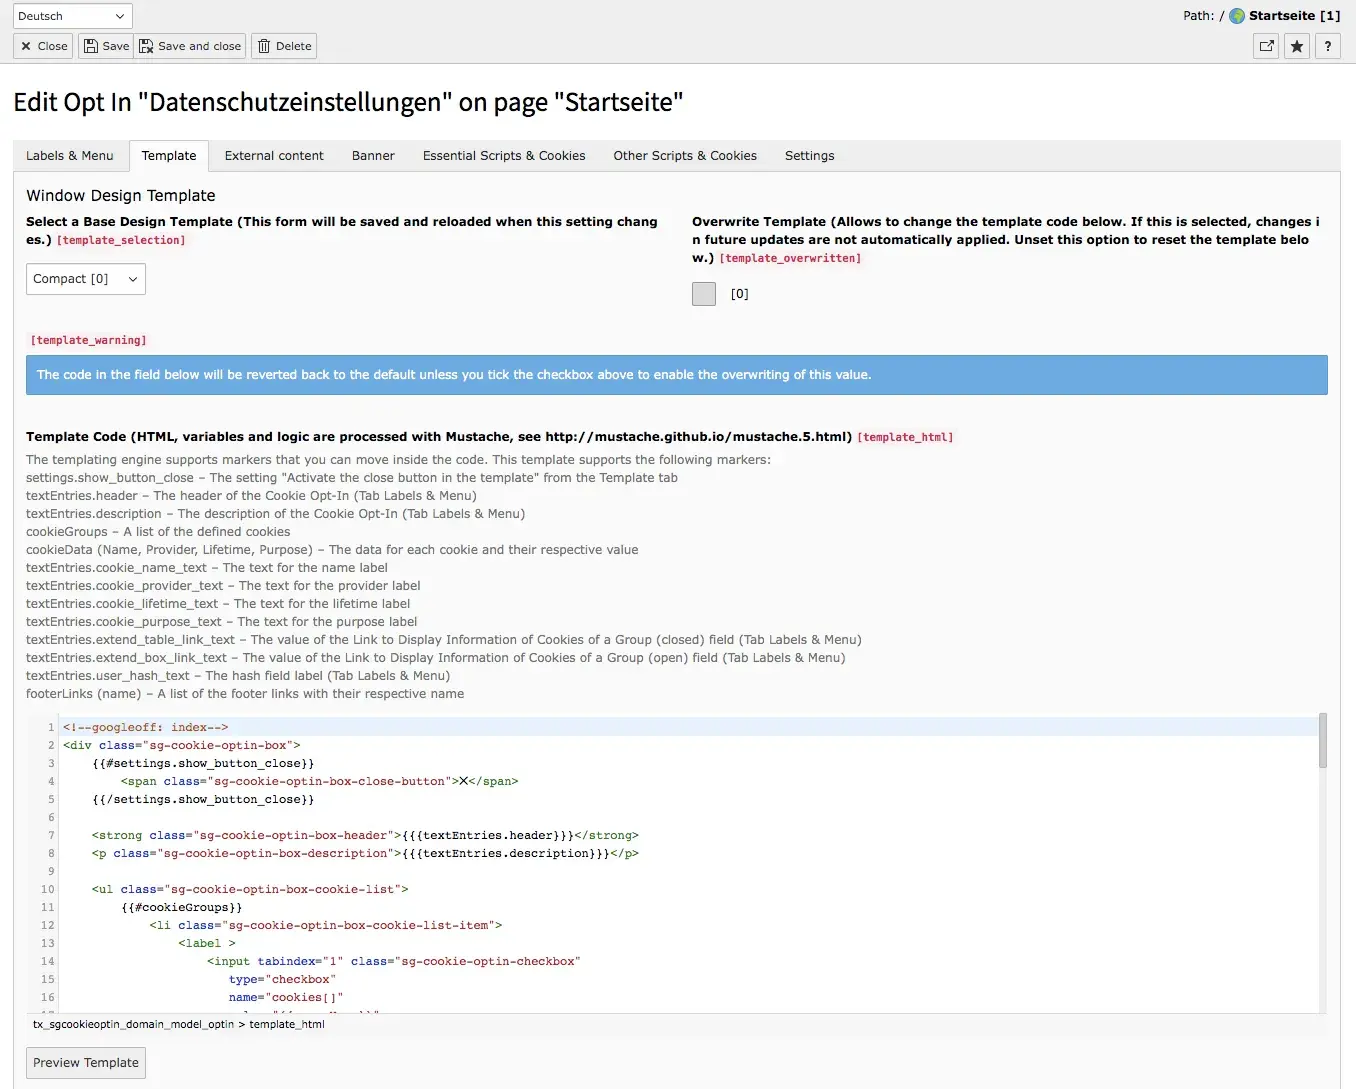
In the first part of the Template tab, you first choose between two basic design templates. In our example, this is the comprehensive variant. You also can choose the compact design.
Alternatively, you can check the box Overwrite Template and adapt the template to your requirements. To ensure that your changes are not lost, the checkbox should remain checked at all times. By saving without a checkmark being set, all changes will be discarded, and the default template will be restored.
The template can be displayed in the frontend at any time by clicking on the Template Preview button (below the template code). In a new tab you will then see your website with the current design of the Cookie Content.
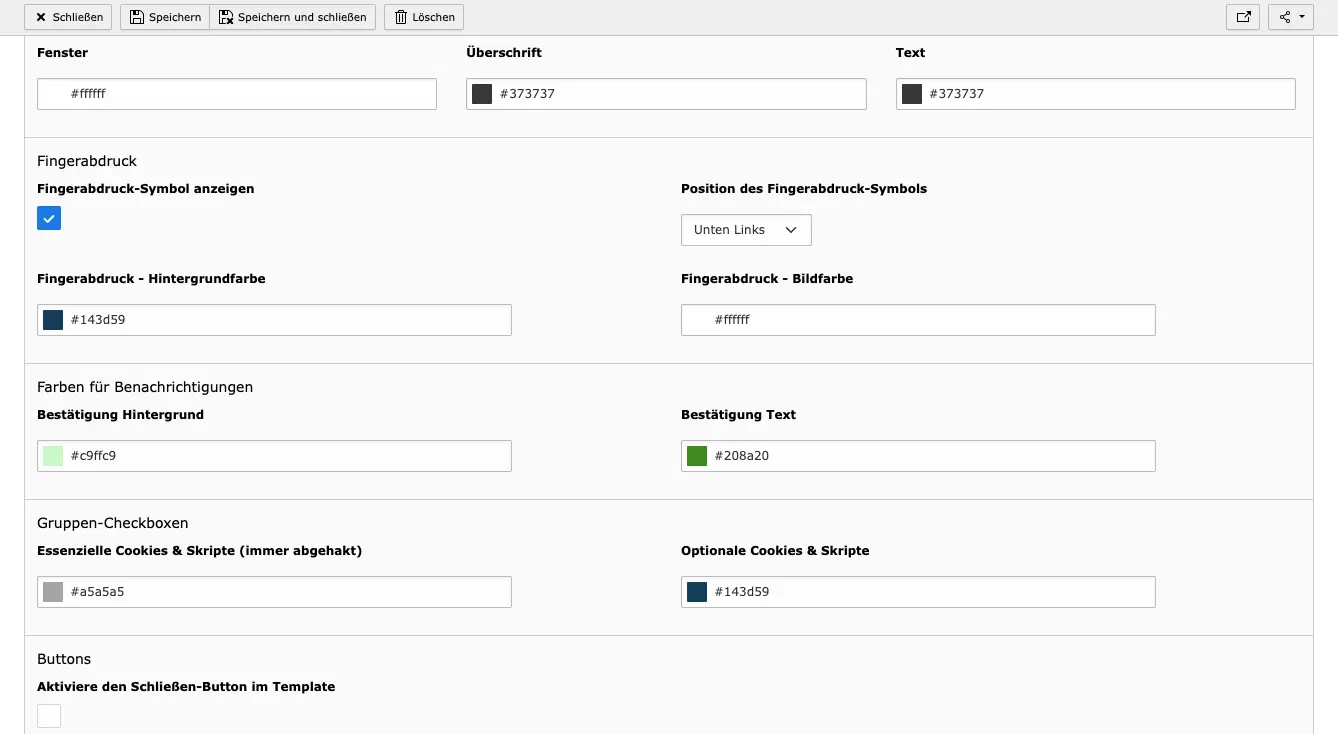
When the template is selected, the colors of the individual components are adjusted. First you define the colors of the upper area and the heading as well as the text.
The template can be customized for each language. To apply a different template in a translated language, you need to select the corresponding language and choose the custom translation behavior in the Template tab. Then customize the template according to your needs. In order for the changes to be applied, you also need to enable the Overwrite Template option (as in the default language).

The fingerprint option is available from version 5 of the sg_cookie_optin extension. It allows users to change their cookie settings at any time and is enabled by default. Set the position of the icon, as well as color and background color for it. The fingerprint icon takes the Dark Theme into account as well.
Colors
Following this are mainly the color settings. First, you determine the window and text colors. This is followed by the colors for notifications. The group checkboxes are located to the left of the cookie group name in our base template. Essential cookies and scripts can get a different color than all other groups.
For each button in the Cookie-Opt-In you have the possibility to change the background, the button-hover (mouseover effect to show an available interaction) and the text color. Finally, you can adjust the colors of the for the list of group details.
You can hide the Powered by sgalinski Cookie Opt-In text in the frontend by activating the checkbox here.

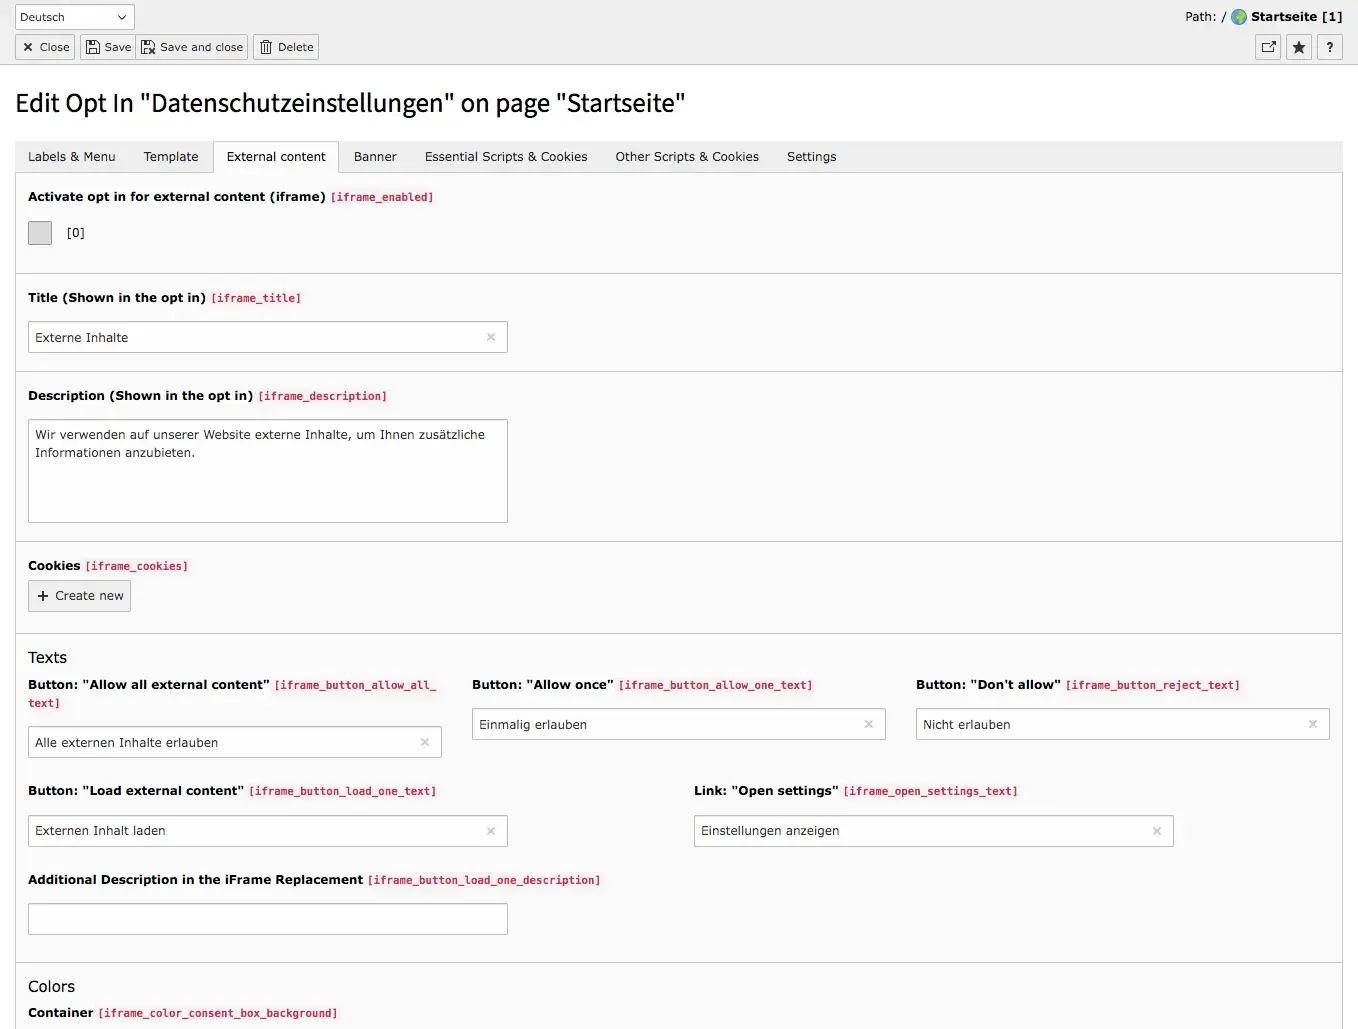
To activate the Cookie Consent for Iframes, simply check the box in the External Content tab and fill in the Title or Description fields and specify the text for the button labels.
Similar to essential cookies you can specify all cookies coming from external scripts under the field Description. The information can be seen in the cookie information part of the Opt-In field in the frontend.
In the Text fields you define the button labels for external content. Furthermore, you can assign an additional text under the button to load the external content (see screenshot below).

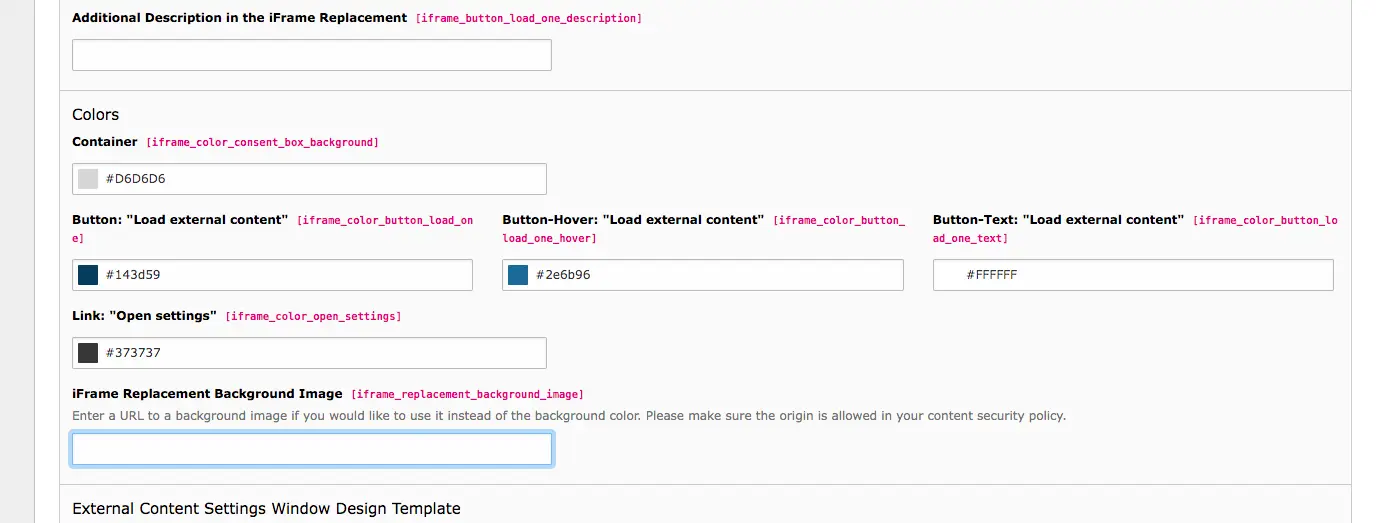
The column Colors is located under the column Texts (button labels). Here you can adjust the color of the box and the buttons.
iFrame Replacement Background Image
This option is available from version 5 of the Cookie Opt-In Extension. In this field, you can enter a URL path to an image that will be used as a background for the iFrame Replacement box. If you set it, it will be used per default for all external content elements. If you would like to set a specific image just for one element, you can make use of the HTML attribute data-sg-cookie-optin-background-image in the element’s source code. Setting it to a path to image would override the default background image for this element. If you would like more than one elements to share the same image, or want to make more complex adjustments to the iFrame Replacement design, please refer to the section of the Services tab.
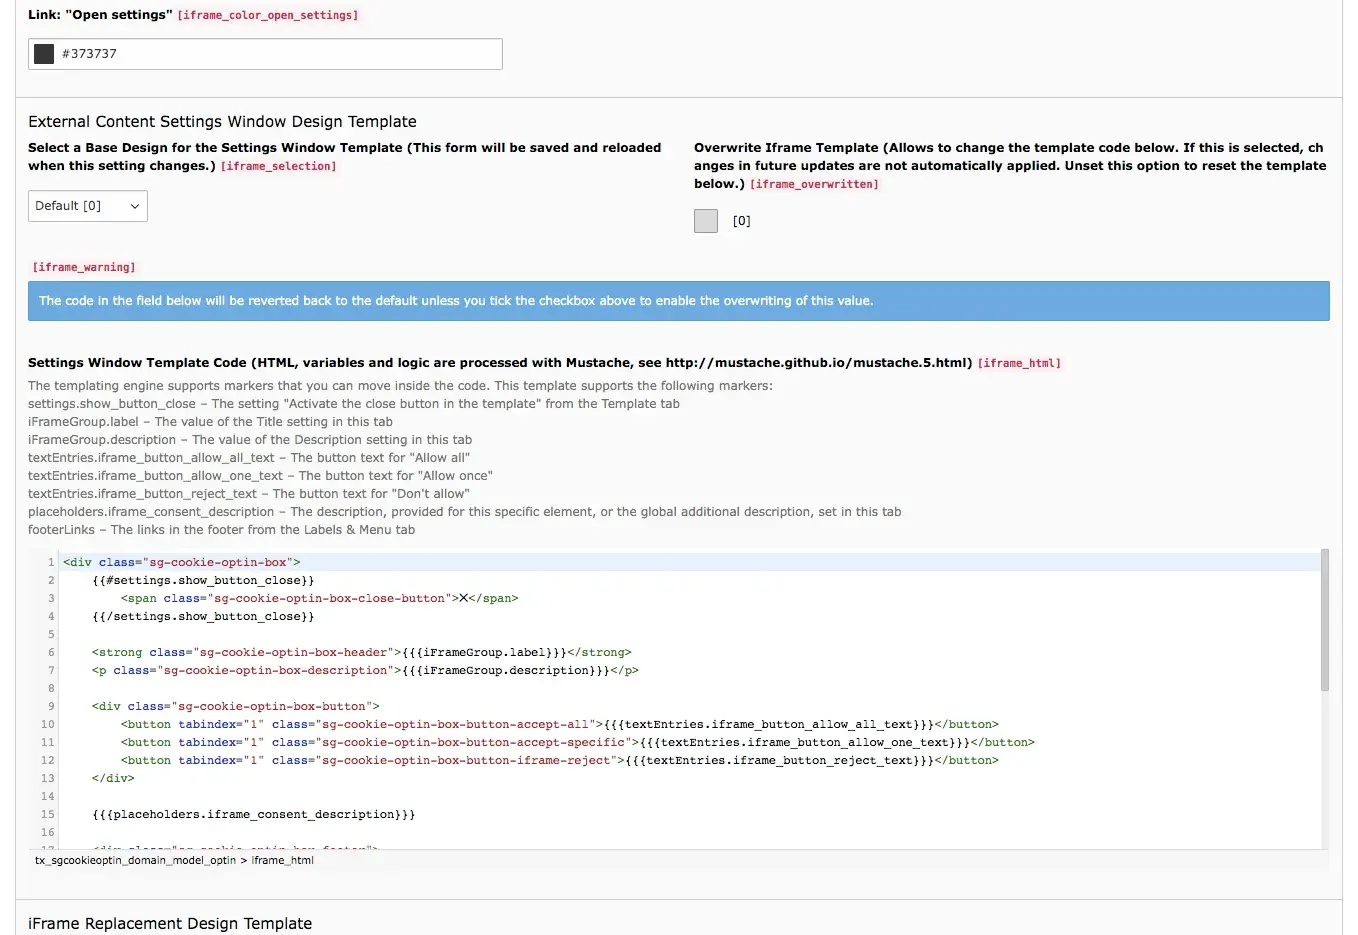
It is also possible to adjust or change the design templates directly in the backend.
To do so, set a checkmark at Override Template of the Settings Window to rework the code for the design for the settings of external content and a checkmark at Override iFrame Replacement Template to change the template that is displayed instead of the iFrame. Overwritten code will not automatically apply future updates. If the option is deactivated again, the template is reset.
To ensure that your changes are not lost, the checkbox should remain checked at all times. By saving without a checkmark being set, all changes will be discarded, and the default template will be restored.
If your website requires certain external content for its functionality or for other reasons, content may be loaded without the prior consent of the user. For this purpose, the extension has a whitelisting function.
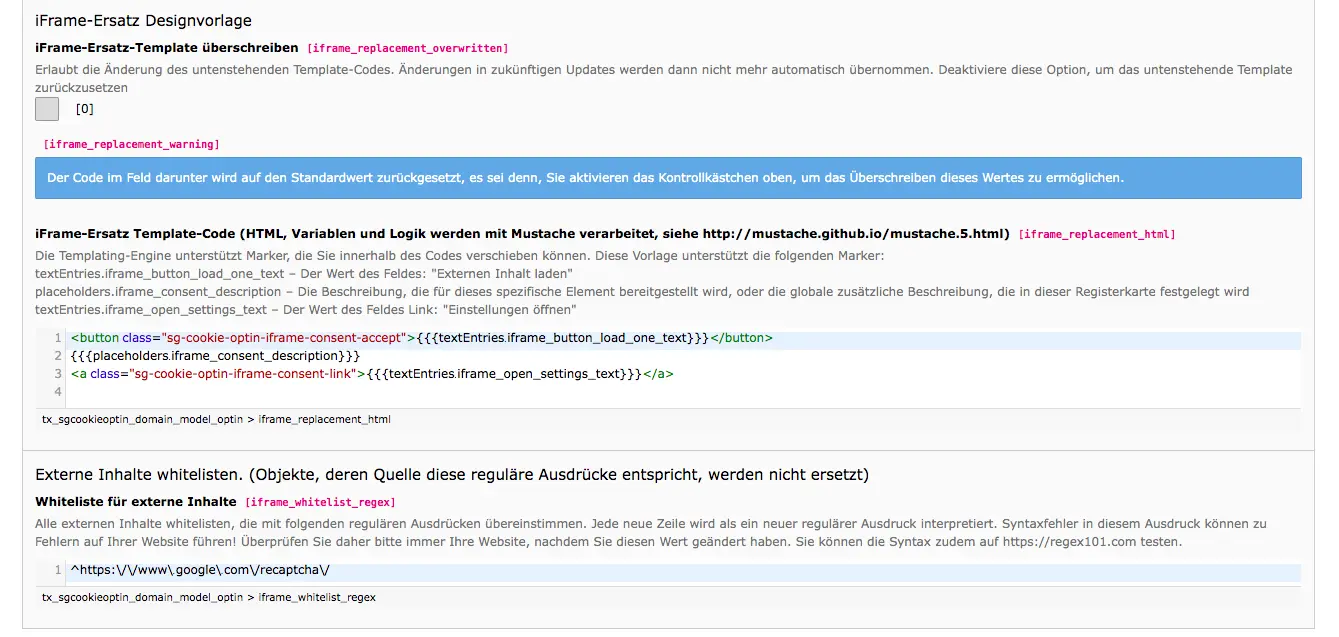
The list automatically includes reCAPTCHA, a service that allows distinguishing humans from bots. You can add more external content (IFrame, objects, audio and video HTML tags), it will be excluded from external protection.
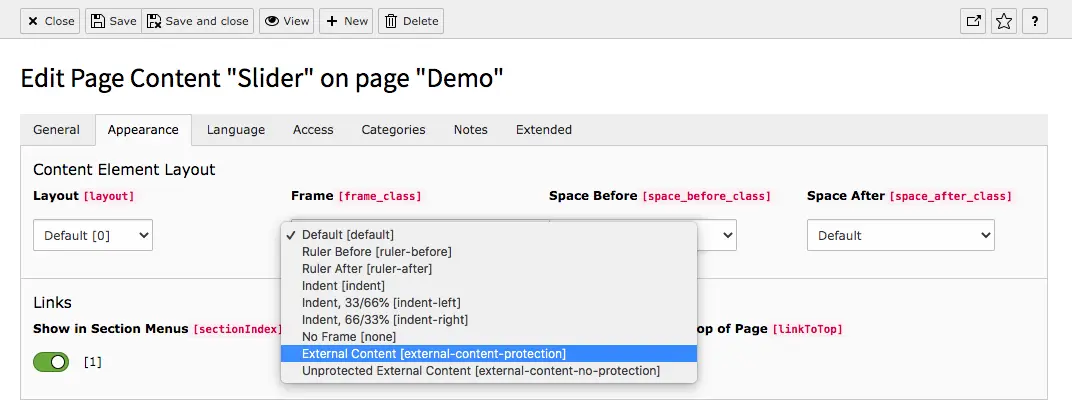
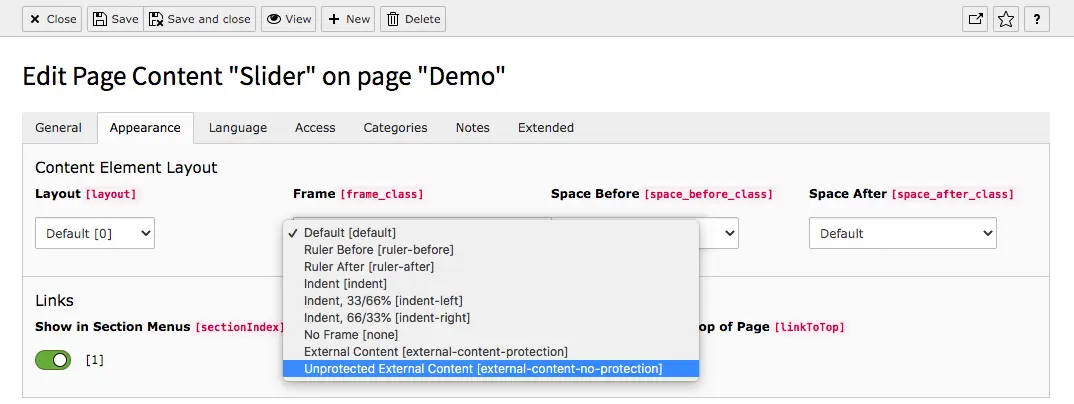
Each content element can be individually protected as external content. This can be useful, for example, if the external content was added by a complex JavaScript or if the content itself represents only a small part of a large block containing text headers, controls, etc. It may then be more convenient for you to mark the entire block as protected. There are three ways to mark a content element as an external element.
Add the attribute data-external-content-protection to the HTML tag.
<div class="test-content-protection" data-external-content-protection="1">
This content would have not been protected
<iframe src=”some/external/page” />
</div>
Or enter the class frame-external-content-protection in the HTML tag.
<div class="test-content-protection frame-external-content-protection">
Content comes here
</div>
It may happen that you do not want to protect individual external content. This may be necessary, for example, if the function of your website depends on the external content, if iFrames of whitelist domains belonging to your company are involved or if the external content does not contain cookies. You should therefore always ensure that your website remains GDPR-compliant.
There are three ways to load a content element that would not automatically appear on the page as an external element without the user's consent.
Add an attribute data-iframe-allow-always or data-external-content-no-protection to the HTML tag.
<iframe width="560" height="315" src="https://www.youtube-nocookie.com/XYZ" data-iframe-allow-always="1">
</iframe>
Or enter the class frame-external-content-protection in the HTML tag.
<iframe width="560" height="315" src="https://www.youtube-nocookie.com/XYZ" class="frame-external-content-no-protection">
</iframe>
Just add the data attribute data-consent-button-text to an iframe HTML tag, like in the example below.
<iframe width="560" height="315" src="youtube-nocookie.com/XYZ" data-consent-button-text="Custom text here"></iframe>
You can insert a description to the external content. To do so, you need to add a corresponding attribute to the HTML code of the iFrame: data-consent-description. The iFrame tag in the HTML content element may then look like this:
<iframe
width="560" height="315"
src="youtube-nocookie.com/XYZ" allowfullscreen
data-consent-description="Some additional description"
data-iframe-allow-always="1">
</iframe>When you turn the external content protection option on, we automatically block any requests to the external servers and replace those page elements with the opt-in element.
However there are traces in the browser that such requests have been attempted. If you want to remain on the safe side, you can edit the HTML of these elements and replace the src attribute with data-content-replace-src.
For example <iframe src="https://external.website.com"> can be changed to <iframe data-src="https://external.website.com">. This way no request will be attempted in the initial load and our Cookie Opt-In will take care of the rest automatically. This only works for <iframe> and <object> tags.
Please bear in mind that this will not automatically work for content that you have loaded after the initial page load, for example with AJAX. In those cases you need to implement the protection manually. We strongly encourage you to make use of our API for this purpose.
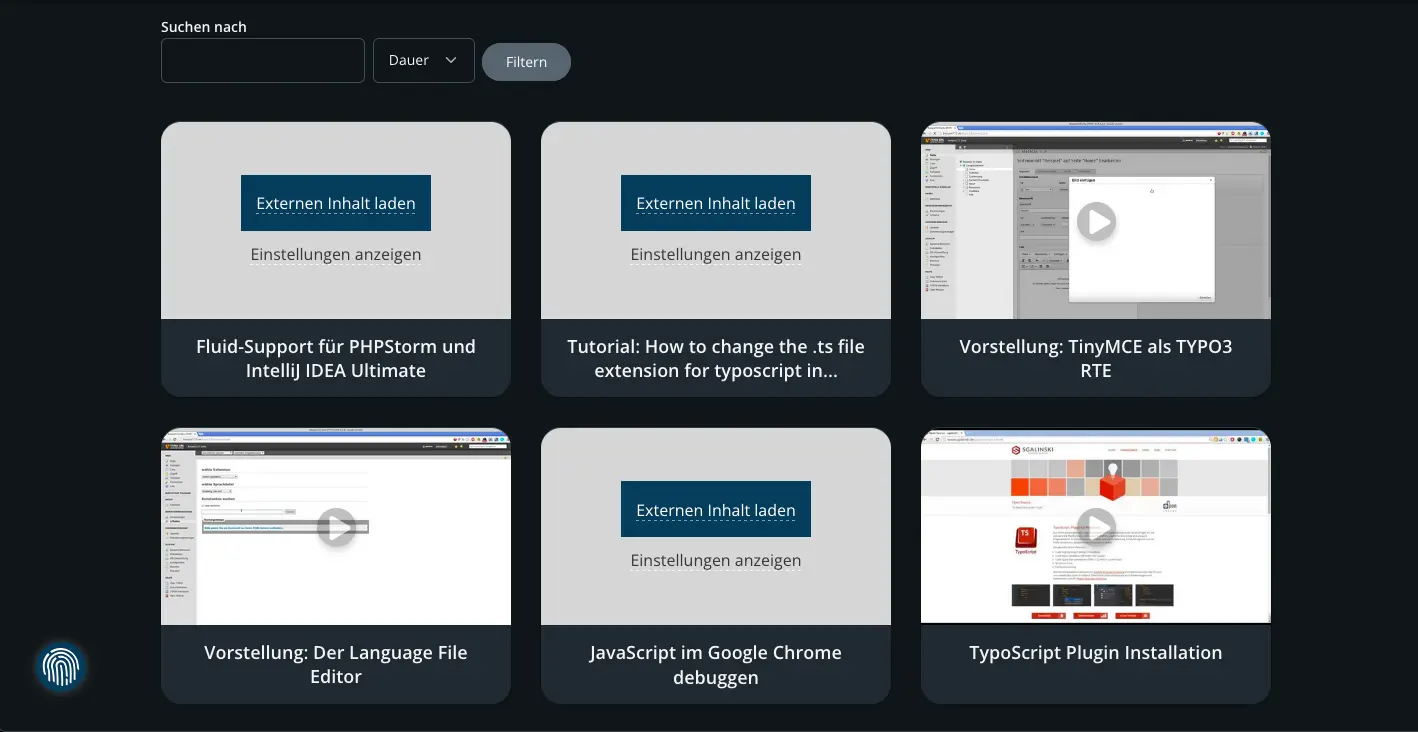
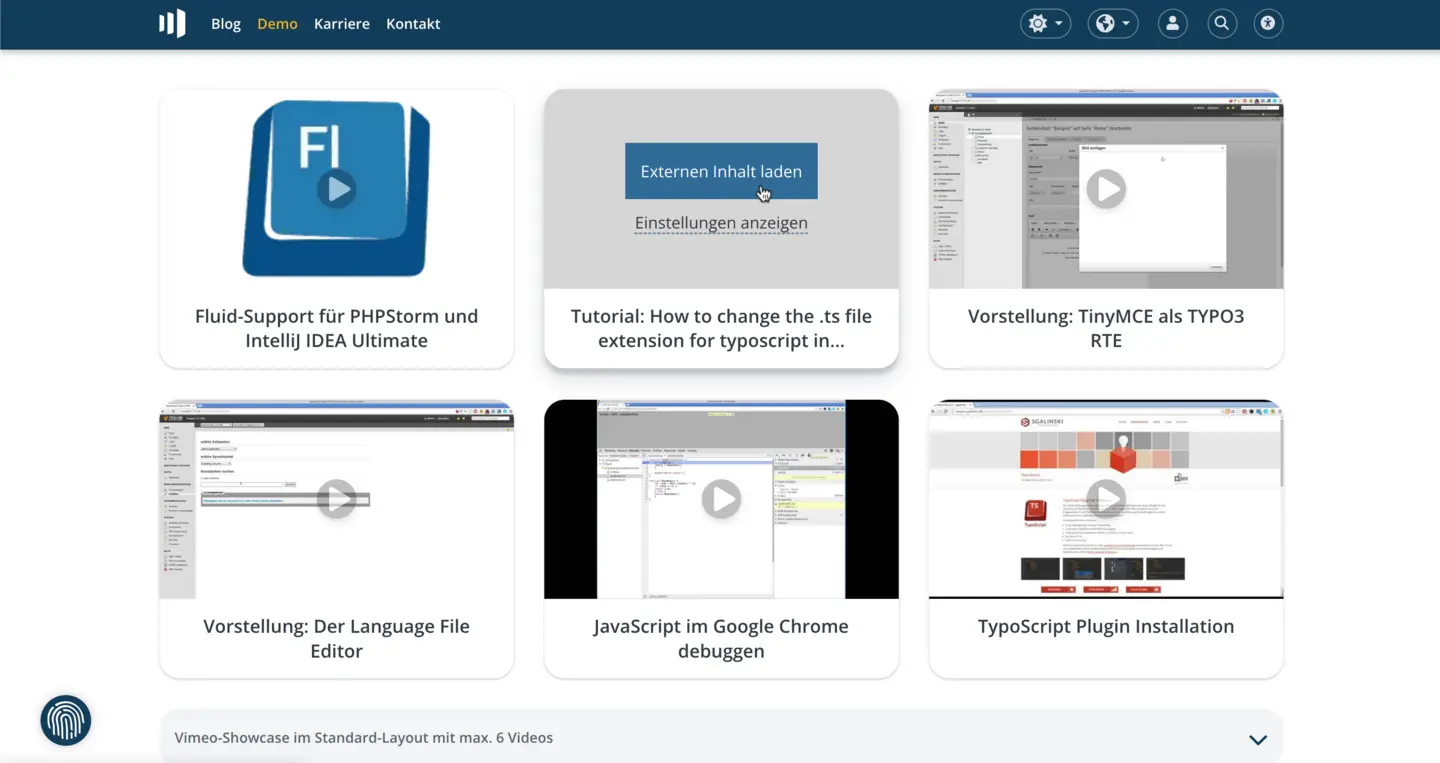
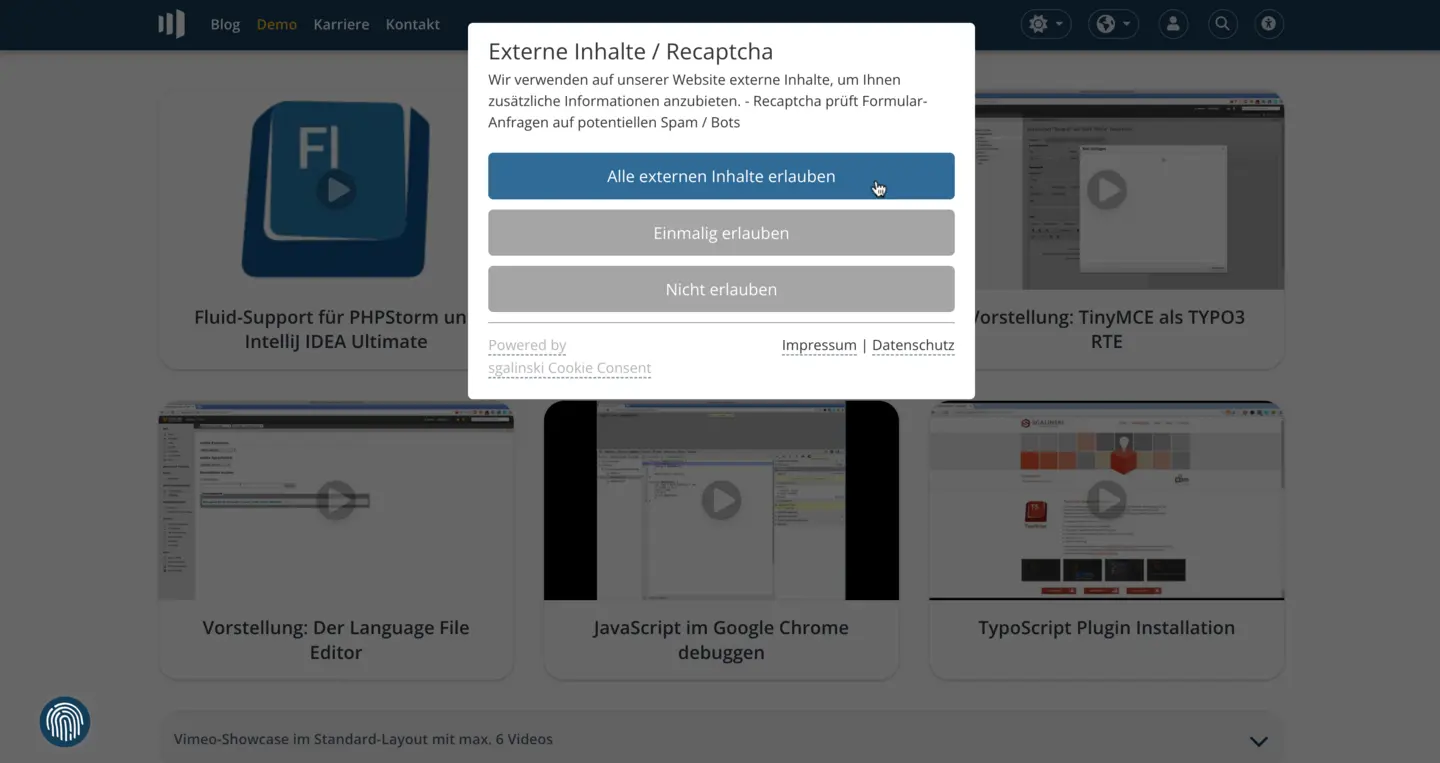
When a user does not accept external content, Iframes are not loaded and are displayed as a box. The visitor now has the option to load only one iframe. When clicking on the Open settings button, a small Cookie Consent window appears (see screenshot below), where all external content or only one iframe can be accepted.
The Services are groups of External Content that we would like to manipulate and adjust the design or behavior of, and are available with version 5 of the sg_cookie_optin extension. Technically experienced users can control the display of individual external contents before they are loaded. By default, all external content is replaced by a gray box (see External Content tab). Let’s say that on your website you have different types of External Content – some YouTube videos, some Google Maps, some other kind of External Content. Services would allow you to provide a different template for the replacement box and even have additional custom functionality for them. The default template can be customized for all external content in the previous tab. Services can be used to get custom boxes or thumbnails for different external services. Likewise, custom buttons, links and descriptions can be added here. So you can design the template as you wish.
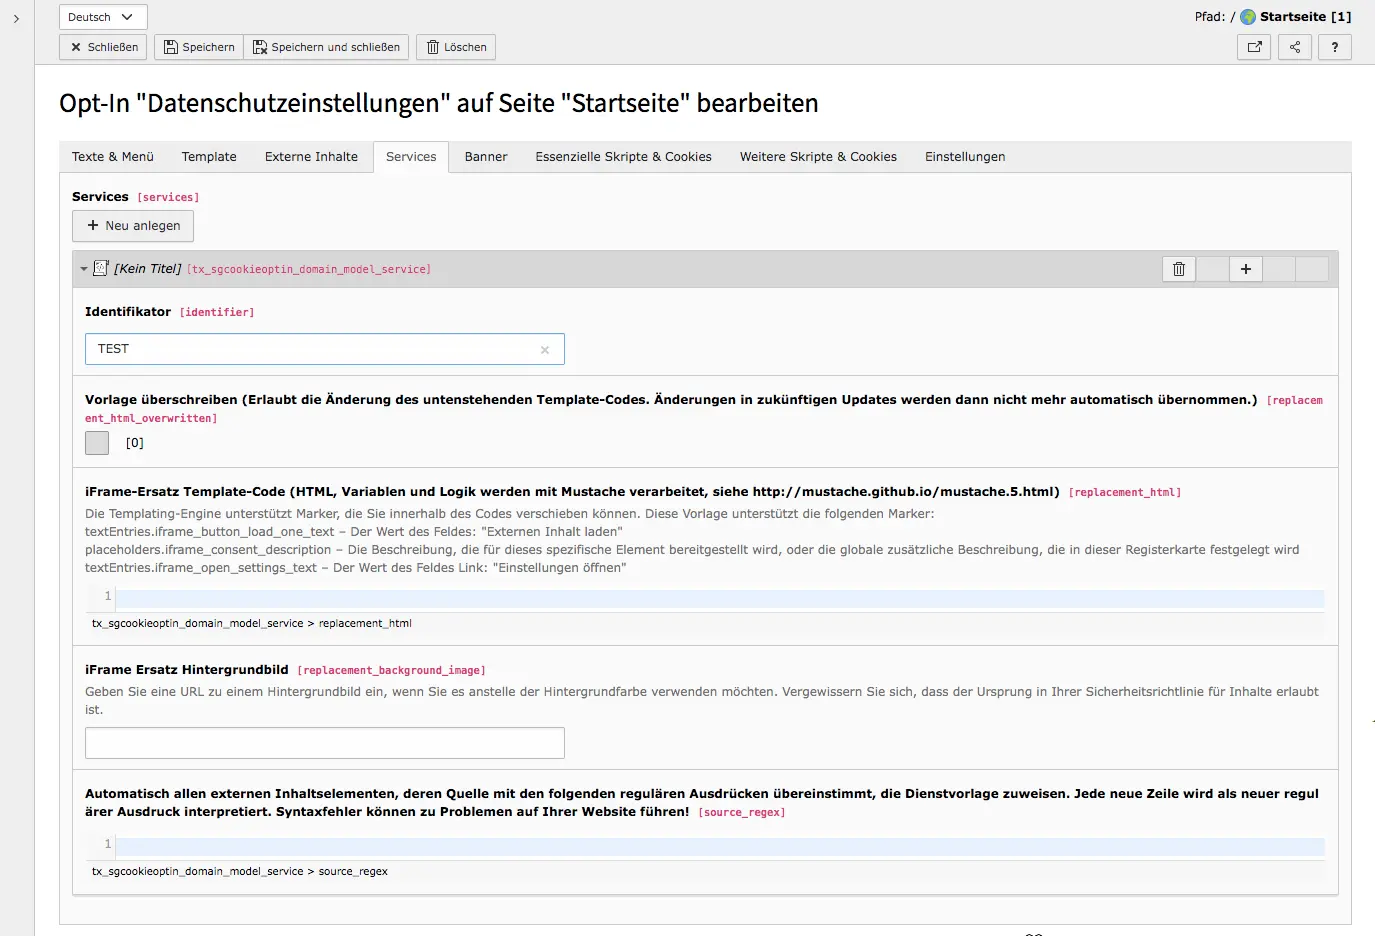
To do this, first create a new record under Services using the Create new button.
When we create a new service, first we have to give it an unique name. It’s called the identifier. The identifier must be unique for each service, otherwise the functionality might break, as the script wouldn’t know which service to use exactly.
By default the services use the default iFrame Replacement Template Code. You may choose to overwrite and change it for your Service. To achieve that you have to mark the box Overwrite Template and then provide a custom iFrame Replacement Template Code.
In the field iFrame Replacement Background Image you can set a specific background image for this Service. This would override the default background image set in the tab External Content. However, it would not override a background image set in the HTML attribute data-sg-cookie-optin-background-image. The HTML attribute in the element itself is considered the most specific description of the element and thus has the highest priority.
Now we have to somehow tell the SG Cookie Optin that a given element belongs to this Service. We can achieve that in two ways.
data-sg-cookie-optin-service="youtube" would try to find a service with identifier 'youtube' and, if successful, would load the settings from that Service.You could even go the extra mile and execute custom JavaScript code any time your Service matches. To do that you must add an EventListener to our event externalContentReplaced. It will fire once the content is replaced and in the event.detail you will be able to see which Service (if any) had been matched. It will also contain a reference to the replacement element. The sky is the limit on what you can do from there.
You can refer to our Demo page (section 'Edit External Content after Loading') to see how we made a dynamic template, that automatically replaced the background image of the replacement box with the corresponding YouTube video thumbnail!
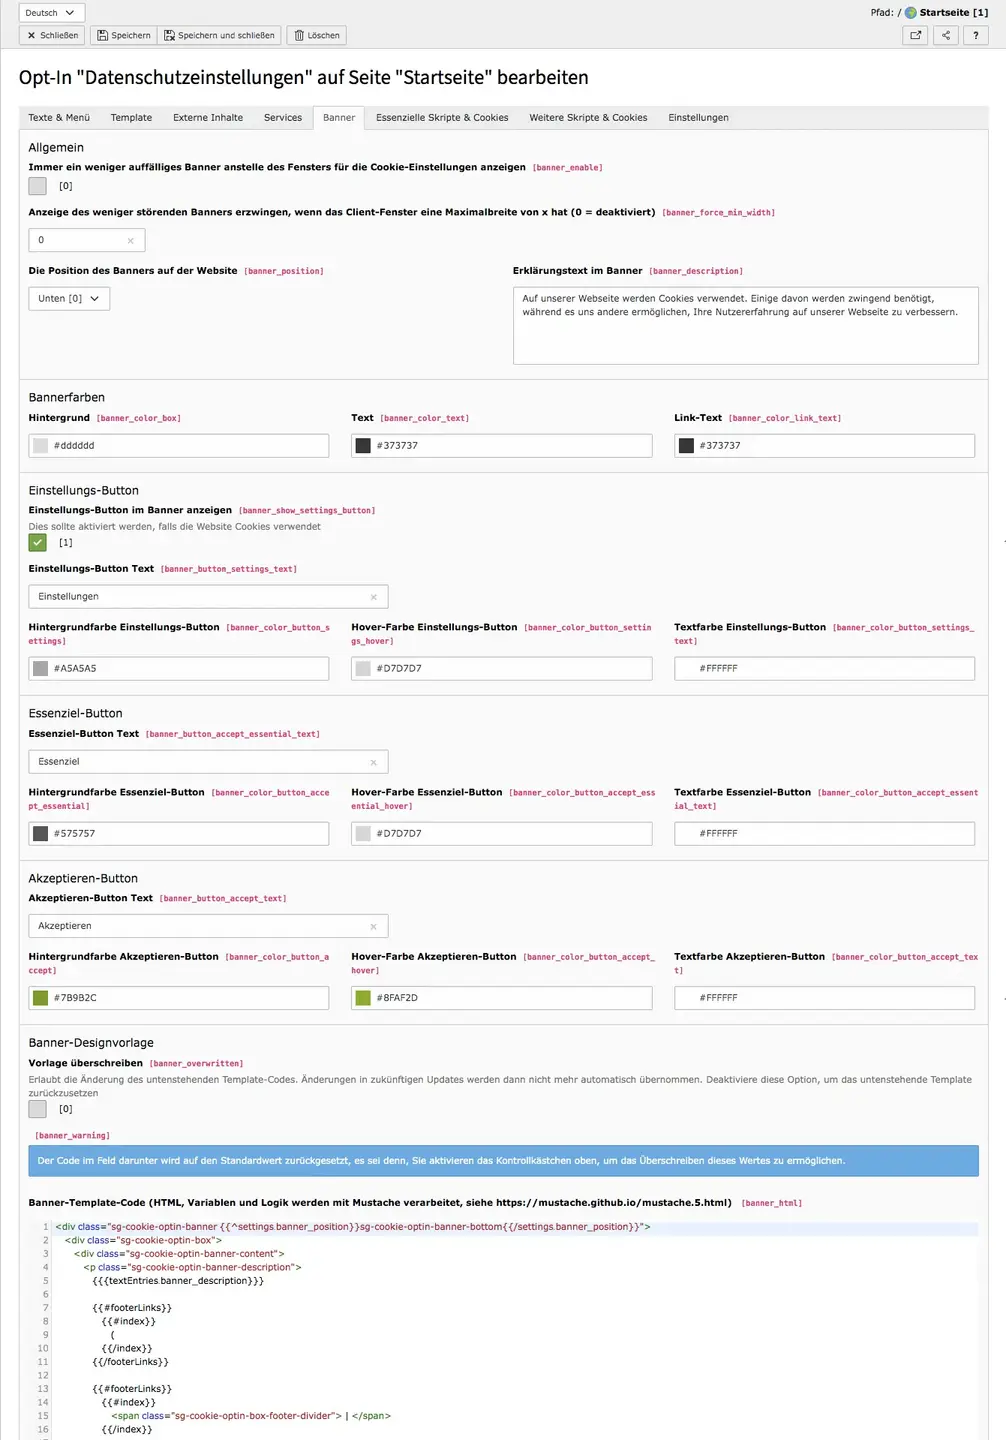
If you check the box for the less noticeable banner in this column, only a small banner will be displayed instead of the detailed variant. However, you can also set a certain width of the browser window up to which the small banner will be displayed, otherwise the large, detailed banner will be visible. Even if the user does not click on Accept, the website remains fully functional. You can set the position of the banner at the bottom or top. In our example the banner is at the bottom. Even in this form of cookie content, a text is intended to inform the site visitor about cookies. You insert the explanatory text in the field provided. You can also force displaying the less noticeable banner if the user's browser window has a certain maximum width.
Banner colors can be set individually for the various components: Banner with background and text, button for Settings and Essential and Accept buttons. The settings button should be activated with the check mark if your site uses cookies.
As in the External Content or Template tabs, changes to the design can be made directly in the backend. To do this, set a check mark for Overwrite Template.
By activating this option, future updates will no longer be applied automatically. As soon as the setting is deactivated, the template is reset to the original template design.

When a site visitor opens the Cookie Consent in the frontend, information about the cookies used can be seen there. In this tab you have to add all essential scripts & cookies.
The individual scripts & cookies, you can create afterwards. Click on the button Add new and fill in all fields.
You will find the necessary information about the cookies in the listing of the tool from the first step. The names of the cookies are in the Cookies column. Under Description you will find the purpose and usually also the provider/provider of the cookies. The lifetime corresponds to the Duration column.
And finally, the last column tells you how to group your cookies: If a cookie is categorized as Necessary, it belongs to the essential cookies, so it is needed for the functionality of the website.
The cookie of the Cookie Optin is required and is already present when the entry is created. The only thing that needs to be filled in here is the provider of the cookie, which is the person or company providing the page.
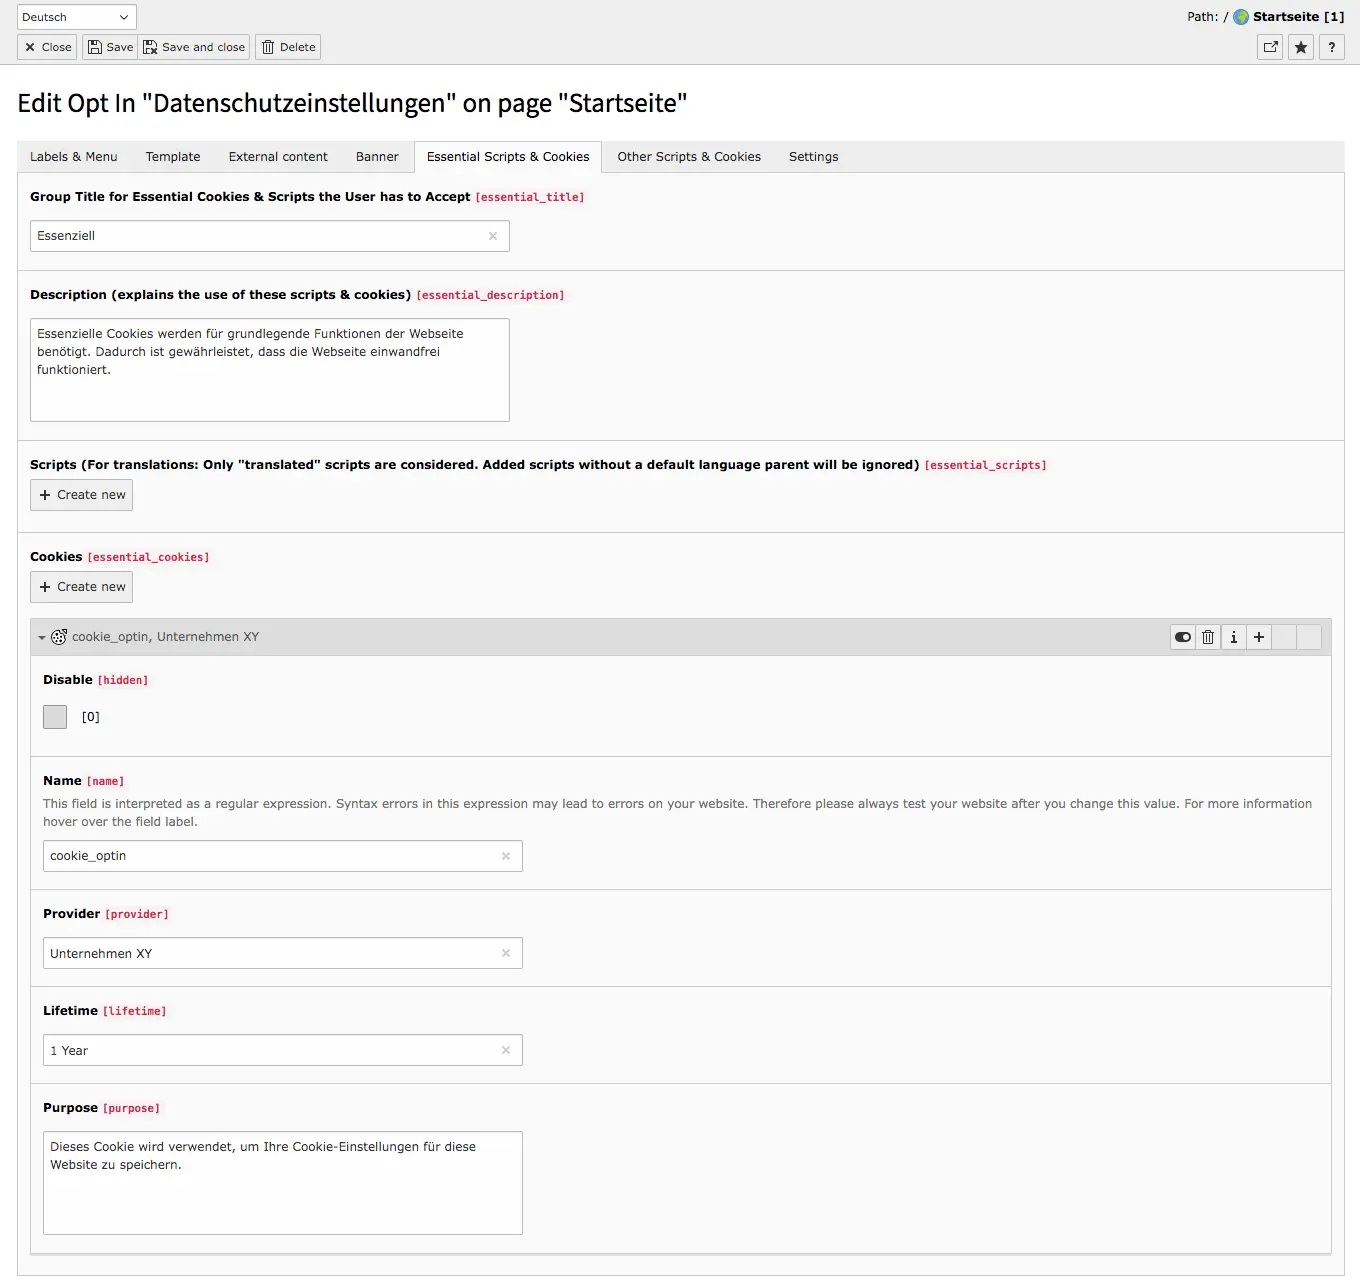
The Name field is a regular expression. These are used to check if a given text matches a certain pattern. The value you enter in the text field is the pattern against which each cookie name is checked. Cookies that match this pattern will be deleted if a user does not agree to the cookie group. You can test the syntax, for example, on the page: regex101.com. After saving, you should clear the cache and reload your page in the frontend. Then try to give consent for a cookie and remove it. Check the browser console to see if cookies are being deleted or if JavaScript errors are occurring.
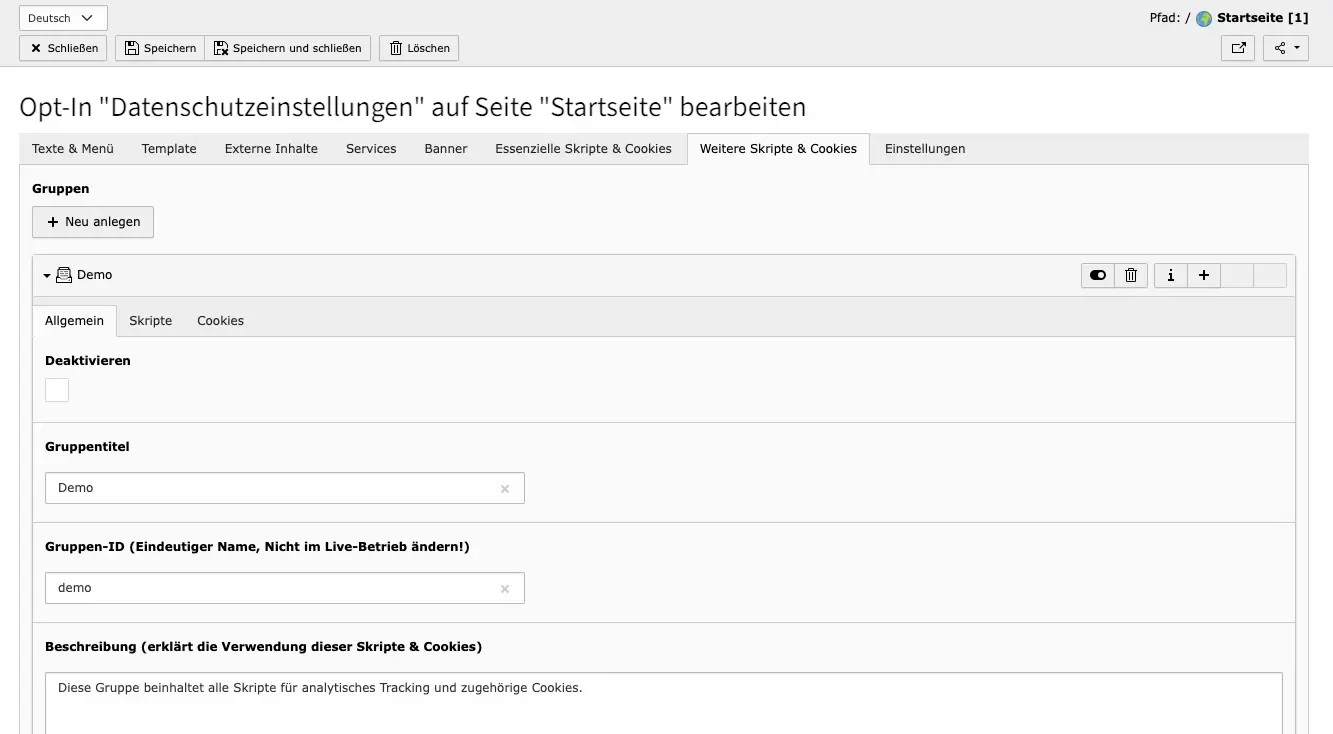
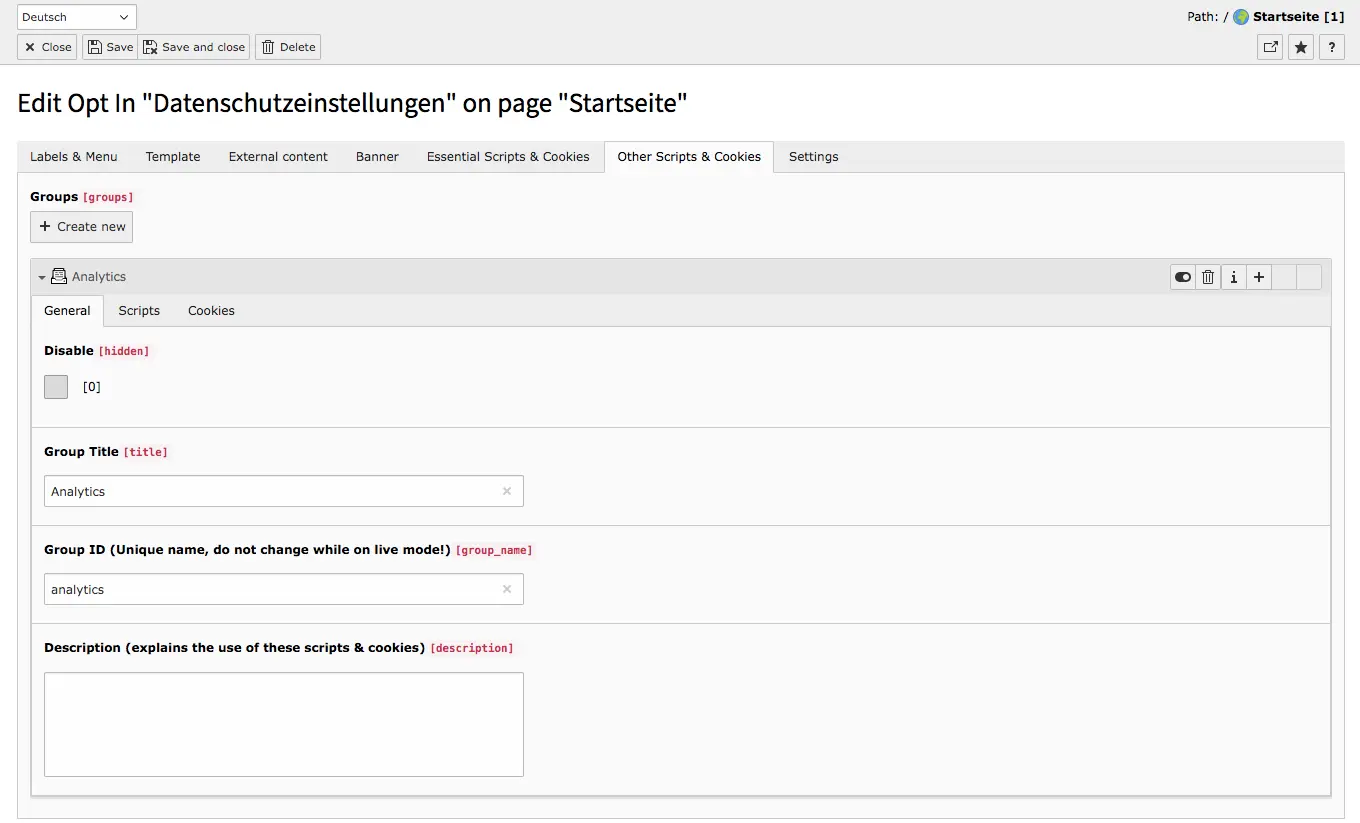
All non-essential cookie and script groups can be added in the tab Other Script & Cookie Groups. When dividing cookies into groups, you can use the table from the first step of the configuration.
Create a group and enter the associated cookies and scripts. Three sub-tabs are available for editing each group. In the General tab simply enter the group title, the Group ID and the description. Title and description are already visible in the frontend in the unfolded state of the Cookie Consent.
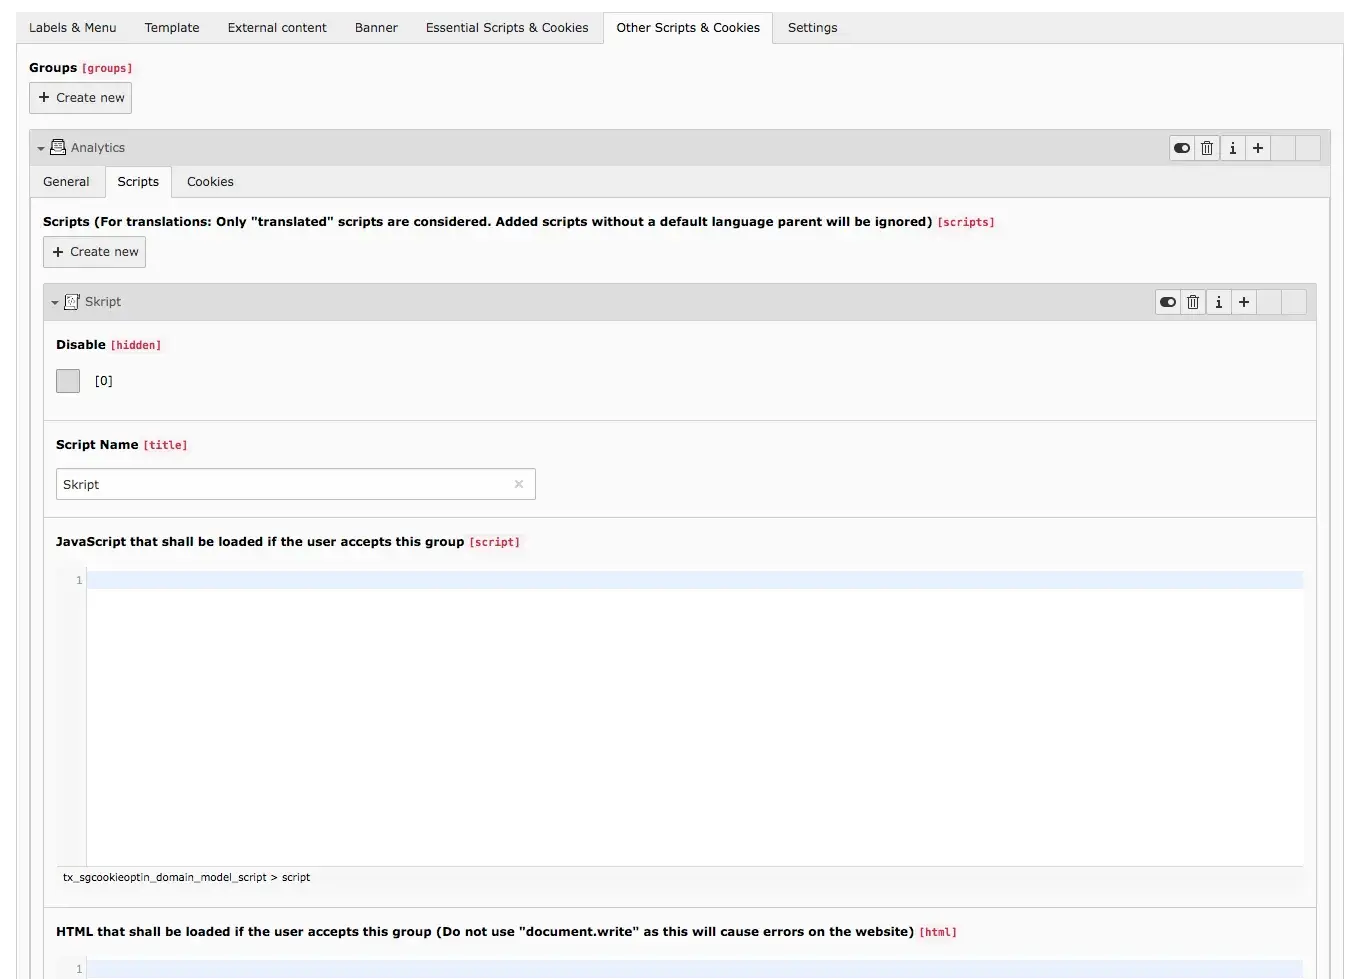
In the Cookies tab you add all other cookies in the same way as the essential cookies.
You can implement scripts as HTML code or as JavaScript. The scripts can be added to your created groups under Scripts. You decide whether you implement the script as HTML or as JavaScript in the Cookie OptIn Extension. Depending on this, you simply use the box provided for this purpose. If your site enforces a Content Security Policy (CSP) with nonces, you can use the ###NONCE### placeholder in your code; the extension replaces it at runtime with the current request nonce (e.g., <script nonce="###NONCE###">…</script>). The tab Scripts and the fields for entering the code you can see here in the screenshot. In a multi-domain environment, you can use a different procedure that allows you to set the ID via TypoScript.
All cookie-related scripts must be added to the configuration and must not be loaded anywhere else!
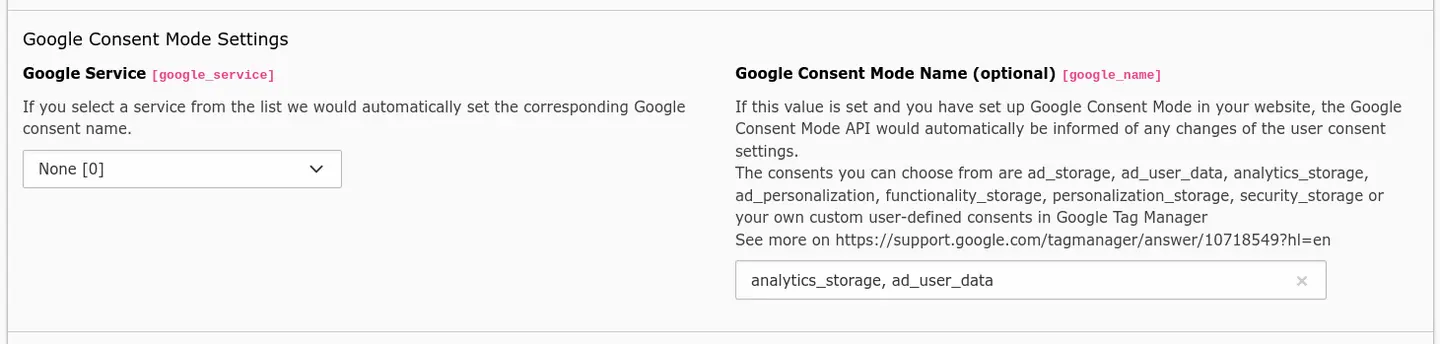
If the given group represents Google Analytics or Google Ads, you may use our predefined dropwdown field Google Service. Selecting one of the options would automatically force the corresponding Google Consents for the service: for Google Analytcs analytics_storage and for Google Ads ad_storage. Should you require another combination of the consent strings – list them comma-sparated in the Google Consent Mode Name field to the right.
As of version 5.4.0, we have the option of using Google Consent Mode. If a value is set in the following field, and if you have set up Google Consent Mode in your website (Google Tag Manager Integration with Consent Mode), the Google Consent Mode API would automatically be informed of any changes of the user consent settings. Then the Google Tag Manager can read these consent settings and fire the tags appropriately.
If you do not want to or cannot use Google Consent Mode (currently beta version), you can use the method described below.
Granting consent to this group would automatically give consent to these groups as well
Cookie groups can depend on each other – for example you may need to load one service before you load another one. A good example is using Google Tag Manager from where you load Google Analytics. For this purpose you can designate the analytics Group to be dependent on the tag_manager group, thus making sure that if consent for Analytics is granted, that consent for Tag Manager is also granted. The field accepts a comma-separated list of values, so that you can make one group dependent on more than one group.

IMPORTANT: When the user grants consent to both groups, there is no way to absolutely guarantee which loadingScript will be loaded first.
Usually the loadingScript is executed in the order in which the Cookie Groups are ordered in the Cookie Opt-In Backend, but on runtime there can be other factors affecting it. This means that you have to implement this logic yourself in the loadingScript – making sure that the master loads the slave. For this purpose you can use our JavaScript API or the events. OR let another service like Google Tag Manager take care of this logic, while using our tool just for managing the user consent.
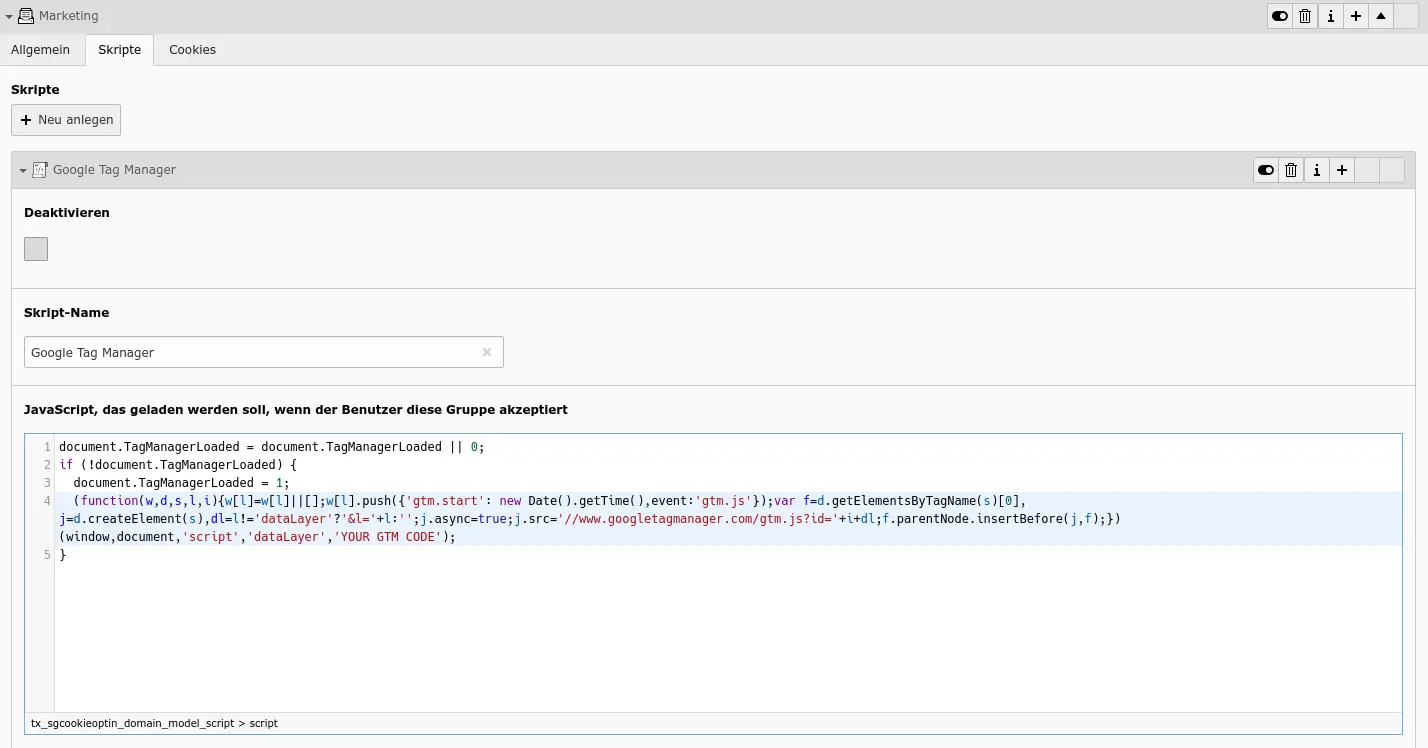
The Google Tag Manager can be integrated via a script as follows (without Google Consent Mode). Further information on the integration of Google Tag Manager without Consent Mode can be found here.
document.TagManagerLoaded = document.TagManagerLoaded || 0;
if (!document.TagManagerLoaded) {
  document.TagManagerLoaded = 1;
  (function(w,d,s,l,i){w[l]=w[l]||[];w[l].push({'gtm.start': new Date().getTime(),event:'gtm.js'});var f=d.getElementsByTagName(s)[0], j=d.createElement(s),dl=l!='dataLayer'?'&l='+l:'';j.async=true;j.src='//www.googletagmanager.com/gtag/js?id='+i+dl;f.parentNode.insertBefore(j,f);})(window,document,'script','dataLayer','YOUR GTM-CODE');
}
This looks like this in the Scripts tab of a cookie and script group:
In a multi-domain system, the method described above can lead to complications that you can avoid with the procedures presented below. Among other things, these alternatives allow you to set the ID (variable) directly in TypoScript.
For the first variant, enter the following code in the HTML field (again, the Google Tag Manager is used as an example):
<!-- Google Tag Manager -->
<script type="text/javascript">
        document.TagManagerLoaded = document.TagManagerLoaded || false;
        if (!document.TagManagerLoaded) {
            document.TagManagerLoaded = true;
            (function(w,d,s,l,i){w[l]=w[l]||[];w[l].push({'gtm.start': new Date().getTime(),event:'gtm.js'});var f=d.getElementsByTagName(s)[0], j=d.createElement(s),dl=l!='dataLayer'?'&l='+l:'';j.async=true;j.src='//www.googletagmanager.com/gtm.js?id='+i+dl;f.parentNode.insertBefore(j,f);})(window,document,'script','dataLayer', document.googleTagManagerId);
        }
</script>
<!-- End Google Tag Manager -->
The ID/variable is then set via TypoScript in the TS template of the instance and can be overwritten with conditions:
page.headerData.14414 = TEXT
page.headerData.14414.value (
<script type="text/javascript">
document.googleTagManagerId = '<MY_ID>';
</script>
)
Alternatively you can integrate the script completely via TypoScript:
<!-- Google Tag Manager -->
<script type="text/javascript">
    function addTagManager () {
        document.TagManagerLoaded = document.TagManagerLoaded || 0;
        if (!document.TagManagerLoaded) {
            document.TagManagerLoaded = 1;
            (function(w,d,s,l,i){w[l]=w[l]||[];w[l].push({'gtm.start': new
Date().getTime(),event:'gtm.js'});var f=d.getElementsByTagName(s)[0],
j=d.createElement(s),dl=l!='dataLayer'?'&l='+l:'';j.async=true;j.src='//
www.googletagmanager.com/gtm.js?id='+i+dl;f.parentNode.insertBefore(j,f);})
(window,document,'script','dataLayer','{$settings.gtm.id}');
        }
    }
</script>
<!-- End Google Tag Manager -->
The parameter settings.gtm.id can then be set dynamically via TypoScript Conditions. You then only have to enter the line addTagManager(); in the extension.
With the latter variant the variable/ID can be set via TypoScript and at the same time it is no longer necessary to copy the code to the different domains.
Unchecking this box would result in separate configurations for each language and site root. This means that visitors would have to select their preferences for each language and site root.
You can also adjust the runtime of our cookie. After this time has elapsed, users will be prompted again to enter the Cookie Consent. The default setting is 12 months; however, you can adjust this period. Furthermore, in the checkbox next to it, you can specify that for visitors who accept only essential cookies, the lifetime of our cookie is limited to the current session only. In addition, you can set the cookie consent to be displayed again after a certain time to users who have not selected all cookie groups.
Our cookie is essential for the function of the Opt-In Extension cookie. It must be saved so that the tool knows which cookie groups the user has accepted. The structure of our cookie looks like this:
This means: The user has accepted the essential and performance groups, but not the analytics one.
You can use this field to overwrite the URL from which the files are loaded in your website. If it is on another (sub)domain, please make sure to include it in your CORS policy header.
All CSS and JavaScript files are compressed. If you don't want this, you have to uncheck the box Minify generated files.
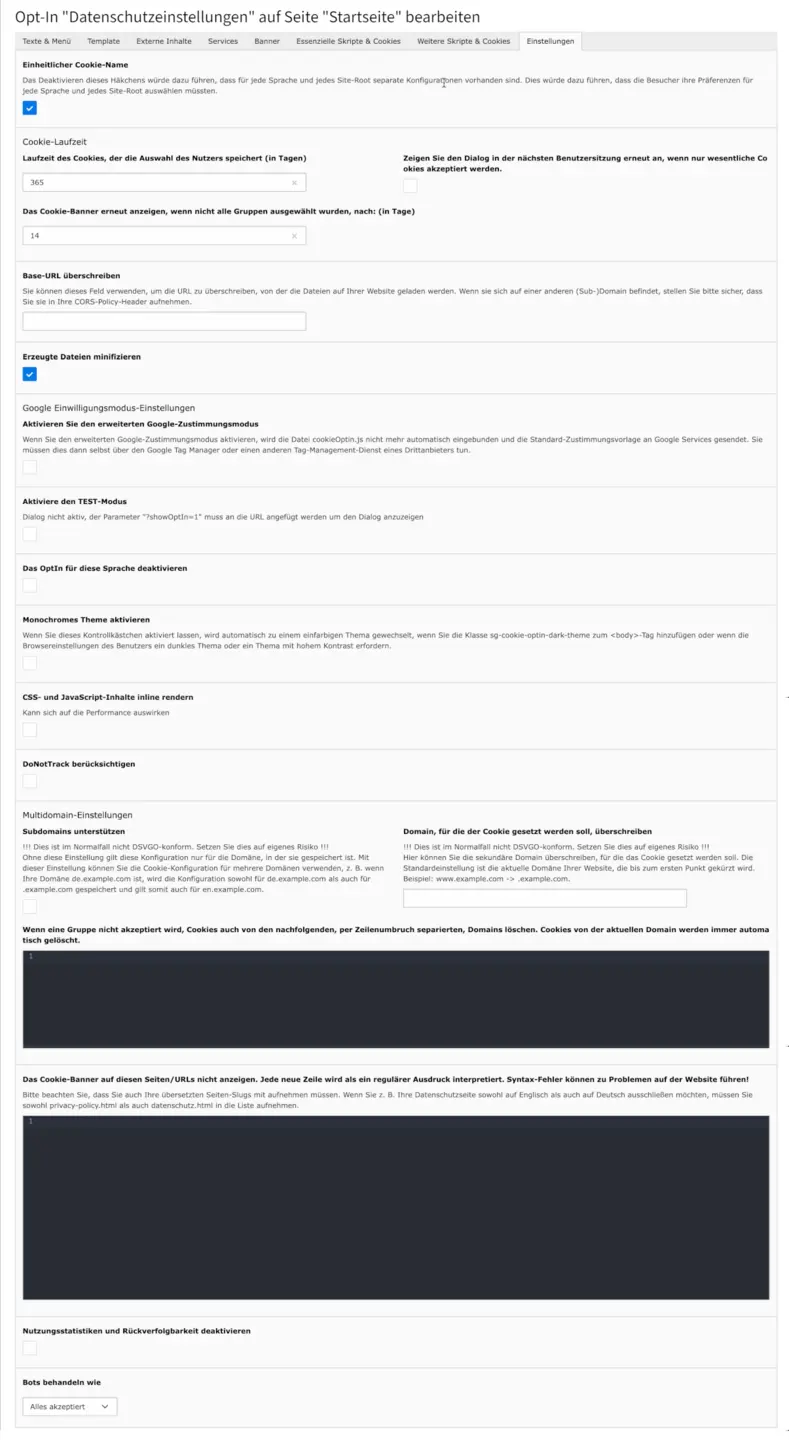
You should activate the test mode if you are still setting up the cookie consent on an existing page. If you enable this mode, the Cookie Opt-In window will not be displayed to the site visitors. To check the appearance and functionality, the dialog can be opened at any time with ?showOptin=1 at the end of the address bar in the frontend.
Not all users of your site come from the EU area? - Then they also do not have to deal with a cookie banner. Put a check mark in the appropriate translation to remove the banner there.
When this option is enabled, scripts in the “essential” group will start automatically whenever possible, without requiring manual consent.
This design is available from version 5 of the Cookie Opt-In. If you leave this box checked, a monochrome theme is automatically used when you add the sg-cookie-optin-dark-theme class to the <body> tag or when the user's browser settings require a dark or high-contrast theme.
If you enable this option, all the JavaScript and CSS content of the Cookie Opt-In is rendered directly in the head element. This improves the page load time because it contains fewer blocking HTTP requests (which includes CSS and JavaScript content).
If users have activated the 'DoNotTrack' option in their browser, they can use this checkbox to decide whether they want to take this setting into account or whether the Cookie Consent window should be displayed to them anyway.
If you create the Cookie OptIn in a multi-domain environment, you have a few more setting options for this.
Support subdomains
Please note that this is not normally GDPR compliant. You use this option at your own risk!
Without this setting, this configuration only applies to the domain where it is stored. With this setting you can use the cookie configuration for multiple domains, for example if your domain is de.example.com so the configuration will be stored for both de.example.com and .example.com and thus will be valid also for en.example.com.
Overwrite what domain this cookie should is set for
Please note that this is not normally GDPR compliant. You use this option at your own risk!
You can use this field to manually specify what the domain for the cookie must be. Without this setting, this configuration applies only to the domain where it is stored. With this setting you can use the cookie configuration for multiple domains, for example by writing example.com so that the configuration is used for both dev.example.com and www.example.com.
If a group is not accepted, also delete cookies from the following domains
Here you can enter domains for which the same cookies are to be deleted as for the domain on which the Cookie OptIn is created.
Don't show the cookie banner on the following page URIs
On your privacy page, you will place the cookie opt-in content element. Therefore, the banner does not need to appear there again. For that, paste the page URI into the field. Each new line will be interpreted as a new regular expression. Check if your regular expression matches the URL of your page, for example by using this page. Also, after saving, check on the frontend in the browser console (to open with F12) that there are no JavaScript errors.
With this option, the statistics and traceability can be turned off. Without this setting, you will find information about accepting cookies in the Statistics and Consent Management functional areas.
Ticking this box will lead to no longer automatically messaging the gtag API for every user consent state we have.
If you activate the extended Google consent mode, we will no longer automatically inject the cookieOptin.js file and send the standard consent template to Google Services. You will then have to do this yourself via Google Tag Manager or another third-party tag management service to load our script. However, the CSS and the file with the settings data will still be loaded, otherwise you will receive errors in Google Tag Manager.
If you want Google Services like PageSpeed to not see your page covered with the Cookie Banner, you can set the field Treat Google bots like: Accept all. This would lead to the bot automatically accepting all of the service – all contents will be loaded immediately and no cookie banner would be shown. If you prefer to not load any 3rd party contents and immediately reject all cookies – set it to Reject all instead. By default this feature is off. It is also possible to treat bots like all other visitors to the website by setting the Regular visitors option.
Alternatively, you may add a special GET parameter to your URL: autoOptIn=accept for automatic accept, or autoOptIn=reject for automatic reject.
If you want to translate the content, simply select the language for which you want to create a translation above the content area. Easily adapt all content to the corresponding language and save the changes with the Save button above the content area.
An individual template can also be applied for each language. You can find more about this in the Template tab section.
This document explains how to integrate our CMP (Consent Management Platform) with Google Consent Mode for both Basic and Advanced consent options. Google Consent Mode allows for a more nuanced approach to user consent, enabling some data collection even when users opt-out of personalization.
Prerequisites:
Basic Consent Mode
This mode offers a simpler setup where you can choose to either block all tags or allow all tags based on user consent. This mode allows collecting limited, non-personalized information even if users withhold consent for personalization purposes.
Advanced Consent Mode
This mode provides more granular control, allowing you to specify which tags fire based on specific consent purposes (e.g., analytics, personalization). This mode provides finer control, allowing you to specify which purposes and vendors can leverage user consent for data collection.
Basic Consent Mode is the default mode and the more-strict mode in terms of the GDPR regulations. The way it works is that your visitors have to explicitly grant consent for you to even load Google Tag Manager on your site. We do this by following the documentation above, but lets get into a bit more detail.
<!-- Google Tag Manager -->
<script>
(function(w,d,s,l,i){w[l]=w[l]||[];w[l].push({'gtm.start':new Date().getTime(),event:'gtm.js'});var f=d.getElementsByTagName(s)[0],j=d.createElement(s),dl=l!='dataLayer'?'&l='+l:'';j.async=true;j.src='https://www.googletagmanager.com/gtm.js?id='+i+dl;f.parentNode.insertBefore(j,f);})(window,document,'script','dataLayer','GTM-XXXXXX');
</script>
<!-- End Google Tag Manager -->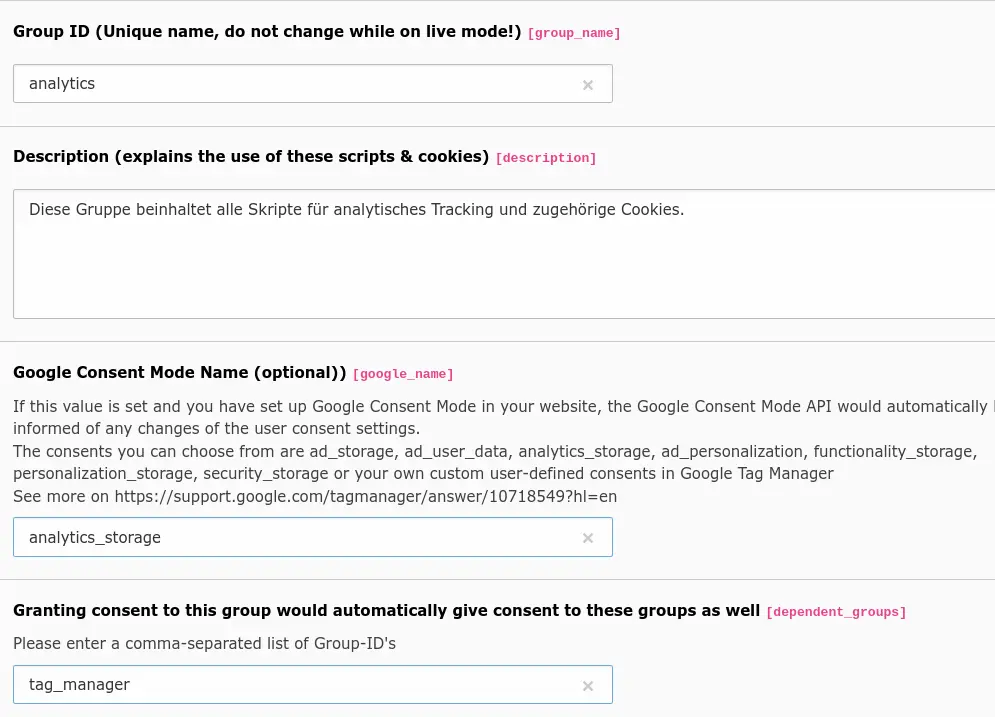

<!-- SG Cookie Optin Integration with Consent Mode via dataLayer -->
<script>
  // Ensure global dataLayer exists
  window.dataLayer = window.dataLayer || [];

  // Define the URL for the Cookie Optin script
  var sGcookieOptinUrl = 'https://{yourdomain.com}/fileadmin/sg_cookie_optin/siteroot-{ID}/cookieOptin.js?{cachebuster}';

  // Create the script element for Cookie Optin
  var sgCookieOptinScript = document.createElement('script');
  sgCookieOptinScript.src = sGcookieOptinUrl;
  sgCookieOptinScript.setAttribute('data-ignore', 1);
  sgCookieOptinScript.setAttribute('crossorigin', 'anonymous');

  // Define a callback after Cookie Optin is loaded
  var sgCookieOptinCallback = function() {
    console.log('Cookie Optin loaded from Tag Manager');
    if (typeof SgCookieOptin !== 'undefined' && typeof SgCookieOptin.initialize === 'function') {
      SgCookieOptin.initialize();
    }
  };

  // When the Cookie Optin script has finished loading
  sgCookieOptinScript.onload = function() {
    // Push Consent Mode defaults into the dataLayer
    window.dataLayer.push({
      event: 'consent',
      consent: {
        ad_personalization: 'denied',
        ad_storage: 'denied',
        ad_user_data: 'denied',
        analytics_storage: 'denied',
        functionality_storage: 'denied',
        personalization_storage: 'denied',
        security_storage: 'denied'
      }
    });

    // Initialize Cookie Optin logic
    if (typeof sgCookieOptinCallback === 'function') {
      sgCookieOptinCallback();
    }
  };

  // Append the script to the document body
  document.body.appendChild(sgCookieOptinScript);
</script>
<!-- End SG Cookie Optin Integration -->

Additional Notes
Most of the services and Tags that are not from Google will not respect the Google Consent Mode settings within them therefore they are not safe to even be loaded on your page without prior user consent. For these cases we recommend that you use our standard way of firing Tags through Triggers.
The first requirement is to create the tracking groups in the Cookie OptIn Extension and add the GTM script in all relevant groups. This avoids double loading. Also note alternative procedures when using multi-domain systems.
The following explanations are based on the exemplary script and cookie groups Analytics and Marketing. The corresponding group keys, which you enter in the tab General of a group, are marketing and analytics in our example.
The script for the Google Tag Manager and the tab Scripts is shown in the figures below.
After the configuration of the Cookies Consent on your website, you must now carry out several actions in the GTM for a complete and successful integration.

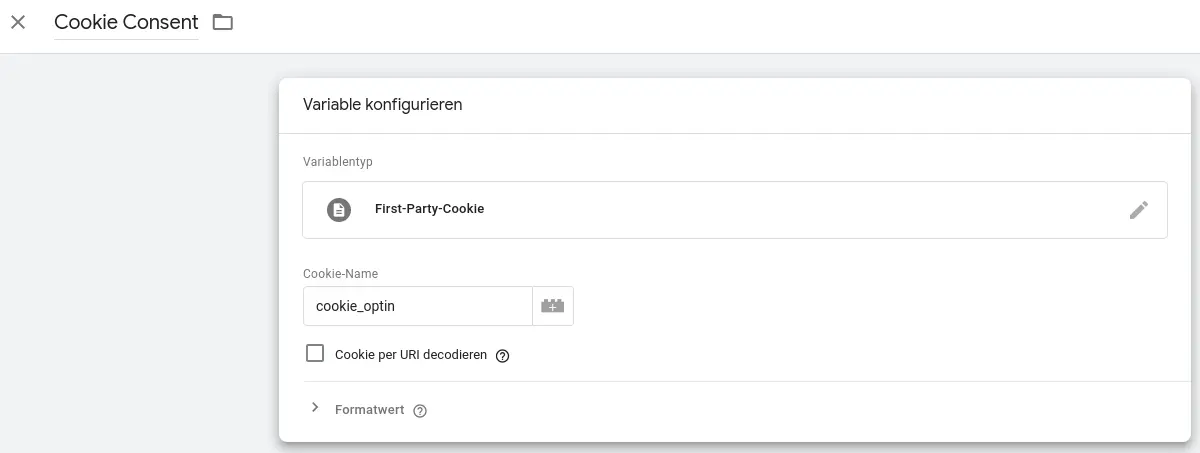
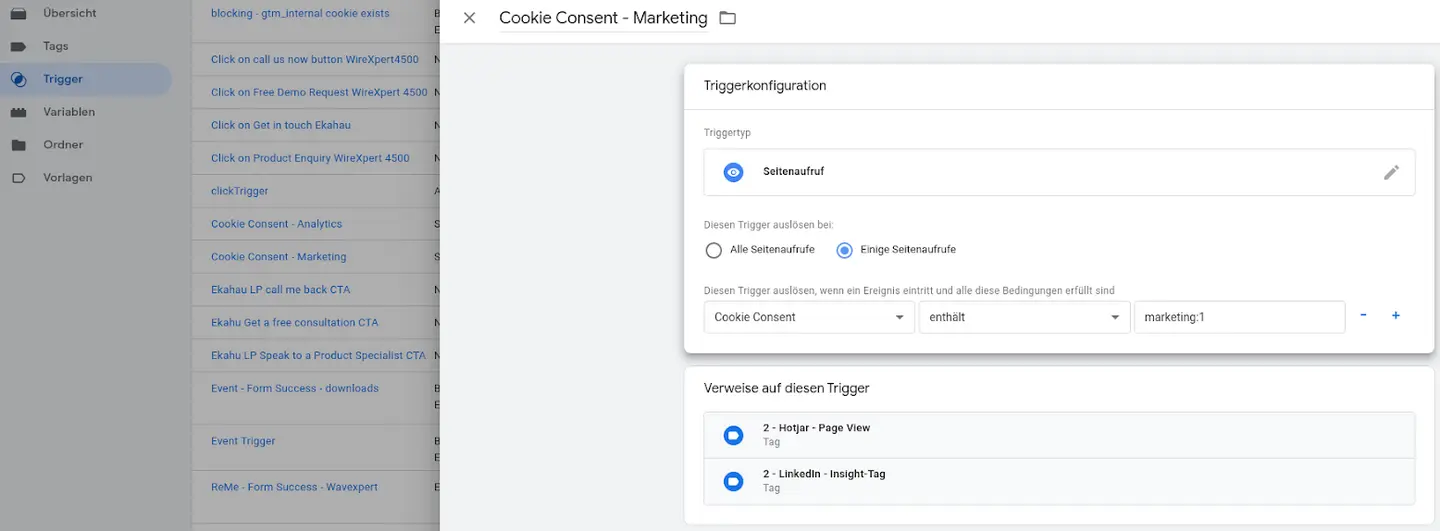
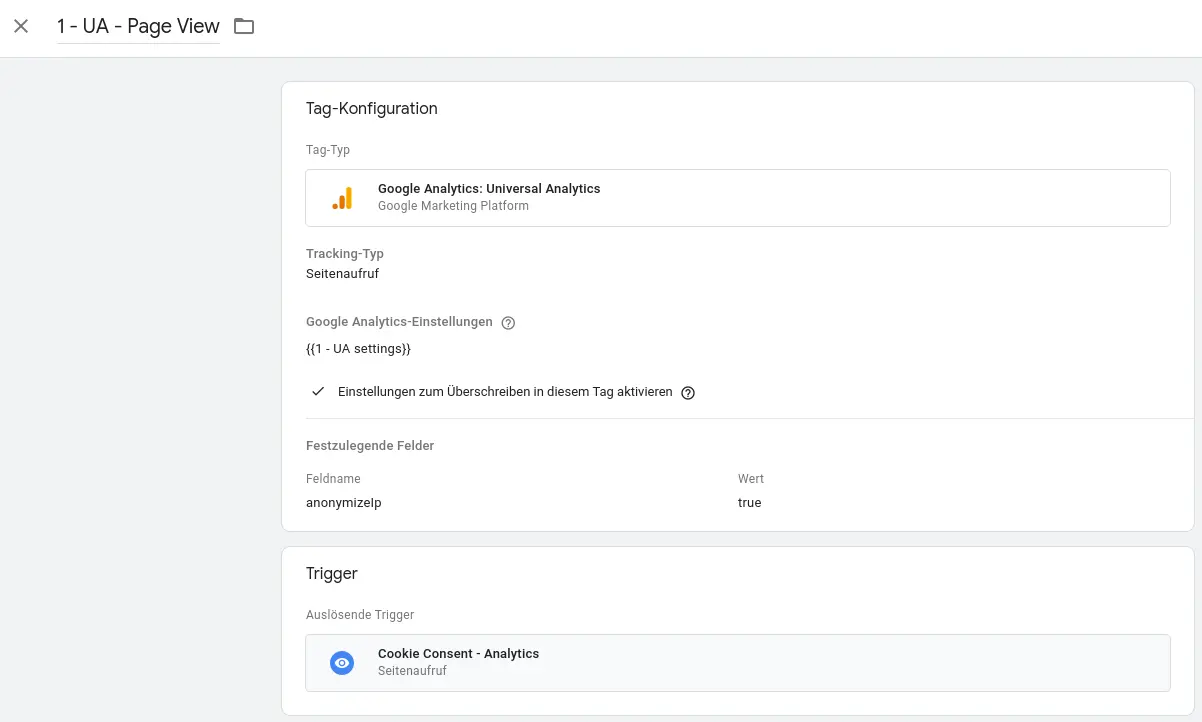
Now you have to set the new triggers in your Google Analytics tags. Depending on which cookie group you have assigned a tag to, you adjust the corresponding trigger in the tag. To change the trigger, proceed as follows:

More complex triggers are not executed on every page. In the GTM these must be converted as a trigger group. To create a trigger group, proceed as follows:
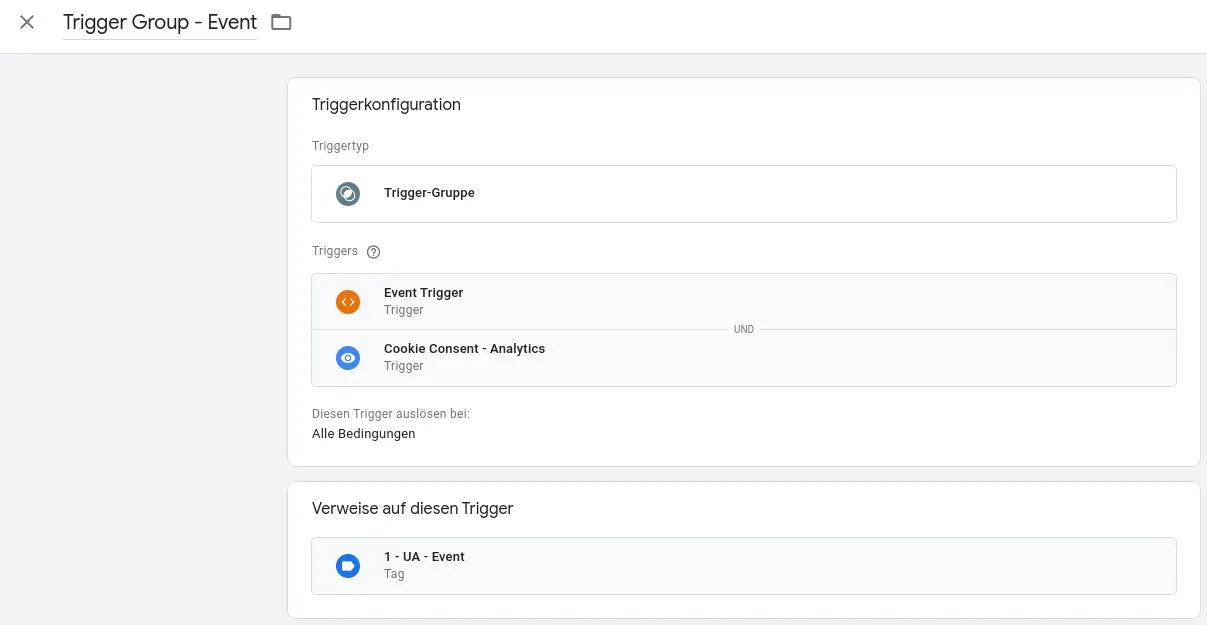
You add trigger groups to a tag in the same way as other triggers. In our example you can see that the created trigger group Trigger Group Event can be found in the tag UA - Event. This tag is only activated if both triggers of the group are fulfilled.

If your specific use case requires it, you may also combine the use of Triggers with the use of Google Consents.
You are now ready with the installation & configuration of the sgalinski Cookie Consent!
For some use cases we have enabled developers to interact with our Cookie OptIn system. You can see the use cases in our demo.
The function opens the Cookie OptIn dialog.
In 99% of the cases you will call the function without parameters and the dialog will open:
SgCookieOptin.openCookieOptin();
This parameter adds a trigger function to all protected elements. It is triggered if the respective element has received the approval. You can filter the elements by a CSS selector.
This is very handy if you want to apply a special logic after adding an element to the DOM (e.g. resizing the element or using a highlight effect).
callback {function} – Represents the callback function that is triggered in case of the event.
selector {string} (optional) – A CSS selector is used to filter unaccepted external content elements. Please note that at this point in the runtime, these elements are extracted from the DOM and replaced by the consent elements. So you cannot use parent selectors in this string. These selectors can only be used to check the external element itself for attributes – id, class, src etc.
The example uses the predefined resizeIframeAfterAccept function to resize the element with the ID rce-event:
SgCookieOptin.addAcceptHandlerToProtectedElements(resizeIframeAfterAccept, '#rce-event');
With this function you can programmatically replace each element on the page with a consent box. Try to execute the command below in the developer tools for testing purposes.
This function can be used for external elements that are loaded with AJAX.
externalContent {dom}: Represents the DOM element to be replaced.
SgCookieOptin.replaceExternalContentWithConsent(document.getElementById('c20534'));
We have introduced some JavaScript events to give developers more ways to programmatically influence the behavior of the Cookie OptIn. These are bubbling events that can be attached to the document.body or any other DOM element that is at a higher level than the element itself. The elements are JavaScript CustomEvent objects that you can work with just like any other JavaScript event. The following events are available.
The event can be used to add additional logic and scripts that will be run after the Cookie OptIn dialog is displayed.
Fired when: The Cookie OptIn Dialog has been displayed.
Event target: document.body
Event detail: {}
The event can be used to add additional logic and scripts that will be run after the Cookie OptIn dialog is hidden or closed.
Fired when: The Cookie Optin Dialog has been hidden or closed.
Event Target: the parent of the cookie optin
Event Detail: {}
The event can be used to add additional logic and scripts that will be run after the OptIn dialog for external content is displayed.
Fired when: The details for an external content have been displayed.
Event Target: the wrapper element of the external content itself
Event Detail: {}
The event helps to read users' settings and add additional custom logic. It can be used when you want to add your own statistics tracking or set the cookie on other domains and subdomains, etc. Use this Event if you need any complex logic with other complex 3rd party Tag Management solutions, such as Google Tag Manager or similar alternatives.
Fired when: The user has selected his preferences and the cookie has been set (Accept or Accept all).
Event Target: document.body
Event Detail: {cookieValue: String}
Tip: To extract the cookieValue information, you can then pass it to the method SgCookieOptin.readCookieValues(event.detail.cookieValue).
With this event you can change this HTML or add more HTML in specific cases.
Fired when: A custom script’s loadingHTML has been added.
Event Target: document.head
Event Detail: {src: String}
The event can be used to add more logic to the JavaScript or change it in some particular context.
Fired when: A custom script’s loadingScript has been added.
Event Target: the script itself
Event Detail: {src: String}
This event can be used to modify the replacement box or the replaced element after it has been replaced.
Event Target: The replacement container
Event Detail: {externalContent: HTMLElement, container: HTMLElement}
This event can be used to modify the replacement box or the replaced element before it has been replaced and after the service template has (or has not) been matched.
Event Target: The replacement container
Event Detail: {externalContent: HTMLElement, container: HTMLElement, service: service}
document.body.addEventListener('cookieOptinShown', function() {
console.log(‘We just opened the cookie optin dialog! We can now change the styling of some elements dynamically at this point.’);
});
document.body.addEventListener('cookieOptinHidden', function() {
console.log(‘We just closed the optin dialog! We can now revert those stylings back to how they were initially.’);
});
Below is a list of commands that you can use on your web server or add as scheduler tasks. You use them in your shell as follows.
./vendor/bin/typo3 sg_cookie_optin:command_name arg1 arg2 ...
sg_cookie_optin:generate_static_files [siteRootId] – Generates the static JavaScript, JSON and CSS files in your fileadmin directory. It replicates the same function as when you save your configuration. It comes in handy, for example, for deployment, unit tests or similar CI/CD tasks. int siteRootId is required – This is the PID of the site root. If you are in a (inconsistent) state that contains more than one configuration entry for the site root, note that the script will export only the first one it finds, assuming it is the correct one.You can do that by attaching to the hook $GLOBALS['TYPO3_CONF_VARS']['EXTCONF']['sg_cookie_optin']['GenerateFilesAfterTcaSave']['preSaveJsonProc'].
It sends an array $params with the following entries:
pObj = An instance of the StaticFileGenerationService. It contains the siteRootId as well as a few public methods that can come in handy.data = A reference to the data array that will be written in the JSON file.languageUid = The uid of the current language.Example:
$GLOBALS['TYPO3_CONF_VARS']['EXTCONF']['sg_cookie_optin']['GenerateFilesAfterTcaSave']['preSaveJsonProc'][] =
     function ($params) {
         $params['data']['newDataEntry'] = 'newValue';
     };
Only the standard layout is currently available. However, it is possible to overwrite the CSS of the cookie window.
In the long term, it is planned to offer different layouts for selection.
We assume that it is possible to create a DSGVO-compliant website with the sgalinski Cookie OptIn Extension. For this it is, however, necessary to load all cookies and tracking scripts exclusively via the extension. As this is the responsibility of the individual website administrator, we cannot assume any responsibility for the legal security of the software.
In addition, the DSGVO conformity of a website includes other aspects that are not covered by sgalinski Cookie OptIn.
You are very welcome to report any suggestions for improvement and feedback about bugs in our tracker to our internal Gitlab. You can also send this directly to our support team via our email address support@sgalinski.de.
This is made possible by the new content element, which has been integrated since version 2.0. This can be found in the backend with the name "Cookie-Opt-In" within the tab "Plugins". Once you have created this, the modular OptIn is no longer displayed on this page.
[1] There is no guarantee for permanent availability or support of the software. Licensees may use the software during the license period as long as it is officially supported and available.
Contact us
Our cookie consent extension have convinced you, and you would like to realize your next web project or your individual software idea together with us? – Then get in touch for a non-binding offer!