Easy integration of YouTube and Vimeo videos into TYPO3 pages

If you have ever tried to insert videos from video portals into a TYPO3 page, you know that TYPO3 itself does not offer a solution specifically designed for this purpose. It is only possible to insert YouTube and Vimeo videos via the HTML element or to upload videos in the filelist and then add them in the Text & Media content element. Both ways are far from perfect for videos located on the popular video portals, as there are no options to control their display. The latter option can also have a major impact on website performance, depending on the size of the video.

With our TYPO3 extensions you get one plugin content element for YouTube videos and one for Vimeo videos. The sg_youtube and sg_vimeo extensions allow you to embed individual videos, entire channels or playlists on a TYPO3 page; YouTube shorts are also possible. Videos do not have to be uploaded to your own servers, and you have a wide range of design options: Determine how many videos from a channel or playlist are displayed and exclude all unwanted videos. If you only want to show videos with certain content, you can also use the practical filter function in the backend or add filters in the frontend so that users can actively search for videos. Determine whether the title and description of the videos should be displayed and set the thumbnail type or change the preview image completely. With these setting options, you can embed YouTube and Vimeo videos quickly and efficiently into your website and are able to build entire media libraries easily.

Highlights

Media library in a snap

You run a YouTube channel or a Vimeo channel and want to build a media library with the content from the video portals on your corporate website? – With our TYPO3 Extensions for YouTube and Vimeo, this is now made easy and fast for TYPO3 sites. With just one plugin content element, you can display the videos of an entire channel or playlist. Individual videos or Shorts can be embedded just as easily: conveniently and configured just the way you want.

Easily embed videos, channels and playlists/showcases using IDs

It really couldn't be easier: Add the ID of a video, a playlist or a showcase or a channel from the popular video portals YouTube or Vimeo to the corresponding plugin content element in the backend of your TYPO3 website, which you get through our extensions, and the videos are already embedded in your website without having to upload them to your servers. This way, your website content can be enriched, and complex topics can be presented in a clear way without having to download videos and using up your storage capacity with potentially large files.

Control layout & behavior

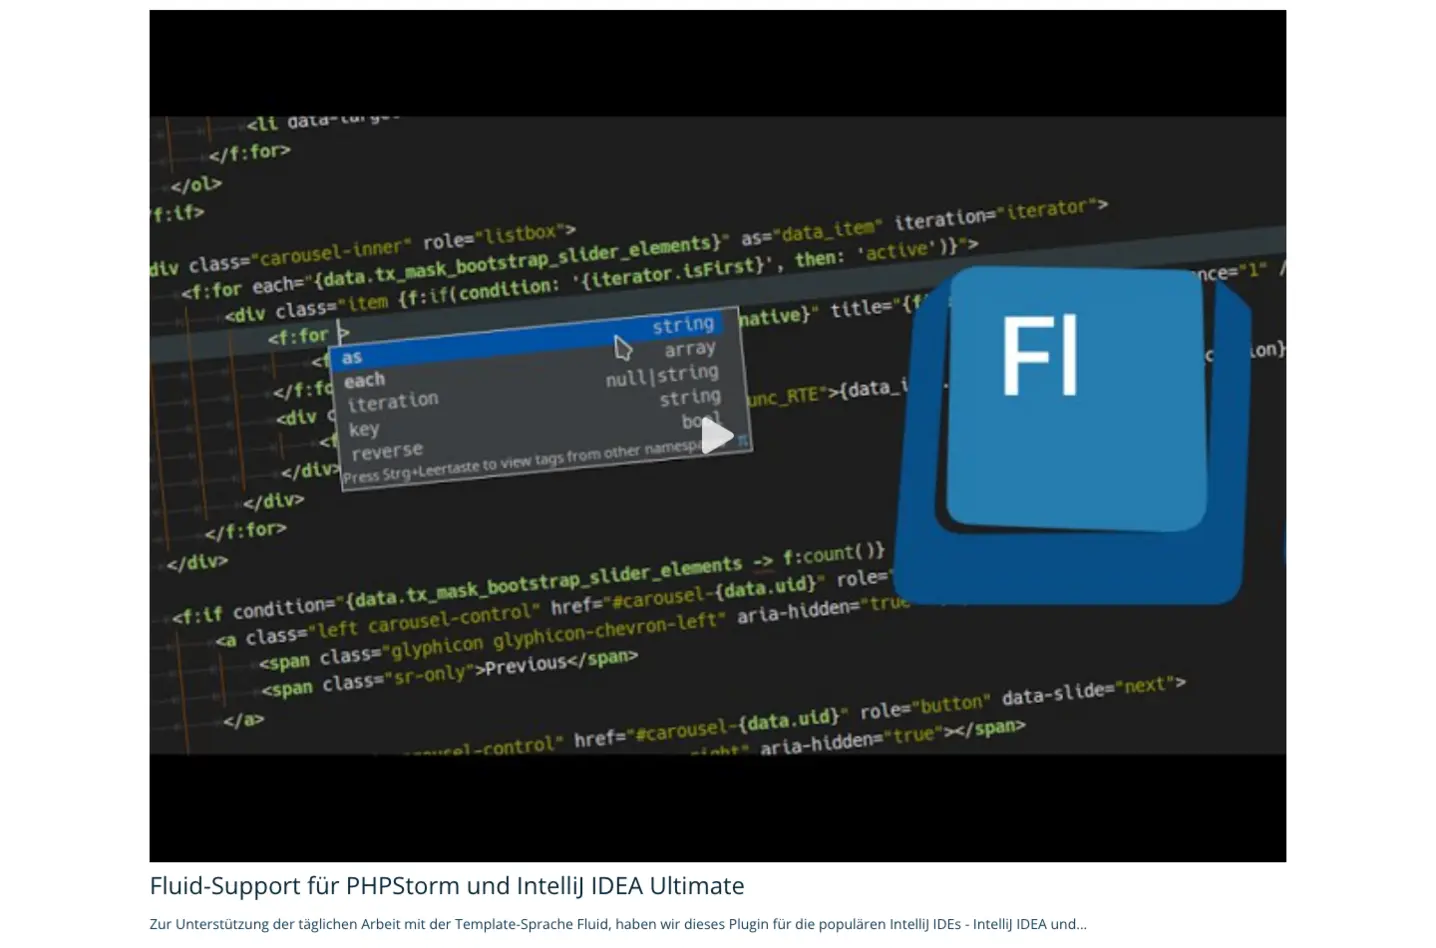
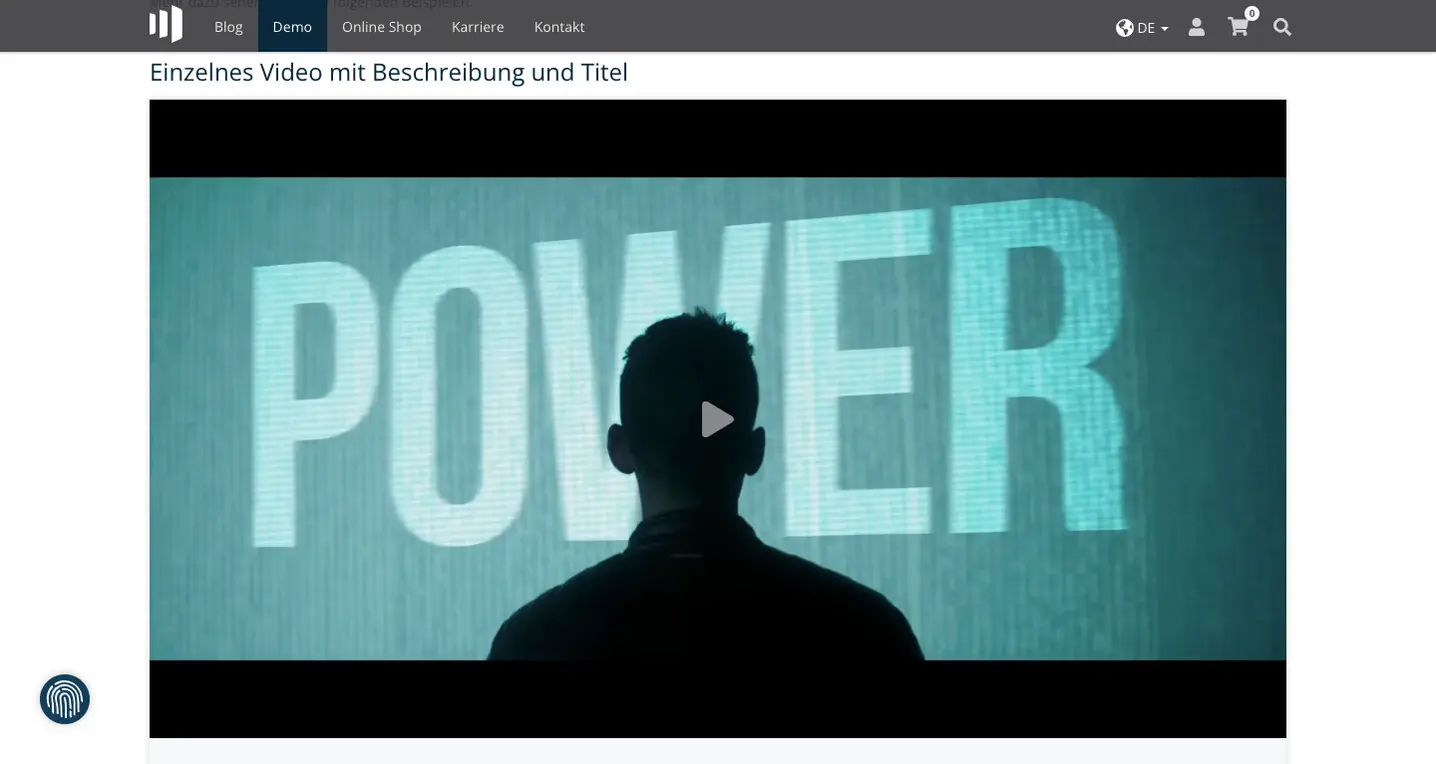
Our TYPO3 extensions for YouTube and Vimeo videos allow you to present videos in a consistent look. If you want to vary the look a bit, insert several YouTube or Vimeo content elements and use the various setting options for layout, information, thumbnails and behavior, with which, for example, certain videos can be highlighted, while a thematic connection can be visually displayed for others. Depending on your needs, videos can be embedded with captions or descriptions. You determine whether videos are played in a lightbox or directly on the page. Furthermore, several layouts are available. The possibilities are manifold, at the same time the content elements are easy and intuitive to use.

Custom thumbnails

Your media library becomes even more personal with custom thumbnails, which are the small preview images you see before a video starts. Both video extensions allow you to set custom thumbnails yourself. To do this, all you have to do is upload the images you want to be used as thumbnails in the file list and link them to the related media element.

Filter

You can easily filter entire video channels in the TYPO3 backend according to desired search terms so that only relevant videos are displayed on your website.

If you have numerous videos, you also have the option of activating filters in the frontend so that your users can search specifically for content in the video media library This keeps the overview clear and your visitors can find the videos that are of interest to them more quickly This not only optimizes the user experience, but also promotes interactivity and dwell time on your website

Data privacy

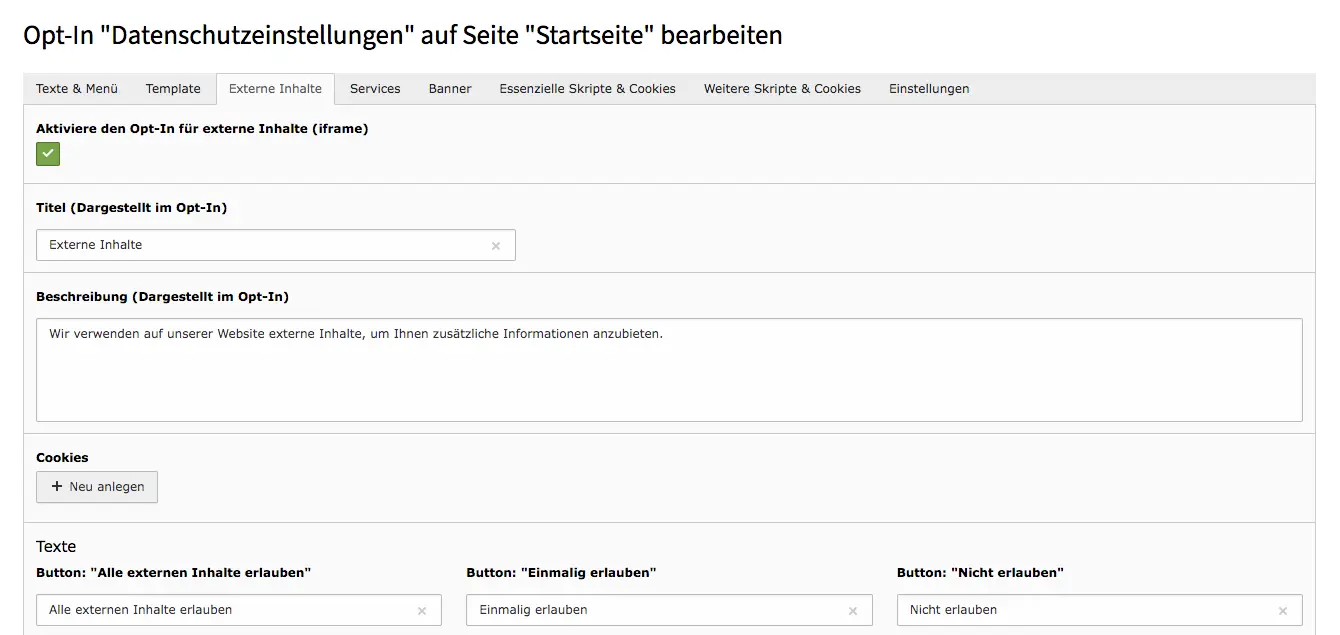
In combination with the protection of external content through our Cookie Opt-In Extension for TYPO3, a privacy-friendly integration of the videos is also possible. Our extension for cookies and external content prevents cookies from being set before visitors have agreed to them. For this purpose, a box is placed over external content, which allows loading this content or to accept all external content. It is also possible to customize this box.

sgalinski Cookie Opt-In for TYPO3

Our Cookie Consent solution fits perfectly into the TYPO3 Video Extensions for YouTube and Vimeo and enables a privacy compliant integration of videos on your TYPO3 website – Visit our Cookie Opt-In product page for more information!

Prices

TYPO3 extensions for the integration of YouTube and Vimeo videos

Our video extensions for TYPO3 are the easiest solution to integrate videos from YouTube or Vimeo into TYPO3 pages.

The plugin content elements for inserting videos are intuitively designed and easy to use. To embed videos, you only need the ID from YouTube or Vimeo. Together with the protection of external content through our Cookie Opt-In Extension, the whole setup can also be implemented in a privacy-friendly way.

  • Easy installation & fast configuration
  • Intuitive & simple design
  • Wide range of design options
  • Free updates for the entire term of your license

Prices:

  • Annual License1: €89.99 per instance
  • Lifetime License1: €299.99 per instance
  • Volume license: 25 % volume discount is granted for orders from 20 licenses and 50 % discount is granted from 50 licenses upwards

Convince yourself of the possibilities of our TYPO3 Video Extensions!

To the Preview Page

Documentation

To ensure that no questions remain unanswered, we have compiled a comprehensive set of documentations for our users of the TYPO3 Video Extensions. These guides take you step by step through the installation and integration of the YouTube and Vimeo extensions, and show you how to use the content elements that you will find in your TYPO3 instance after successful configuration.


1 Technical Documentation: API Keys, Installation & Integration

1.1 YouTube

1.1.1 YouTube API Key

The TYPO3 extension for YouTube videos needs a YouTube API key to function correctly. Proceed as follows to get the API key for the YouTube API. We assume in this tutorial that you already have a Google account and are logged in.

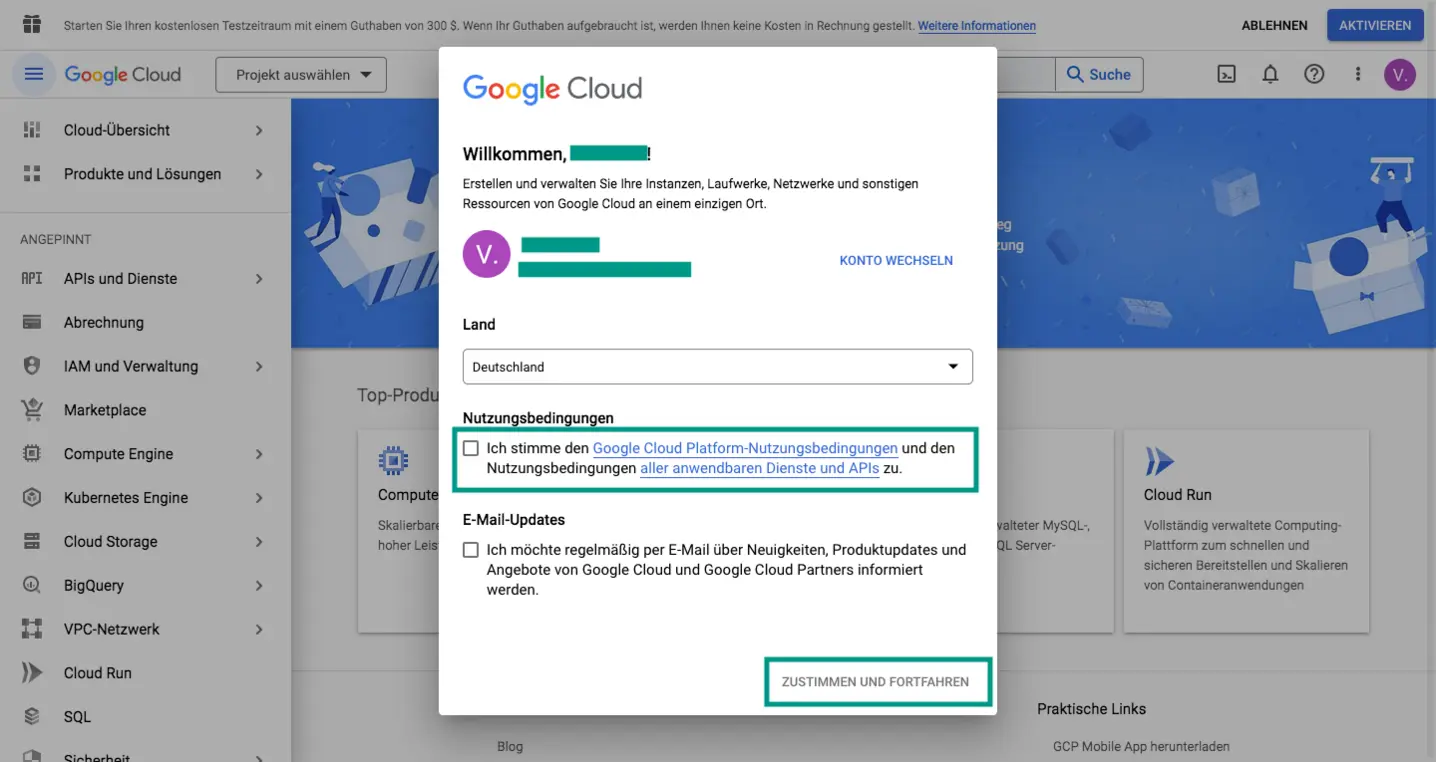
  • Go to Google Cloud Console: https://console.cloud.google.com/
    If you have not yet signed in to Google Cloud Console, the sign in window will appear. There you need to select your country and accept the terms of service. After that, click Agree and continue.


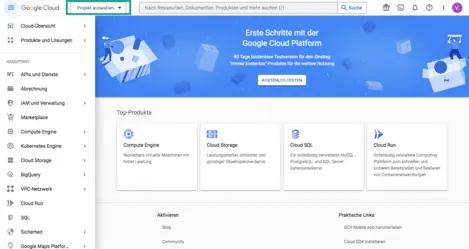
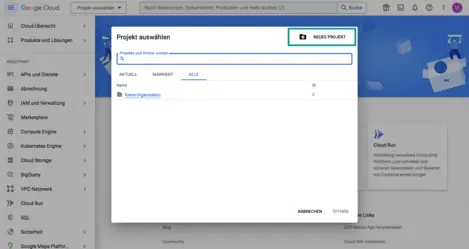
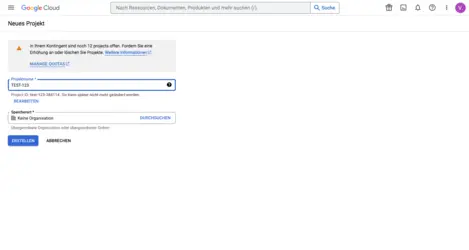
  • Create a new project: Click New Project in the project selection. Enter a name for the project and click Create. Creating the project may take some time. Once the new project is 'ready', it will display notifications.
  • Select project: Click Select Project directly in the notifications, or go to project selection as shown in the previous step and select the project you just created.
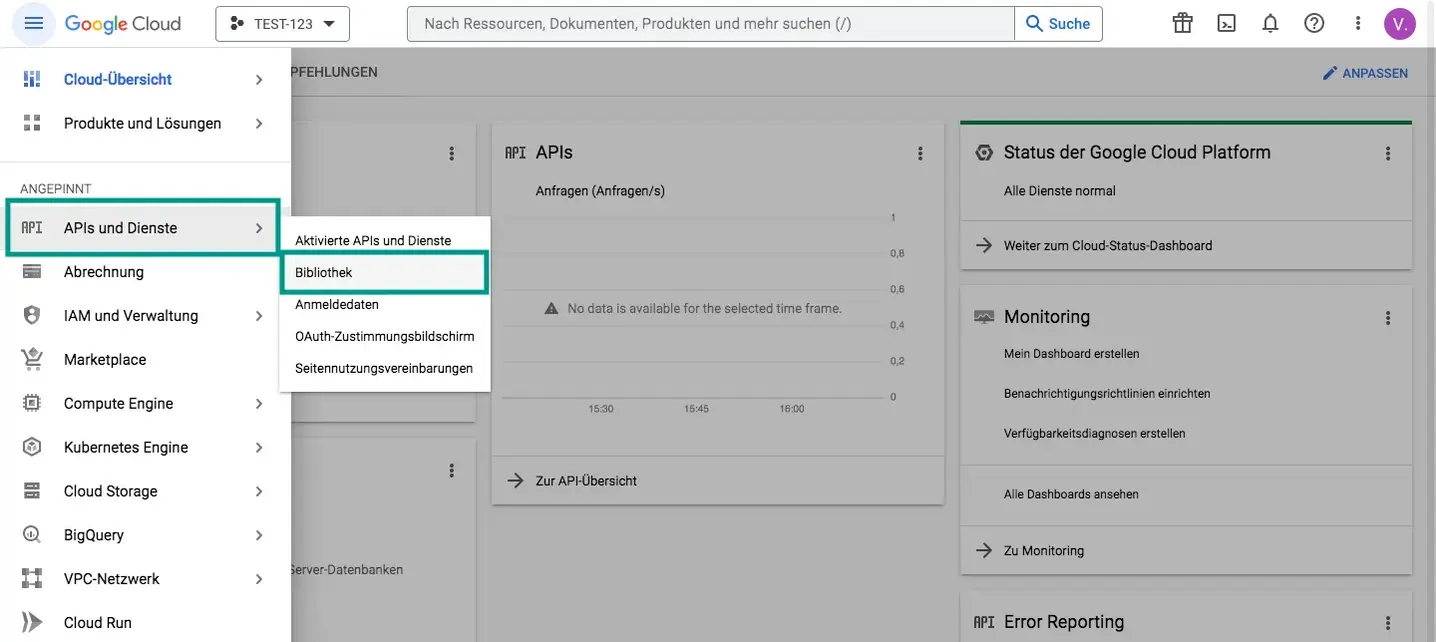
  • Open the API library: Click the APIs and Services > Library button in the left menu. Here you will find all available APIs/Services.
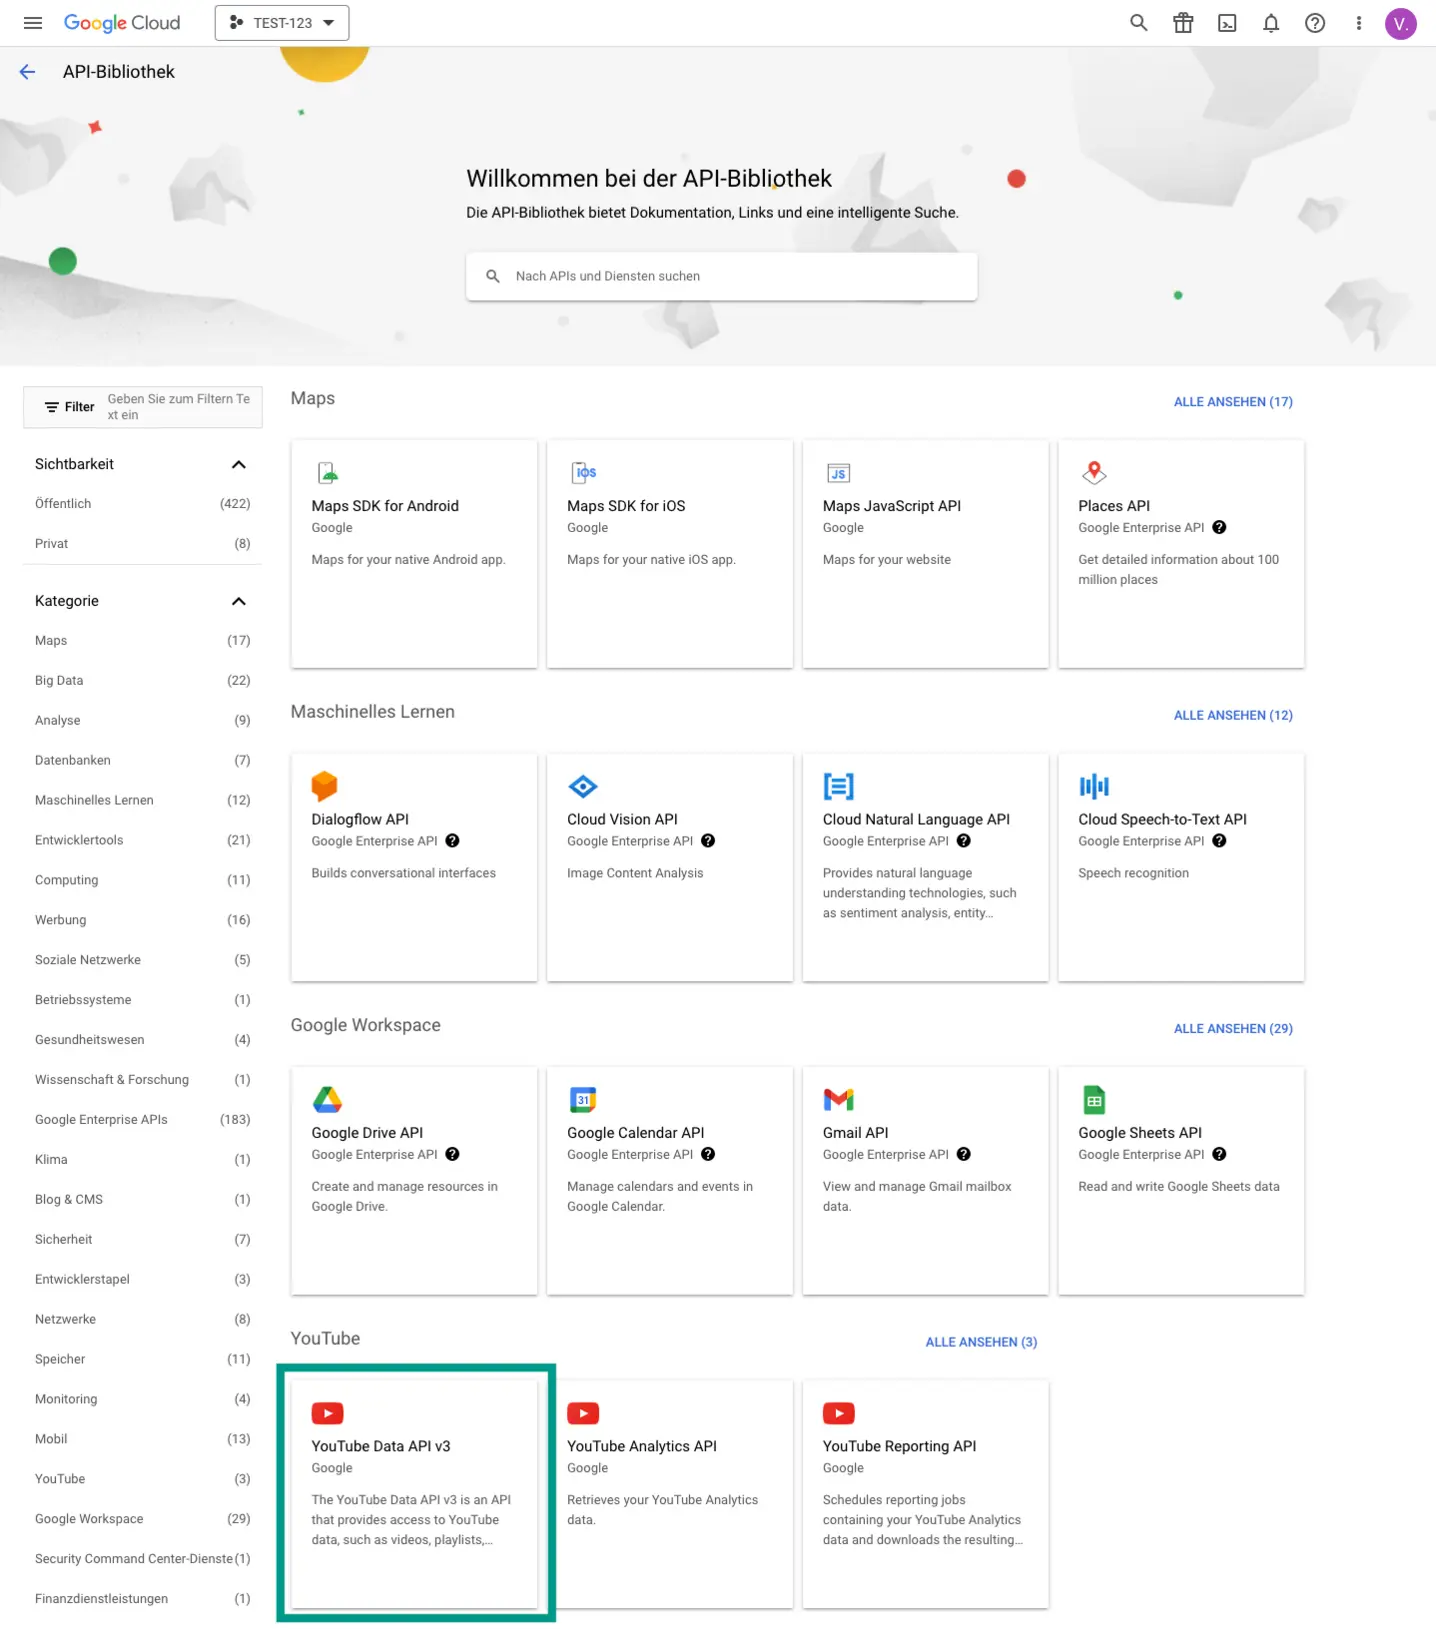
  • Enable YouTube API: Scroll down the library until you see YouTube APIs or use the search bar. Click on the API YouTube Data API v3, and then click Activate on the API details page and you will be taken to the API/Service details.
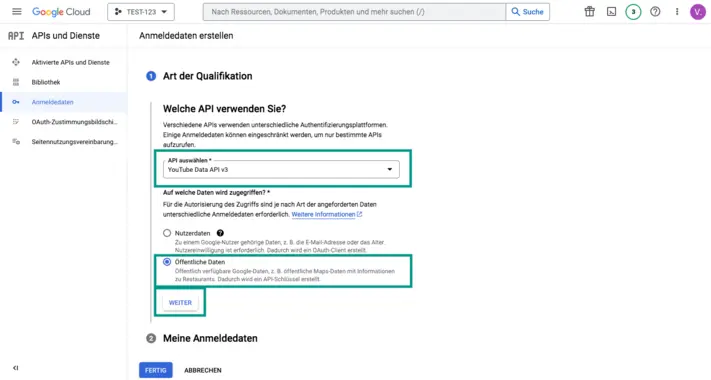
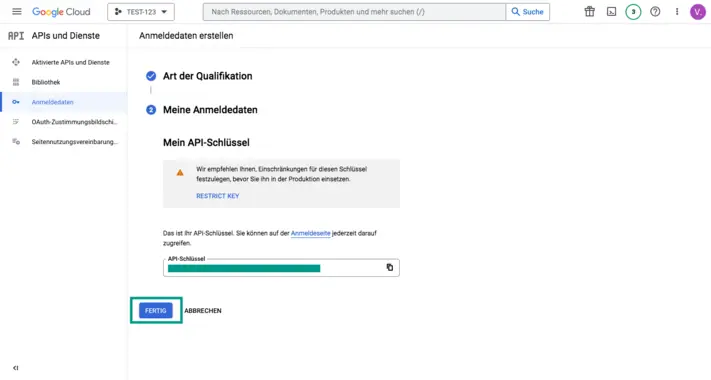
  • Create credentials and generate API key: For the API key, you must now click the Create credentials button. After that, you need to select the API (if not preselected). In our case, this is YouTube Data API v3. For the question 'What data will you be accessing?' select the checkbox 'Public data' and then click Next. Now you will already see your API key, which you can copy and use directly. Click Done.
  • View and copy API key: Go to APIs and Services > Credentials to find the created API key at any time.

You have created the YouTube API key! – Enter the YouTube API key in the place as described in the TypoScript Integration section of the documentation below.

1.1.2 YouTube TYPO3 Extension: Installation & Integration

Ext: sg_youtube

License: GNU GPL, Version 2

Repository: https://gitlab.sgalinski.de/typo3/sg_youtube

Please report bugs here: https://gitlab.sgalinski.de/typo3/sg_youtube

Installation / Integration

First install the extension and activate it in the Extension Manager.

TypoScript integration

  • Include the TypoScript in Configuration/TypoScript/setup.typoscript and constants.typoscript in your theme.
  • Add your YouTube API key:
plugin.tx_sgyoutube {
	settings {
		# cat=plugin.tx_sgyoutube/file; type=string; label=YouTube API Key
		apiKey = <your-api-key>
	}
}

Registration for more than the free 10.000 quotas per day

It's not 1 quota per 1 API call. Each API has its own costs, which can be seen in the link below.

Currently, at the version 3.2.1 we are using the following APIs:

  • "search/list" for channel videos
  • "playlistItems/list" for videos from a specific playlist
  • "videos/list" for getting the details for each video and the localizations, if needed.

The maximum quota costs would be "102" at the moment for rendering the latest videos from a channel with the video details and translations.

Quota Calculator

YouTube API Services - Audit and Quota Extension Form

Caching behaviour

Because of the quota costs we implemented a caching for the calls for each day. The response from the APIs will be saved and used for 24 hours. Normally the site cache would do it, but it could be, that the cache will be cleared multiple times in a row, or that the plugin is on an uncached page. The TYPO3 registry is used as a cache. The cleanup is handled on the fly.

If the ?disableYoutubeCache=1 parameter is added to the URL, this cache will be ignored as well.

Possible way to solve the quota limit, if it's still reached

You can use a different API key for specific sites. You can implement a TypoScript page uid check and just change the key from the "TypoScript integration" topic.

Making changes in JavaScript/CSS

We are shipping the extension with source files and already minified assets. By default, the minified assets are loaded in the Layout, so that the extension works out of the box just with plug and play. Should you want to change this behavior, you can do the following:

  • Override the layout path in TypoScript local/project_theme/Configuration/TypoScript/Extensions/SgYouTube/Constants.typoscript
plugin.tx_sgyoutube {
	settings {
		apiKey = MY_KEY
	}

	view {
		layoutRootPath = EXT:project_theme/Resources/Private/Layouts/SgYouTube/
	}
}

  • Create a new layout file omitting the assets that you would like to change (for example, loading without CSS)
<div class="tx-sg-youtube">
	<f:asset.script identifier="sgVideoJs" src="EXT:sg_youtube/Resources/Public/JavaScript/Dist/main.bundled.min.js" />
	<f:render section="main"/>
</div>

  • Import the CSS or JavaScript source files in your respective asset pipeline and add them externally.

Compiling CSS/JS assets with SGC

  • Install the sgalinski/sgc-core library via composer
  • Add the sg-youtube extension paths in the .sgc-config.json
  • Remove the loading of the compiled CSS/JS assets from Resources/Private/Templates/Youtube/Index.html
  • Add import the scss and js module file in the corresponding main.scss and main.js
  • Initialize the javascript modules in your main.js: new SgVideoLightbox(); SgVideo.initDefault();
  • If you want to recompile the JS with SGC, you must add excludeFromQa: ['!**/Backend/**/*'] to your .sgc-config.js and also set your main extension in extensions to sg-youtube extensions: ['sg-youtube']

Compiling SASS only without SGC

Example:

npm install -g sass npx sass ./Resources/Public/Sass/Bootstrap5/main.scss ./Resources/Public/StyleSheets/Bootstrap5/main.min.css --style compressed --no-source-map

Using the Bootstrap 5 templates

If you want to use the Bootstrap 5 templates, you have to first install Bootstrap 5 in your theme to use its styles and JavaScript. Afterwards simply set the plugin.tx_project_theme.config.bootstrapVersion TypoScript setup variable to 5.

Using Events to Customize YouTube API Results in TYPO3

This documentation explains how to leverage custom events in your TYPO3 extension to manipulate the results of YouTube API calls. By using these events, you can modify the API parameters, filter results, and further customize the JSON data returned from YouTube.

Available Events

The following events are dispatched in the YouTube video rendering process:

  1. BeforeYoutubeCallEvent
  2. AfterYoutubeCallEvent
  3. AfterFilterVideosEvent
  4. AfterMapCustomThumbnailsEvent

Event Listeners

1. BeforeYoutubeCallEvent

Description: This event is triggered before making the YouTube API call, allowing you to modify the API parameters.

Example Use Case: Change API Key or manipulate other paramters
<?php

namespace Vendor\Extension\EventListener;

use SGalinski\SgYoutube\Event\BeforeVimeoCallEvent;

class BeforeYoutubeCallEventListener
{
    public function __invoke(BeforeVimeoCallEvent $event): void
    {
        // Change the API key
        $event->setApiKey('your-new-api-key');
        // Extend the max results limit by 10 videos
        $event->setMaxResultsWithFilters($event->getMaxResultsWithFilters() + 10);
    }
}

2. AfterYoutubeCallEvent

Description: Add Custom Data to JSON Array

Example Use Case: Change API Key or manipulate other paramters
<?php
namespace SGalinski\SgYoutube\EventListeners;

use SGalinski\SgYoutube\Event\AfterVimeoCallEvent;

class AfterYoutubeCallEventListener
{
	public function __invoke(AfterVimeoCallEvent $event): void
	{
		$jsonArray = $event->getJsonArray();
		// Add custom data
		$jsonArray['customData'] = 'This is some custom data';
		$event->setJsonArray($jsonArray);
	}
}

3. AfterFilterVideosEvent

Description: This event is triggered after the videos have been filtered, allowing you to further manipulate the filtered results.

Example Use Case: Remove the 10 videos that we added initially with the first event
<?php
namespace SGalinski\SgYoutube\EventListeners;

use SGalinski\SgYoutube\Event\AfterFilterVideosEvent;

class AfterFilterVideosEventListener
{
	public function __invoke(AfterFilterVideosEvent $event): void
	{
		// Modify the jsonArray if needed
		$jsonArray = $event->getJsonArray();
		// Add some custom processing here
		// For example let's remove the extra 10 videos that we added in the other event
		if (count($jsonArray['items']) > 10) {
			array_splice($jsonArray['items'], 0, 10);
		}
		$event->setJsonArray($jsonArray);
	}
}

4. AfterMapCustomThumbnailsEvent

Description: This event is triggered after custom thumbnails have been mapped, allowing you to modify the JSON array one last time before rendering.

Example Use Case: Use a custom thumbnail for all videos in the list
<?php
namespace SGalinski\SgYoutube\EventListeners;

use SGalinski\SgYoutube\Event\AfterMapCustomThumbnailsEvent;

class AfterMapCustomThumbnailsEventListener
{
    public function __invoke(AfterMapCustomThumbnailsEvent $event): void
    {
        $jsonArray = $event->getJsonArray();
        // Add a custom thumbnail URL
        foreach ($jsonArray['items'] as &$item) {
            $item['customThumbnail'] = 'https://example.com/custom-thumbnail.jpg';
        }
        $event->setJsonArray($jsonArray);
    }
}

To enable the events just register them in your Services.php as follows (you can use yaml instead if you prefer):

$services->set(BeforeYoutubeCallEventListener::class)
    ->tag('event.listener', ['event' => BeforeYoutubeCallEvent::class]);
$services->set(AfterYoutubeCallEventListener::class)
    ->tag('event.listener', ['event' => AfterYoutubeCallEvent::class]);
$services->set(AfterFilterVideosEventListener::class)
    ->tag('event.listener', ['event' => AfterFilterVideosEvent::class]);
$services->set(AfterMapCustomThumbnailsEventListener::class)
    ->tag('event.listener', ['event' => AfterMapCustomThumbnailsEvent::class]);

Setting Up the Frontend Filers

Step 1: Adding the Plugin to a Page

  1. In the TYPO3 backend, create or edit the page where you want to display YouTube videos.
  2. Add a new content element and select the YouTube plugin from the list.
  3. Provide the necessary YouTube details in the plugin settings (like YouTube API key, video/channel/playlist ID, max results, etc.).

Step 2: Disable caching for the extension and Cache validation for your web page

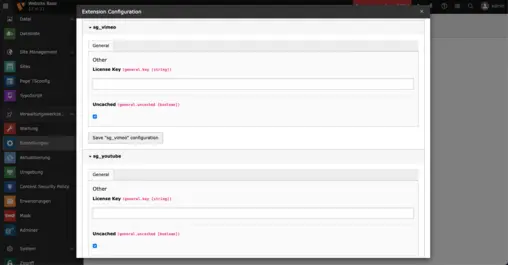
  1. In the TYPO3 backend, go to Settings -> Extensions and open the sg_youtube settings. Tick the box that says 'uncached' and save.
  2. This way the the extension will not cache the results and the the data will be loaded dynamically based on the filter settings.
  3. Set $GLOBALS['TYPO3_CONF_VARS']['FE']['cacheHash']['enforceValidation'] = false in your TYPO3 configuration, otherwise using the frontend filters may result in a 404 page in some instances.

Step 3: Configuring Filters via FlexForm

  1. In the plugin's FlexForm settings, you will see a section for "Filters."
  2. Depending on your site configuration, filters will be available in a select field. You can select the filters you want to display (like search term, video duration, etc.).
  3. Save your settings and publish the page.

3. Using Filters in the Frontend

Once filters are enabled, they will appear on the frontend in a form, allowing users to interact with the displayed videos dynamically. For example:

  • Search Term: Allows users to input a search term to filter videos based on keywords.
  • Duration Filter: Provides a dropdown to filter videos by length (short, medium, long, etc.).

The filter values are sent to the YouTube API, and the video list updates based on the selected criteria.


4. TypoScript Configuration for Filters

To define custom filters, the plugin uses TypoScript. Below is an example configuration and an explanation of each section:

Example TypoScript Configuration

filters {
	searchTerm {
		label = LLL:EXT:sg_youtube/Resources/Private/Language/locallang.xlf:filter.searchTerm
		partial = Filters/TextField
		filterClass = SGalinski\SgYoutube\Filter\QueryStringFilter
		defaultValues {
#			search = test
		}
		position = top
	}
	duration {
		label = LLL:EXT:sg_youtube/Resources/Private/Language/locallang.xlf:filter.duration
		partial = Filters/Dropdown
		filterClass = SGalinski\SgYoutube\Filter\DurationFilter
		position = top
		options {
			0 {
				label = LLL:EXT:sg_youtube/Resources/Private/Language/locallang.xlf:filter.duration.0
				value = 1
			}
			1 {
				label = LLL:EXT:sg_youtube/Resources/Private/Language/locallang.xlf:filter.duration.1
				value = 2
			}
		}
	}
}

submitButton {
	position = top
	cssClass = btn btn-default
	label = LLL:EXT:sg_youtube/Resources/Private/Language/locallang.xlf:filter.submitButton
}

Explanation of the Configuration

filters

This TypoScript object defines all the available filters for the YouTube plugin. Each filter is a separate sub-object, like searchTerm and duration in the example.

Filter Fields

  1. searchTerm (Text Field)

    • label: The label for the filter form field. This can be translated using the TYPO3 language file (locallang.xlf).
    • partial: Specifies which partial file to use for rendering the filter. In this case, it points to a text field (Filters/TextField).
    • filterClass: This is the PHP class responsible for processing the filter and applying it to the YouTube API request. For the searchTerm, it's a QueryStringFilter.
    • defaultValues: You can specify default values for the filter (commented out in the example).
    • position: Defines where the filter should be displayed on the page. It can be top (above the video list) or bottom (below the video list).
  2. duration (Dropdown)

    • label: The label for the filter form field.
    • partial: Points to a dropdown partial (Filters/Dropdown).
    • filterClass: This is the PHP class responsible for processing the filter. For duration, it's DurationFilter.
    • options: This section defines the options for the dropdown, each with a label (for the user to see) and a value (sent to the API).
    • position: Indicates where the filter should be displayed on the page.

submitButton

  • Defines the configuration for the submit button:
    • position: Determines where the submit button is placed in the form (top in this case). It accepts top, bottom or both
    • cssClass: Adds CSS classes for styling the button.
    • label: Provides the text for the submit button (translatable using locallang.xlf).

5. Adding Custom Filters

You can easily extend the plugin by defining your own filters in TypoScript:

  1. Create a New Filter Add a new filter object under filters in your TypoScript setup. For example, if you want to filter by video quality, your configuration might look like this:

    filters {
        quality {
            label = LLL:EXT:sg_youtube/Resources/Private/Language/locallang.xlf:filter.quality
            partial = Filters/Dropdown
            filterClass = SGalinski\SgYoutube\Filter\QualityFilter
            position = top
            options {
                0 {
                    label = HD
                    value = hd
                }
                1 {
                    label = SD
                    value = sd
                }
            }
        }
    }
    
  2. Implement the Filter Logic You will need to define the corresponding PHP filterClass that handles the logic for applying the filter to the YouTube API request. For example, the QualityFilter class would process the selected video quality and add the appropriate parameters to the API request. It must implement the FilterInterface interface. The modifyRequest method is called before sending the reuqest, while the modifyResponse method is called after receiving the response.


6. Working with Filter Positions

You can choose where filters are displayed (above or below the video list) by setting the position attribute in the TypoScript configuration. This allows you to create a flexible layout for filters:

  • Filters with position = top will be displayed before the video list.
  • Filters with position = bottom will be displayed after the video list.

For example:

filters {
   searchTerm {
       position = top
   }
   duration {
       position = bottom
   }
}

7. Debugging and Error Handling

If something goes wrong (e.g., videos aren't displayed, or the API request fails), here are a few things to check:

  • Make sure the YouTube API key is correctly configured.
  • Check the TypoScript configuration for errors (e.g., missing or incorrect filter definitions).
  • Look for error messages in the TYPO3 backend log for issues related to the plugin.

8. Conclusion

With this flexible filter system, you can easily customize the YouTube video list based on user input. By defining filters in TypoScript and adding them to the plugin's FlexForm, you provide an interactive and tailored experience for your site's visitors.

If you need to add more filters, just extend the TypoScript configuration, create the necessary filter classes, and you're ready to go!

1.2 Vimeo

1.2.1 Vimeo Client ID and Client Secret

The TYPO3 extension for Vimeo videos needs a Vimeo Client ID and Client Secret to work correctly. We show you how to get the keys for the Vimeo API. We assume that you already have a Vimeo account and are logged in. If this is not the case, you have to register and/or log in to Vimeo beforehand (https://vimeo.com/).

You have already created a Vimeo App and only need Client ID and Client Secret for our TYPO3 Vimeo Extension? - Then go directly to the Apps on the Vimeo Developer page (https://developer.vimeo.com/apps). You can get there with the link just mentioned or via User Settings > API Apps. Click on the corresponding app and read out the necessary data as described in the following section.

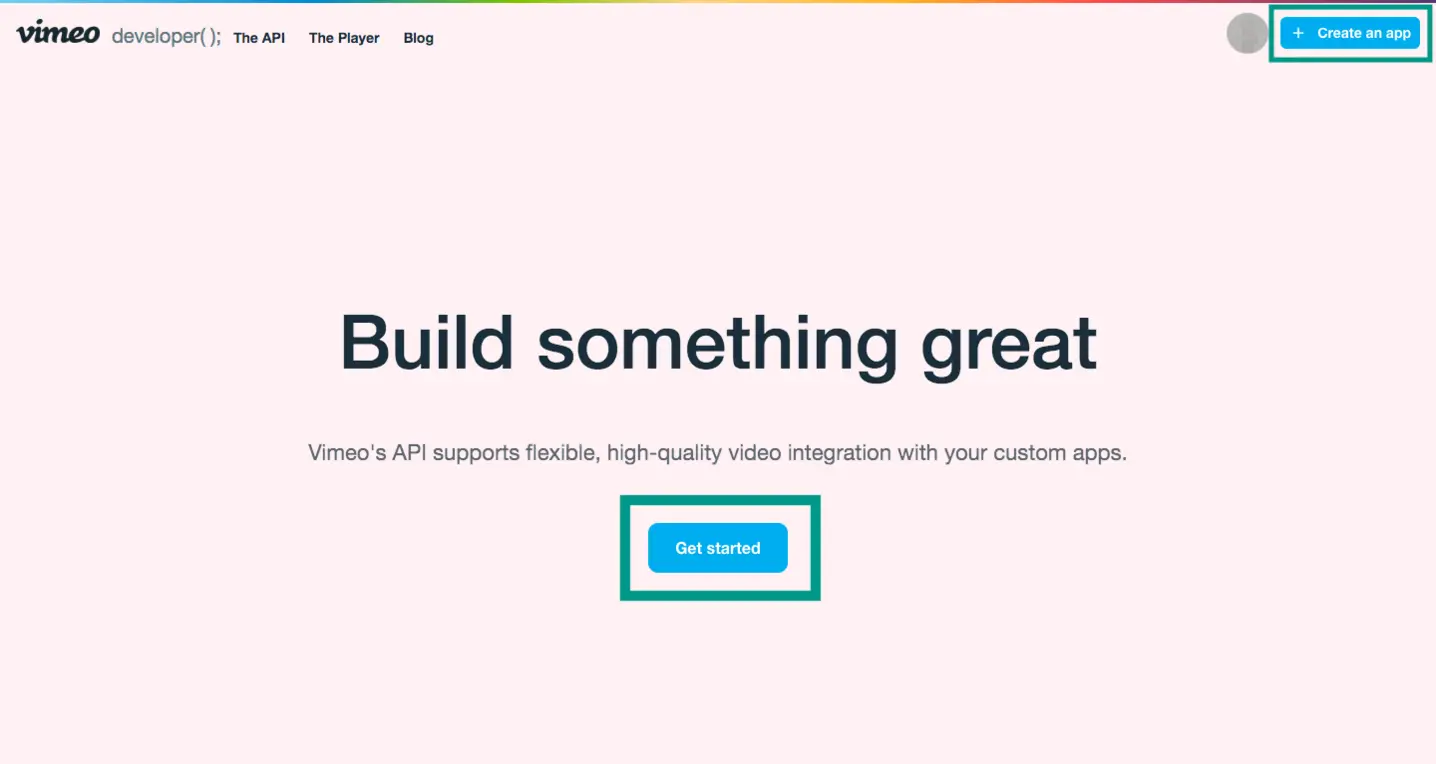
  • Go to the Vimeo Developer page: https://developer.vimeo.com/
  • Create an App: Click the Create an App or Get started button to create a new app.
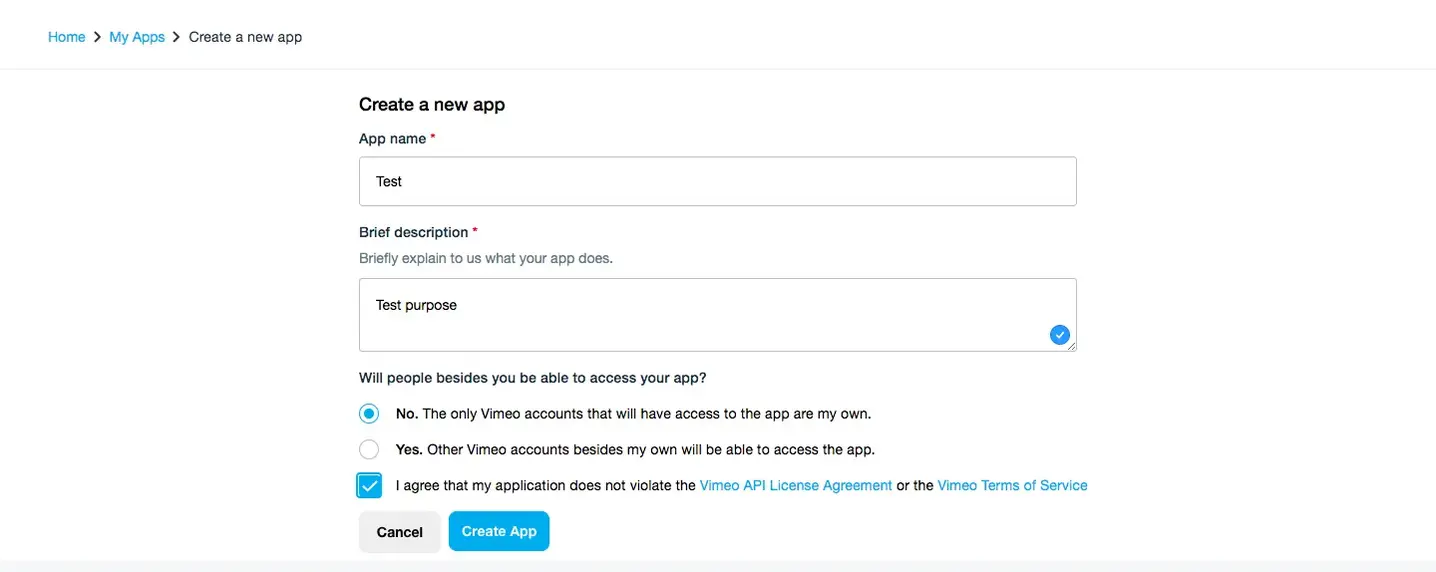
  • Enter the details of the app: Choose a name for the app and fill in the description. Select 'No. The only Vimeo accounts that will have access to the app are my own.' for the question 'Will people besides you be able to access your app?' Agree to the Vimeo API License Agreement and the Vimeo Terms of Use and click Create app.
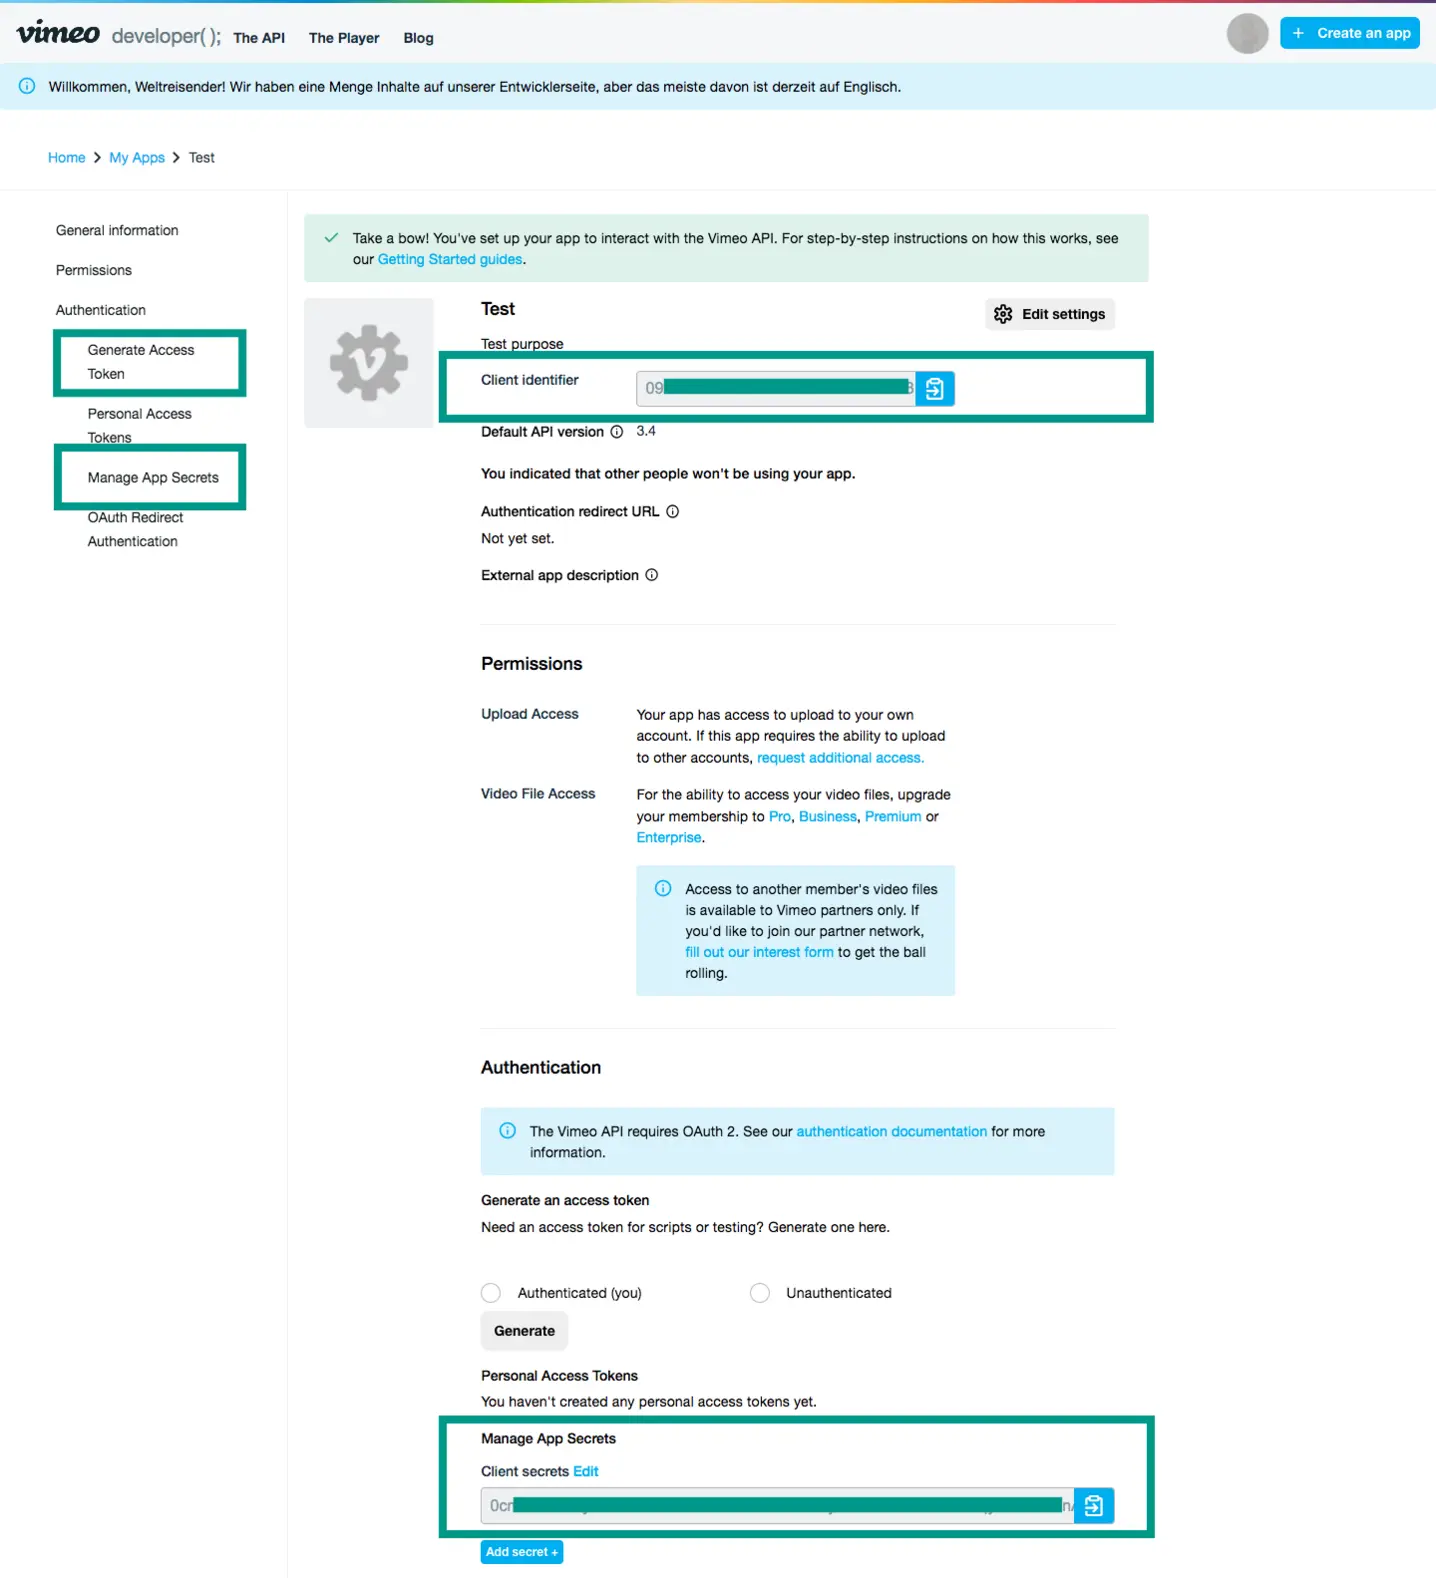
  • After creating the app, you will be taken directly to the overview of the app. There you will find the required data. On the left you will find a menu that allows you to jump directly to the desired item.
    • At the top of the information under General Information you will find the Client ID or the Client Identifier. You can copy this at any time or whenever necessary.
    • Under Manage App Secrets you will find the Vimeo Client Secret. You can also copy this at any time.

IMPORTANT: You must make sure that the account associated with the clientId and clientSecret API keys has the right permissions to search in the channel where the filters are being used. Otherwise searching for a query string will always result in an empty result set.


1.2.2 Vimeo Personal Access Token

If you want to show a Vimeo video on your website that is not publicly available, you need a Personal Access Token. Follow these steps to create a personal access token.

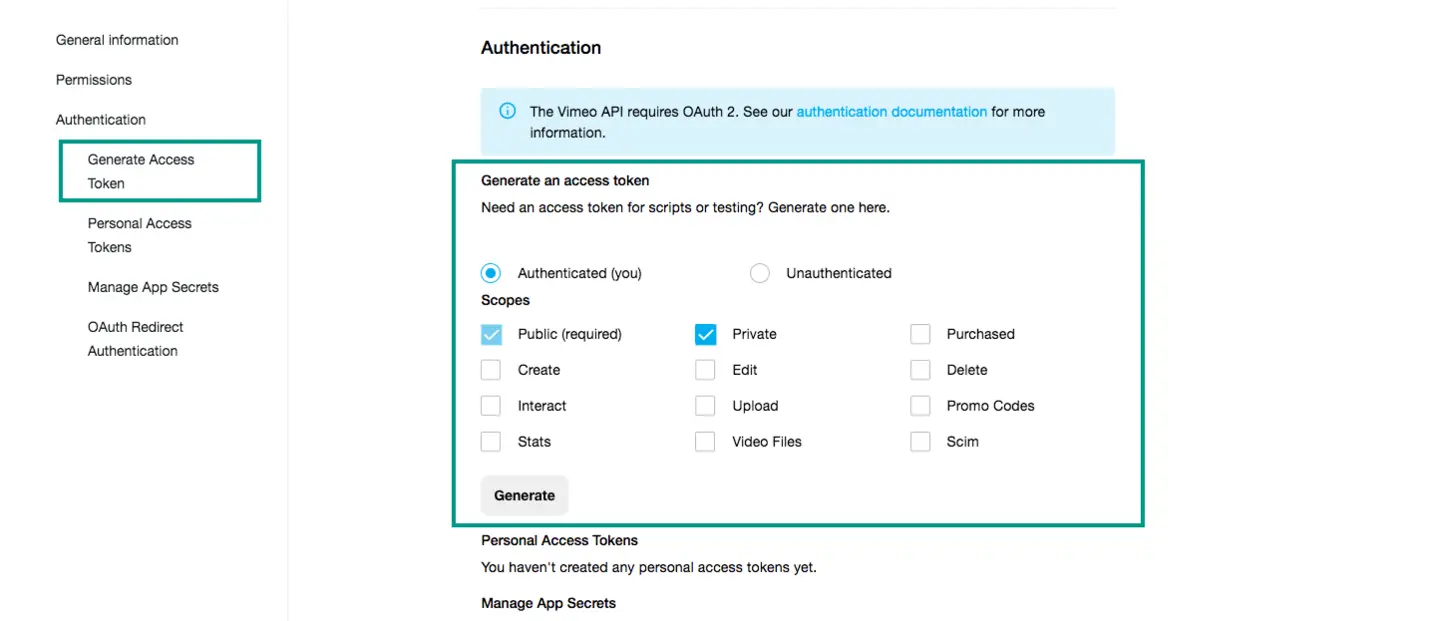
  • Click Generate Access Token in the menu on the left. Select the 'Authenticated (you)' checkbox. Then select under Scopes: 'Public (required)' and 'Private'. This ensures long-term access to the data, you can read more about this on the Vimeo page on authentication: https://developer.vimeo.com/api/authentication. Click Generate.
  • The personal access token now appears in the menu under Personal Access Token. You should copy this token and treat it like a password.

Note: As soon as you leave the page and/or reload it, you will no longer be able to copy the access token. It will be unrecognizable afterwards. However, it is always possible to create a new personal access token for a Vimeo app or to delete it.

Read more about the process of creating a Vimeo Personal Access Token in the official Vimeo documentation, at: https://help.vimeo.com/hc/en-us/articles/12427789081745-How-do-I-generate-a-personal-access-token

Enter the Vimeo Keys in the place as described in the TypoScript Integration section of the documentation below.

1.2.3 Vimeo TYPO3 Extension: Installation & Integration

Ext: sg_vimeo

License: GNU GPL, Version 2

Repository: https://gitlab.sgalinski.de/typo3/sg_vimeo

Please report bugs here: https://gitlab.sgalinski.de/typo3/sg_vimeo

Installation / Integration

First install the extension and activate it in the Extension Manager.

Vimeo app

TypoScript integration

  • Include the TypoScript in Configuration/TypoScript/setup.typoscript and constants.typoscript in your theme.
  • Add your Vimeo client identifier & client secret (and optionally your personal access token):
plugin.tx_sgvimeo {
	settings {
		# cat=plugin.tx_sgvimeo/file; type=string; label=Vimeo client identifier
		clientId = <your-client-id>
		# cat=plugin.tx_sgvimeo/file; type=string; label=Vimeo client secret
		clientSecret = <your-client-secret>
		# cat=plugin.tx_sgvimeo/file; type=string; label=Vimeo Personal access token
		personalAccessToken =
	}
}

Private videos

If you have a video which is not available to the public, but you want to show it on your website, you need an authenticated personal access token. You can find a guide, on how to generate such a token here: https://vimeo.zendesk.com/hc/en-us/articles/360042445032-How-do-I-generate-a-personal-access-token-

The following requirements have to be met, for the private video to show up:

  • the video has to be hosted on the same vimeo account, that was used to configure the clientSecret & clientId (vimeo app)
  • a personal access token with access scope "private" has to be configured in the typoscript settings ( personalAccessToken)

Working with Rate Limits

As with almost every API, there is a usage limit, which depends on the vimeo user membership of the user, that makes the API requests (the owner of the vimeo app).

sg_vimeo uses the following endpoints:

  • Video - api.vimeo.com/videos/{video_id}
  • Channel Videos - api.vimeo.com/channels/{channel_id}/videos

sg_vimeo uses field filtering to request only the fields that are needed.

Caching behaviour

Because of the quota costs, we implemented a caching for the calls for each day. The response from the APIs will be saved and used for 24 hours. Normally, the site cache would do it, but it could be, that the cache will be cleared multiple times in a row, or that the plugin is on an uncached page. The TYPO3 registry is used as a cache. The cleanup is handled on the fly.

If the ?disableVimeoCache=1 parameter is added to the URL, this cache will be ignored as well.

.htaccess - Content-Security-Policy

Requires img-src https://i.vimeocdn.com;, script-src https://player.vimeo.com;.

Making changes in JavaScript/CSS

We are shipping the extension with source files and already minified assets. By default, we the minified assets are loaded in the Layout, so that the extension works out of the box just with plug and play. Should you want to change this behavior, you can do the following:

  • Override the layout path in TypoScript local/project_theme/Configuration/TypoScript/Extensions/SgVimeo/Constants.typoscript
plugin.tx_sgvimeo {
	settings {
		clientId = MY_CLIENT_ID
		clientSecret = MY_CLIENT_SECRET
	}

	view {
		layoutRootPath = EXT:project_theme/Resources/Private/Layouts/SgVimeo/
	}
}

  • Create a new layout file omitting the assets that you would like to change (for example, loading without CSS)
<div class="tx-sg-vimeo">
	<f:asset.script identifier="sgVideoJs" src="EXT:sg_vimeo/Resources/Public/JavaScript/Dist/main.bundled.min.js" />
	<f:render section="main"/>
</div>

  • Import the CSS or JavaScript source files in your respective asset pipeline and add them externally.

Compiling CSS/JS assets with SGC

  • Install the sgalinski/sgc-core library via composer
  • Add the sg-vimeo extension paths in the .sgc-config.json
  • Remove the loading of the compiled CSS/JS assets from Resources/Private/Templates/Vimeo/Index.html
  • Add import the scss and js module file in the corresponding main.scss and main.js
  • Initialize the javascript modules in your main.js: new SgVideoLightbox(); SgVideo.initDefault();
  • If you want to recompile the JS with SGC, you must add excludeFromQa: ['!**/Backend/**/*'] to your .sgc-config.js and also set your main extension in extensions to sg-vimeo extensions: ['sg-vimeo']

Compiling SASS only without SGC

Example:

npm install -g sass npx sass ./Resources/Public/Sass/Bootstrap5/main.scss ./Resources/Public/StyleSheets/Bootstrap5/main.min.css --style compressed --no-source-map

Using the Bootstrap 5 templates

If you want to use the Bootstrap 5 templates, you have to first install Bootstrap 5 in your theme to use its styles and JavaScript. Afterwards simply set the plugin.tx_project_theme.config.bootstrapVersion TypoScript setup variable to 5.

Using Events to Customize Vimeo API Results in TYPO3

This documentation explains how to leverage custom events in your TYPO3 extension to manipulate the results of Vimeo API calls. By using these events, you can modify the API parameters, filter results, and further customize the JSON data returned from Vimeo.

Available Events

The following events are dispatched in the Vimeo video rendering process:

  1. BeforeVimeoCallEvent
  2. AfterVimeoCallEvent
  3. AfterFilterVideosEvent
  4. AfterMapCustomThumbnailsEvent

Event Listeners

1. BeforeVimeoCallEvent

Description: This event is triggered before making the Vimeo API call, allowing you to modify the API parameters.

Example Use Case: Change API Key or manipulate other paramters
<?php

namespace Vendor\Extension\EventListener;

use SGalinski\SgVimeo\Event\BeforeVimeoCallEvent;

class BeforeVimeoCallEventListener
{
    public function __invoke(BeforeVimeoCallEvent $event): void
    {
        // Change the API key
        $event->setApiKey('your-new-api-key');
        // Extend the max results limit by 10 videos
        $event->setMaxResultsWithFilters($event->getMaxResultsWithFilters() + 10);
    }
}

2. AfterVimeoCallEvent

Description: Add Custom Data to JSON Array

Example Use Case: Change API Key or manipulate other paramters
<?php
namespace SGalinski\SgVimeo\EventListeners;

use SGalinski\SgVimeo\Event\AfterVimeoCallEvent;

class AfterVimeoCallEventListener
{
	public function __invoke(AfterVimeoCallEvent $event): void
	{
        $response = $event->getResponse();
		// Add custom data
		$response['customData'] = 'This is some custom data';
		$event->setResponse($response);
	}
}

3. AfterFilterVideosEvent

Description: This event is triggered after the videos have been filtered, allowing you to further manipulate the filtered results.

Example Use Case: Remove the 10 videos that we added initially with the first event
<?php
namespace SGalinski\SgVimeo\EventListeners;

use SGalinski\SgVimeo\Event\AfterFilterVideosEvent;

class AfterFilterVideosEventListener
{
	public function __invoke(AfterFilterVideosEvent $event): void
	{
		// Modify the response if needed
		$response = $event->getResponse();
		// Add some custom processing here
		// For example let's remove the extra 10 videos that we added in the other event
		if (count($response['items']) > 10) {
			array_splice($response['items'], 0, 10);
		}
		$event->setResponse($response);
	}
}

4. AfterMapCustomThumbnailsEvent

Description: This event is triggered after custom thumbnails have been mapped, allowing you to modify the JSON array one last time before rendering.

Example Use Case: Use a custom thumbnail for all videos in the list
<?php
namespace SGalinski\SgVimeo\EventListeners;

use SGalinski\SgVimeo\Event\AfterMapCustomThumbnailsEvent;

class AfterMapCustomThumbnailsEventListener
{
    public function __invoke(AfterMapCustomThumbnailsEvent $event): void
    {
        $response = $event->geRresponse();
        // Add a custom thumbnail URL
        foreach ($response['items'] as &$item) {
            $item['customThumbnail'] = 'https://example.com/custom-thumbnail.jpg';
        }
        $event->setResponse($response);
    }
}

To enable the events just register them in your Services.php as follows (you can use yaml instead if you prefer):

$services->set(BeforeVimeoCallEventListener::class)
    ->tag('event.listener', ['event' => BeforeVimeoCallEvent::class]);
$services->set(AfterVimeoCallEventListener::class)
    ->tag('event.listener', ['event' => AfterVimeoCallEvent::class]);
$services->set(AfterFilterVideosEventListener::class)
    ->tag('event.listener', ['event' => AfterFilterVideosEvent::class]);
$services->set(AfterMapCustomThumbnailsEventListener::class)
    ->tag('event.listener', ['event' => AfterMapCustomThumbnailsEvent::class]);

Usage in non-composer mode (Classic, Legacy)

This extentension has depdendencies from 3rd party sources that we import through composer. Should you have an installation in legacy mode (non-composer), we need to import these libraries. For this purpose we have the Libraries/ directory where we put the dependencies as PHAR files. You can check how they are used in Services/VimeoService.php.

If the dependencies are updated in composer though, we need to regenerate the PHAR file and commit it again. For this we first pull the new version with composer and then we need to create the PHAR archive by using the following PHP code:

<?php

$pharFile = __DIR__ . '/../sg_vimeo.phar';

// Remove previous PHAR file if it exists
if (file_exists($pharFile)) {
    unlink($pharFile);
}

$phar = new Phar($pharFile);
$phar->startBuffering();

// Add your extension's files
$phar->buildFromDirectory(__DIR__ . '/../sg_vimeo');

// Optionally, add files from the vendor directory
$phar->buildFromDirectory(__DIR__ . '/../sg_vimeo');

// Optionally, set the default stub to load an entry script
$stub = <<<EOD
<?php
Phar::mapPhar();
require 'phar://' . __FILE__ . '/Classes/Main.php';
__HALT_COMPILER();
EOD;

$phar->setStub($stub);

// Stop buffering and save the PHAR file
$phar->stopBuffering();

echo "PHAR file created successfully!";

Once it runs it will create the file and we can commit the new version and use it.

Setting Up the Frontend Filers

Step 1: Adding the Plugin to a Page

  1. In the TYPO3 backend, create or edit the page where you want to display Vimeo videos.
  2. Add a new content element and select the Vimeo plugin from the list.
  3. Provide the necessary Vimeo details in the plugin settings (like Vimeo API key, video/channel/playlist ID, max results, etc.).

Step 2: Disable caching for the extension and Cache validation for your web page

  1. In the TYPO3 backend, go to Settings -> Extensions and open the sg_vimeo settings. Tick the box that says 'uncached' and save.
  2. This way the the extension will not cache the results and the the data will be loaded dynamically based on the filter settings
  3. Set $GLOBALS['TYPO3_CONF_VARS']['FE']['cacheHash']['enforceValidation'] = false in your TYPO3 configuration, otherwise using the frontend filters may result in a 404 page in some instances.

Step 3: Configuring Filters via FlexForm

  1. In the plugin's FlexForm settings, you will see a section for "Filters."
  2. Depending on your site configuration, filters will be available in a select field. You can select the filters you want to display (like search term, video duration, etc.).
  3. Save your settings and publish the page.
  4. IMPORTANT! You must make sure that the user associated with the clientId and clientSecret API keys has the right permissions to search in the channel where the filters are being used. Otherwise searching for a query string will always result in an empty result set.

3. Using Filters in the Frontend

Once filters are enabled, they will appear on the frontend in a form, allowing users to interact with the displayed videos dynamically. For example:

  • Search Term: Allows users to input a search term to filter videos based on keywords.
  • Duration Filter: Provides a dropdown to filter videos by length (short, medium, long, etc.).

The filter values are sent to the Vimeo API, and the video list updates based on the selected criteria.


4. TypoScript Configuration for Filters

To define custom filters, the plugin uses TypoScript. Below is an example configuration and an explanation of each section:

Example TypoScript Configuration

filters {
	searchTerm {
		label = LLL:EXT:sg_vimeo/Resources/Private/Language/locallang.xlf:filter.searchTerm
		partial = Filters/TextField
		filterClass = SGalinski\SgVimeo\Filter\QueryStringFilter
		defaultValues {
#			search = test
		}
		position = top
	}
	duration {
		label = LLL:EXT:sg_vimeo/Resources/Private/Language/locallang.xlf:filter.duration
		partial = Filters/Dropdown
		filterClass = SGalinski\SgVimeo\Filter\DurationFilter
		position = top
		options {
			0 {
				label = LLL:EXT:sg_vimeo/Resources/Private/Language/locallang.xlf:filter.duration.0
				value = 1
			}
			1 {
				label = LLL:EXT:sg_vimeo/Resources/Private/Language/locallang.xlf:filter.duration.1
				value = 2
			}
		}
	}
}

submitButton {
	position = top
	cssClass = btn btn-default
	label = LLL:EXT:sg_vimeo/Resources/Private/Language/locallang.xlf:filter.submitButton
}

Explanation of the Configuration

filters

This TypoScript object defines all the available filters for the Vimeo plugin. Each filter is a separate sub-object, like searchTerm and duration in the example.

Filter Fields

  1. searchTerm (Text Field)

    • label: The label for the filter form field. This can be translated using the TYPO3 language file (locallang.xlf).
    • partial: Specifies which partial file to use for rendering the filter. In this case, it points to a text field (Filters/TextField).
    • filterClass: This is the PHP class responsible for processing the filter and applying it to the Vimeo API request. For the searchTerm, it's a QueryStringFilter.
    • defaultValues: You can specify default values for the filter (commented out in the example).
    • position: Defines where the filter should be displayed on the page. It can be top (above the video list) or bottom (below the video list).
  2. duration (Dropdown)

    • label: The label for the filter form field.
    • partial: Points to a dropdown partial (Filters/Dropdown).
    • filterClass: This is the PHP class responsible for processing the filter. For duration, it's DurationFilter.
    • options: This section defines the options for the dropdown, each with a label (for the user to see) and a value (sent to the API).
    • position: Indicates where the filter should be displayed on the page.

submitButton

  • Defines the configuration for the submit button:
    • position: Determines where the submit button is placed in the form (top in this case). It accepts top, bottom or both
    • cssClass: Adds CSS classes for styling the button.
    • label: Provides the text for the submit button (translatable using locallang.xlf).

5. Adding Custom Filters

You can easily extend the plugin by defining your own filters in TypoScript:

  1. Create a New Filter Add a new filter object under filters in your TypoScript setup. For example, if you want to filter by video quality, your configuration might look like this:

    filters {
        quality {
            label = LLL:EXT:sg_vimeo/Resources/Private/Language/locallang.xlf:filter.quality
            partial = Filters/Dropdown
            filterClass = SGalinski\SgVimeo\Filter\QualityFilter
            position = top
            options {
                0 {
                    label = HD
                    value = hd
                }
                1 {
                    label = SD
                    value = sd
                }
            }
        }
    }
    
  2. Implement the Filter Logic You will need to define the corresponding PHP filterClass that handles the logic for applying the filter to the Vimeo API request. For example, the QualityFilter class would process the selected video quality and add the appropriate parameters to the API request. It must implement the FilterInterface interface. The modifyRequest method is called before sending the reuqest, while the modifyResponse method is called after receiving the response.


6. Working with Filter Positions

You can choose where filters are displayed (above or below the video list) by setting the position attribute in the TypoScript configuration. This allows you to create a flexible layout for filters:

  • Filters with position = top will be displayed before the video list.
  • Filters with position = bottom will be displayed after the video list.

For example:

filters {
   searchTerm {
       position = top
   }
   duration {
       position = bottom
   }
}

7. Debugging and Error Handling

If something goes wrong (e.g., videos aren't displayed, or the API request fails), here are a few things to check:

  • Make sure the Vimeo API key is correctly configured.
  • Check the TypoScript configuration for errors (e.g., missing or incorrect filter definitions).
  • Look for error messages in the TYPO3 backend log for issues related to the plugin.

8. Conclusion

With this flexible filter system, you can easily customize the Vimeo video list based on user input. By defining filters in TypoScript and adding them to the plugin's FlexForm, you provide an interactive and tailored experience for your site's visitors.

If you need to add more filters, just extend the TypoScript configuration, create the necessary filter classes, and you're ready to go!


1.3 Add license key

To use our extensions, you need a license key. You can purchase the licenses for our products in the sgalinski online shop.  You enter the purchased license key(s) for the video extensions in the backend module Settings under Extension Configuration in sg_youtube or sg_vimeo.


2 Editorial documentation: Plugin content elements

YouTube

With the YouTube plugin, YouTube videos can be easily integrated without downloading videos and uploading them again in the system. In addition, the content element has various options that can be used to customize the display and behavior of the videos.

Tab Plugin

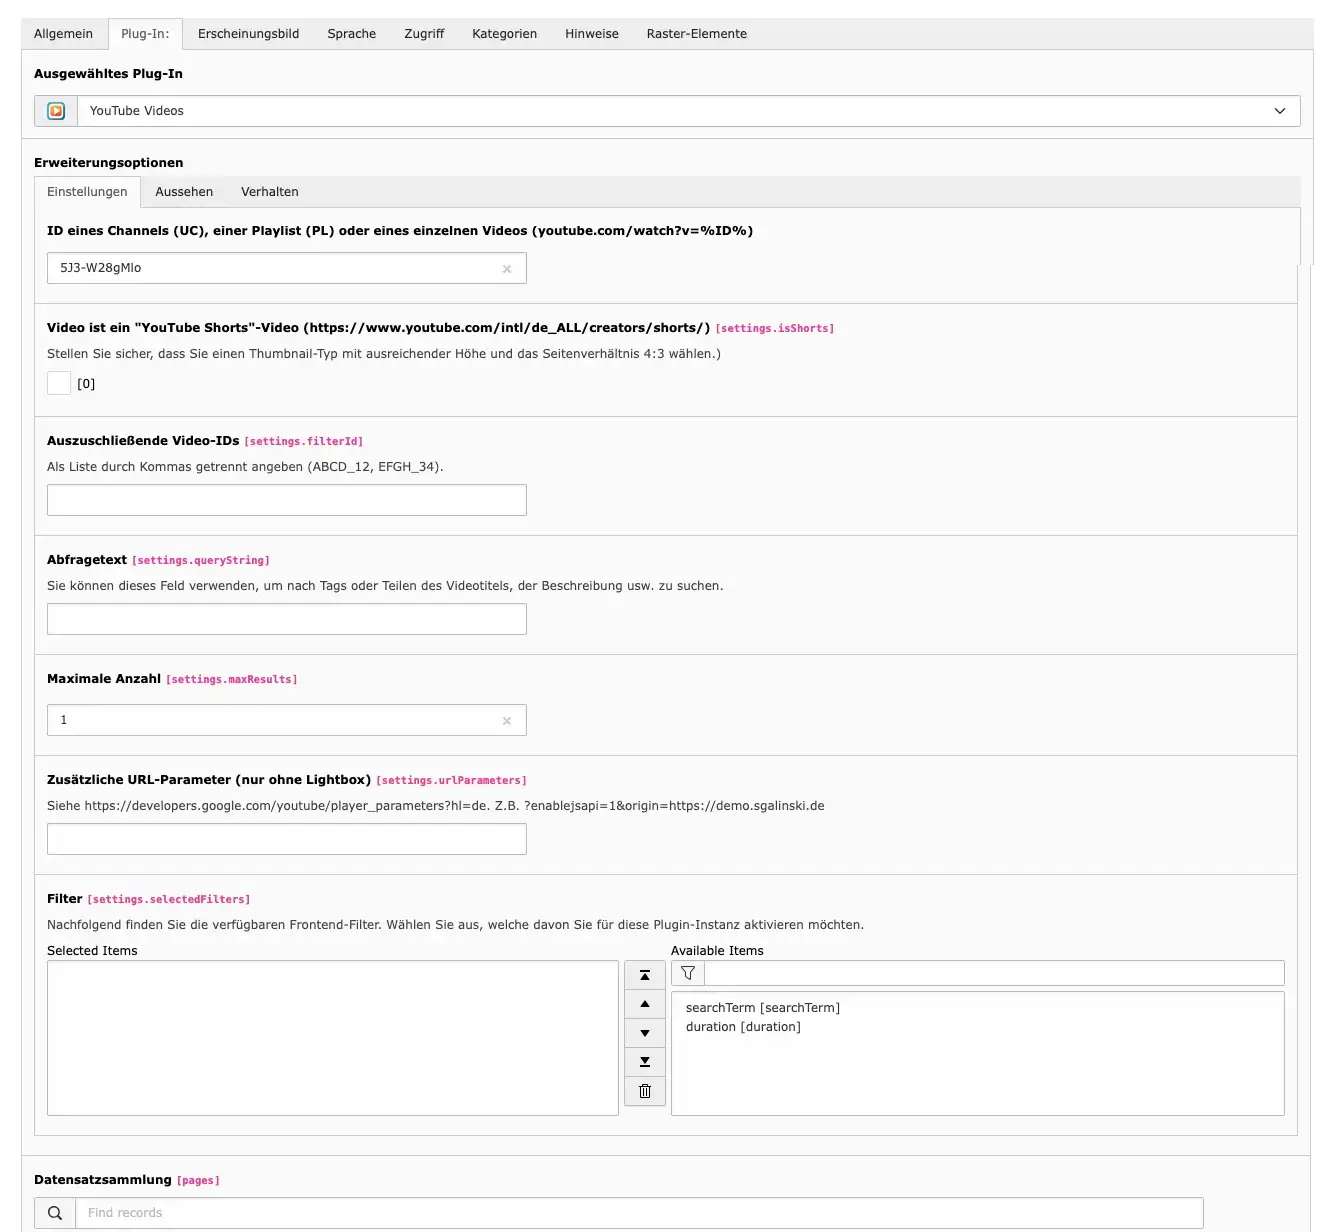
Settings

ID of Channel, Playlist or Single Video

Enter the ID of the channel, playlist or a single YouTube video here. If you want to enter multiple IDs, enter them separated by commas (ABCD_12, EFGH_34). In the YouTube IDs section we show where you can find the IDs.

Video is a “YouTube Shorts” video

Our video extension also allows you to use YouTube Shorts. To do this, you must activate the checkbox. Also make sure that you use a thumbnail type with a high resolution in the Appearance tab and select the 4:3 aspect ratio. If you use custom thumbnails, the images should have a ratio of 9:16.

IDs of the videos to exclude

If you do not want to show certain videos of a playlist or channel on your website, you can exclude them here. To do this, enter the corresponding IDs one after the other, separated by a comma (ABCD_12, EFGH_34).

Query string

This field can be used if, for example, you do not want to include all videos of an entire channel, but only those with specific content, topics or tags. To do this, enter the desired terms separated by commas.

Maximum Amount

Decide the maximum number of videos to display and enter the desired number. Please note that some layouts only work with or above a certain number of videos (see Layout type at the 'Appearance' section).

Additional URL parameters

For further customization of the embedded videos you can use YouTube Player parameters. The parameters work only when videos are played directly on the page. For more information, see: https://developers.google.com/youtube/player_parameters?hl=de.

Filters

If you integrate a particularly large number of videos, filters can be useful. Depending on the configuration, various filters are available to you in the right-hand field. Click on the desired filter(s). These now appear in the left-hand field and are displayed in a form after saving in the frontend so that users can interact dynamically with the displayed videos, e.g:

  • Search term: Allows users to enter a search term to filter videos by keywords.
  • Duration filter: Provides a drop-down menu to filter videos by length (short, medium, long, etc.).

The filter values are sent to the YouTube API and the video list is updated based on the selected criteria.

IMPORTANT: Follow these two steps if you want to use filters!

  1. In the TYPO3 backend, go to the Settings module (Admin tools section) and click Configure extensions. Click on sg_youtube, check the uncached checkbox and save. This way the extension will not cache the results and the data will be loaded dynamically based on the filter settings.
  2. Furthermore, you must deactivate the TYPO3 cHash parameter validation in your configuration and set $GLOBALS['TYPO3_CONF_VARS']['FE']['cacheHash']['enforceValidation'] = false.

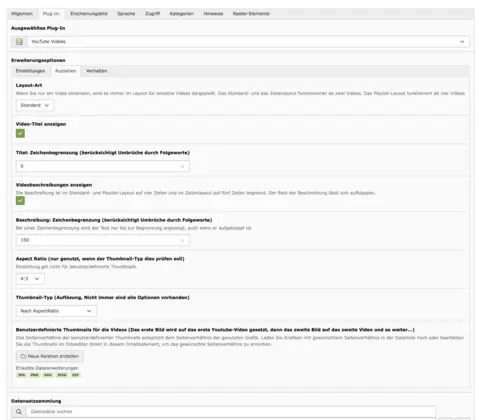
Appearance

Layout Style

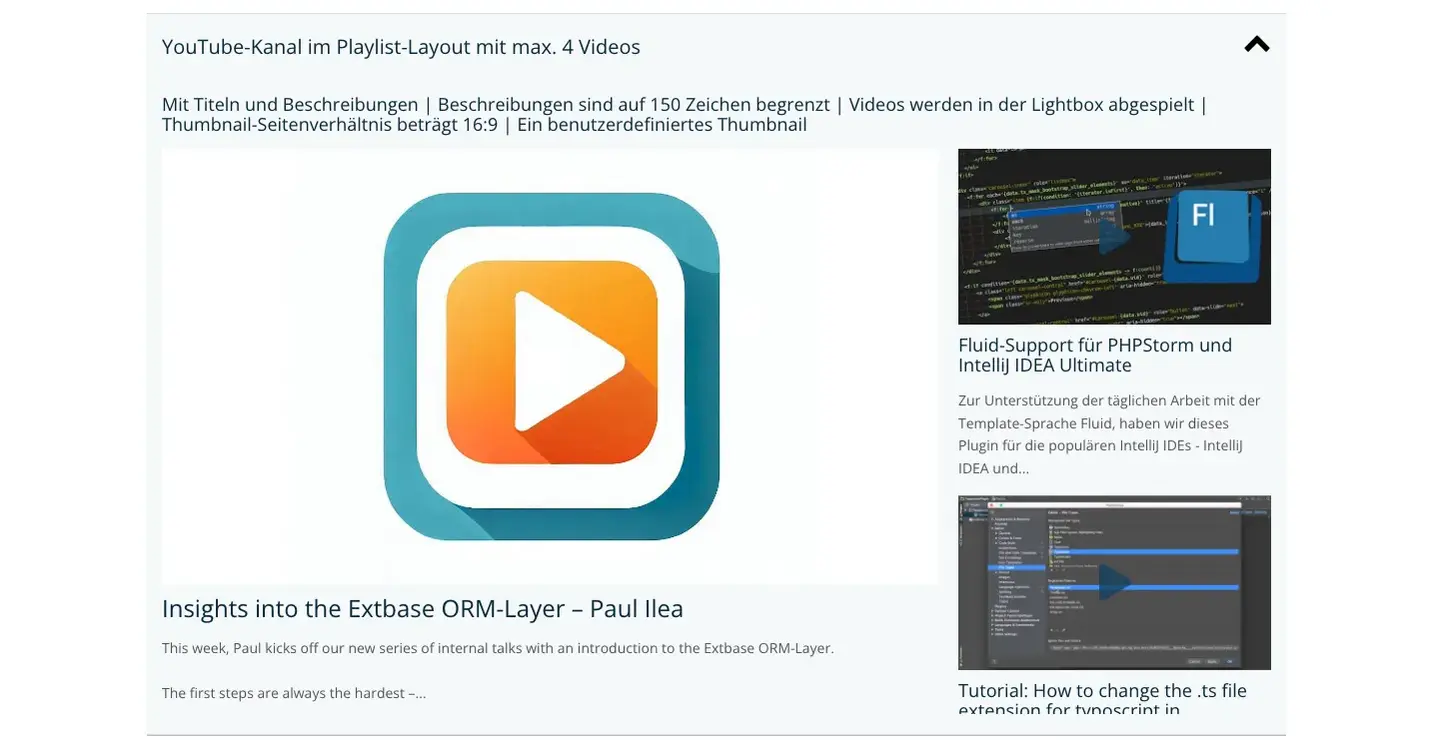
You can select the standard, row or playlist layout. There is also the single video layout, which is used automatically when you embed only one video. It's also important to note that the standard and row layouts work with two or more videos, and the playlist layout works with four or more videos. We present how these look on our preview page.

Show Videos Titles & Show Video Descriptions

These checkboxes allow you to specify whether to show titles or descriptions of the video. If you don't show titles and/or descriptions, you don't need to set a character limit.

Character limit for title & description

Titles and descriptions of videos can be of different length, that's why you can set a character limit for title and description. The plugin will not stop in the middle of the word, but will consider whole words. By default, the value '0' (zero) is entered, with this setting there is no limit to the number of characters.
Regardless of the number of characters, the lines of the description are limited: four lines for the single video, standard and playlist layout, and five lines for the row layout. In the frontend, the rest of the description can be expanded using a button. Also note that if the description has a character limit, the text is always shown only up to the limit, even if you expand it.

Aspect Ratio

Specify the aspect ratio. The setting is only used when the thumbnail type should check it. This setting does not affect the aspect ratio of the custom thumbnails.

Thumbnail Type

Set the resolution from maximum to low. Not all options are always available.

Custom Thumbnails for the Videos

It is also possible to set your own thumbnail images for YouTube videos. The first image is placed over the first video, the second image is placed over the second video, and so on.
The aspect ratio of custom thumbnails is the same as the aspect ratio of the used image. Upload images with desired aspect ratio in the file list or edit the thumbnails in the photo editor directly in this content item to achieve the desired aspect ratio.

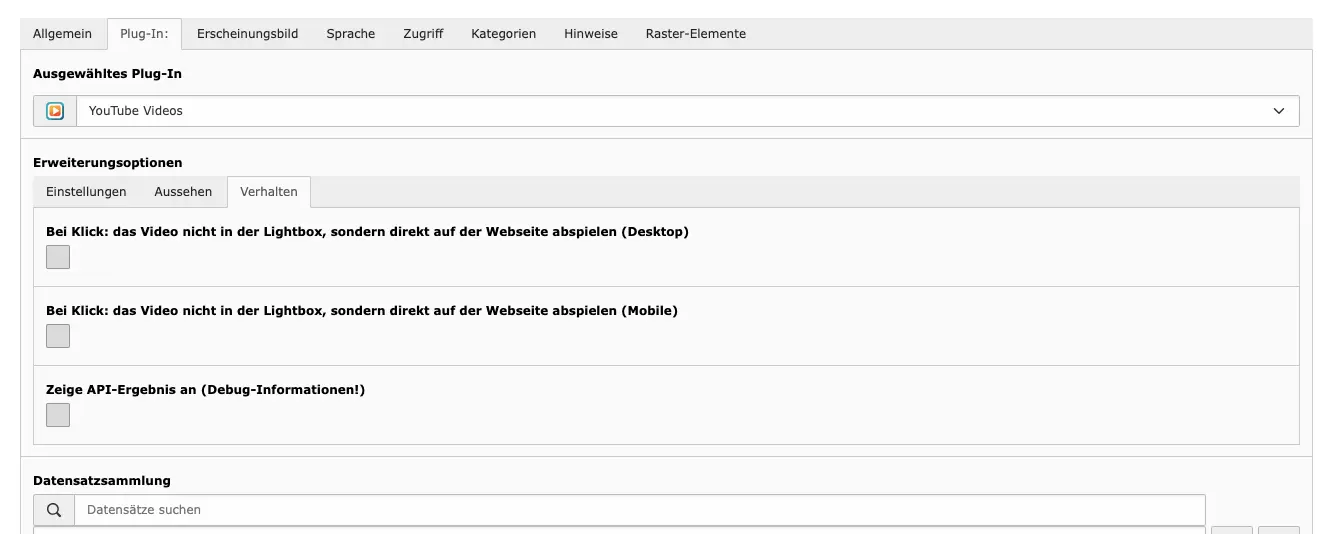
Behavior

Play video not in the lightbox, but directly on the web page

By default, a video is played in a lightbox. You can specify here to play videos directly on the page.

Show API Result

Specify whether debug information should be displayed.

YouTube IDs

YouTube Channel ID

There are several ways to find out the channel ID, as through the URL the ID is no longer visible for some time. If it is the ID of your own YouTube channel, you can find the letters and number sequence in the advanced settings of the account. You can find instructions from Google on how to do this.

If you need the channel ID of any YouTube channel, you need to open the desired channel in YouTube. Click on 'more' in the channel description and then click on Share channel in the window that appears. There you will find the option 'Copy channel ID'. You can then paste the copied ID into the YouTube extension.

You then simply paste the channel ID into the plug-in and make any other settings you need.

ID of YouTube Playlist

To add a playlist ID, copy from the playlist link everything that comes after list= and paste it into line for the ID.

  • Playlist-Link: www.youtube.com/watch?v=rrVDATvUitA&list=PLmhUZw8WWzebYTvtVWHkb_YMgKARy6UON
  • Playlist-ID: PLmhUZw8WWzebYTvtVWHkb_YMgKARy6UON
ID of YouTube Video

To add a video ID, copy from the link of the video everything that comes after watch?v= and paste it into line for the ID.

  • Video-Link: www.youtube.com/watch?v=IBAhAk0-sPo
  • Video-ID: IBAhAk0-sPo

Content Area

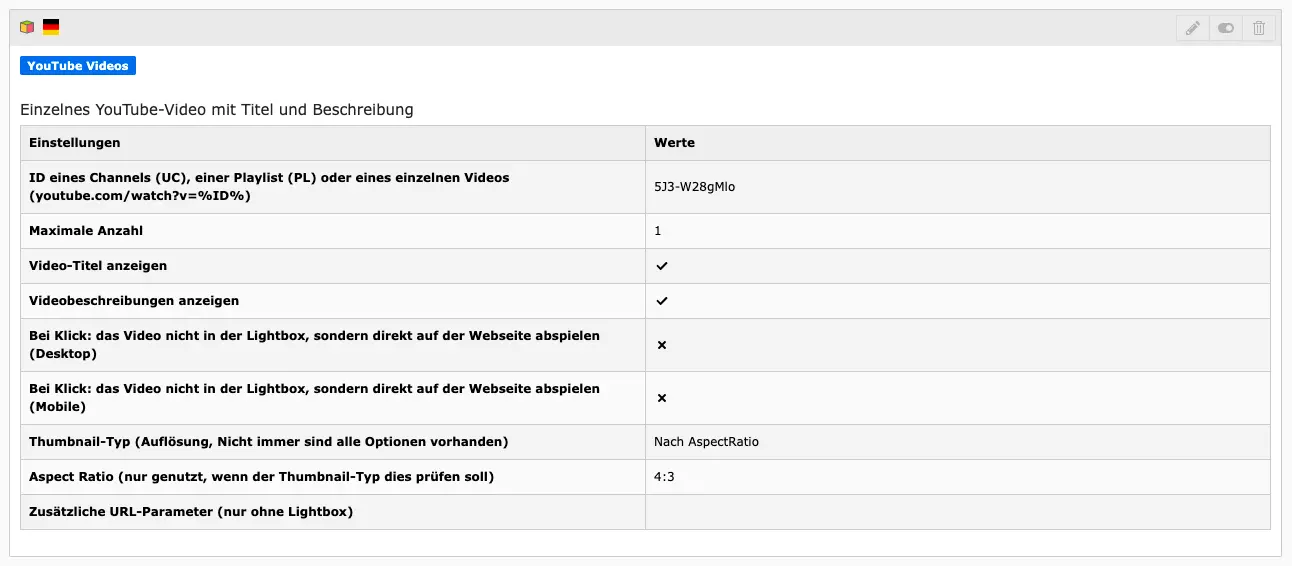
In the content area you will see an overview of the settings you have made in the YouTube plugin.

YouTube in Frontend

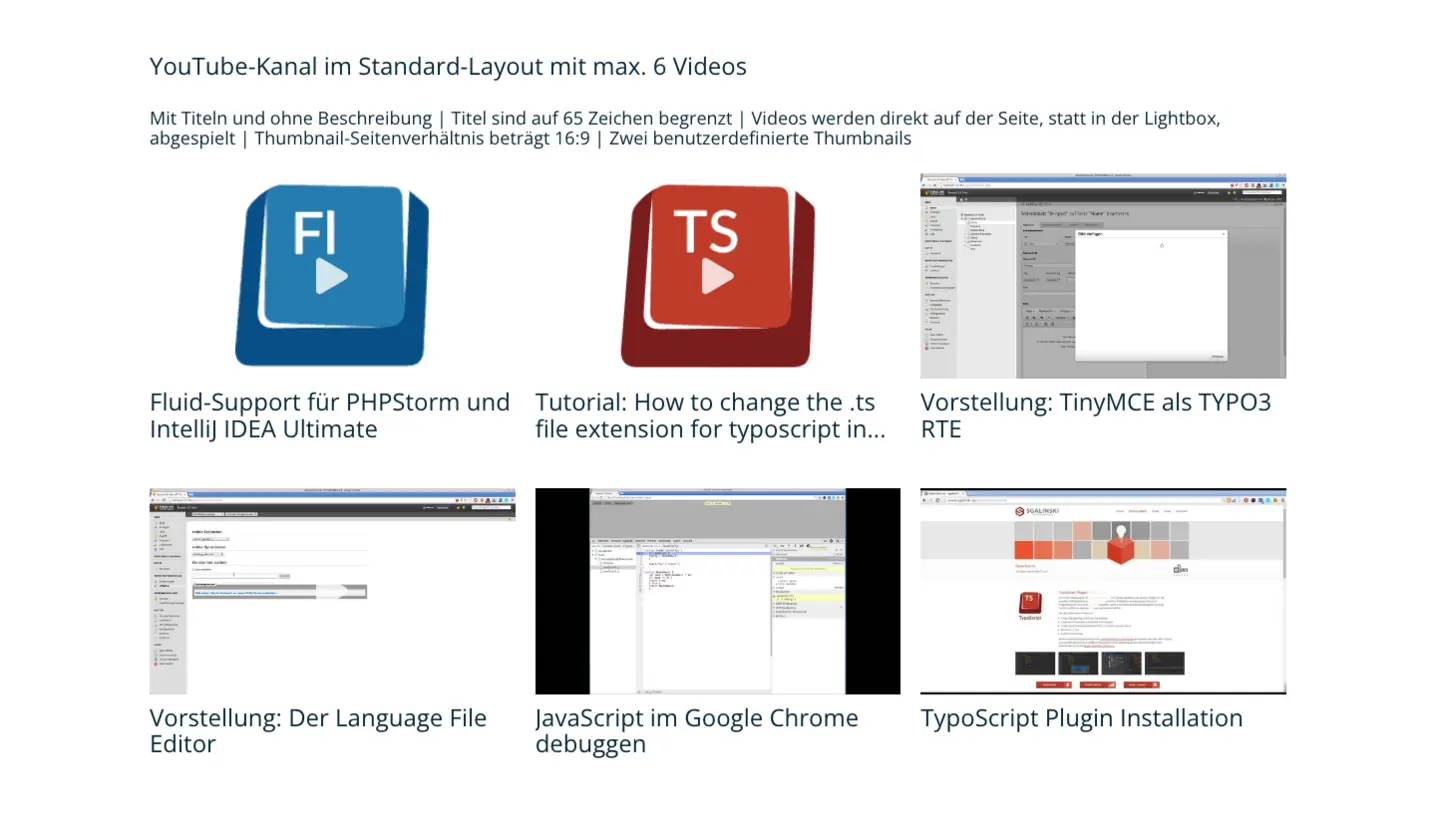
Depending on the settings chosen in the plugin, videos, playlists and channels can look very different. On our preview page you can see some examples showing how different settings affect the look in the frontend.

Vimeo

With the Vimeo plugin, Vimeo videos can be displayed on a TYPO3 page without having to download videos and upload them again in the system. Also, like the YouTube plugin, the content element has various options that allow you to customize the appearance and behavior of the videos.

Tab Plugin

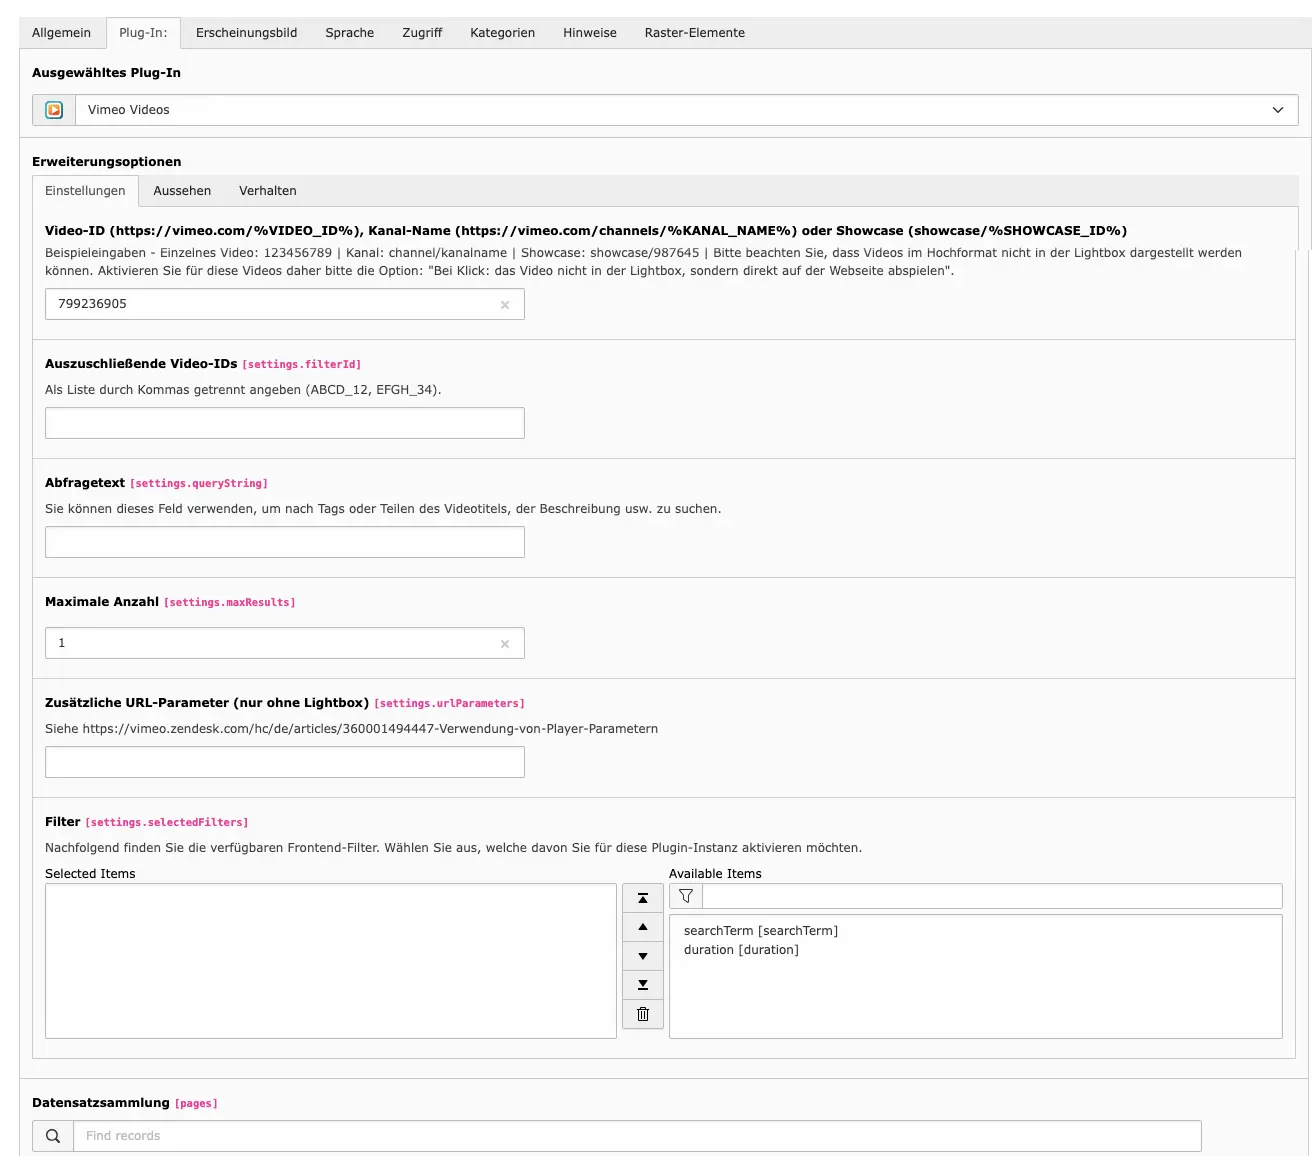
The following options are available. These are similar to the options for the YouTube plugin. When editing the Vimeo content element, you can therefore follow the YouTube instructions.

Settings

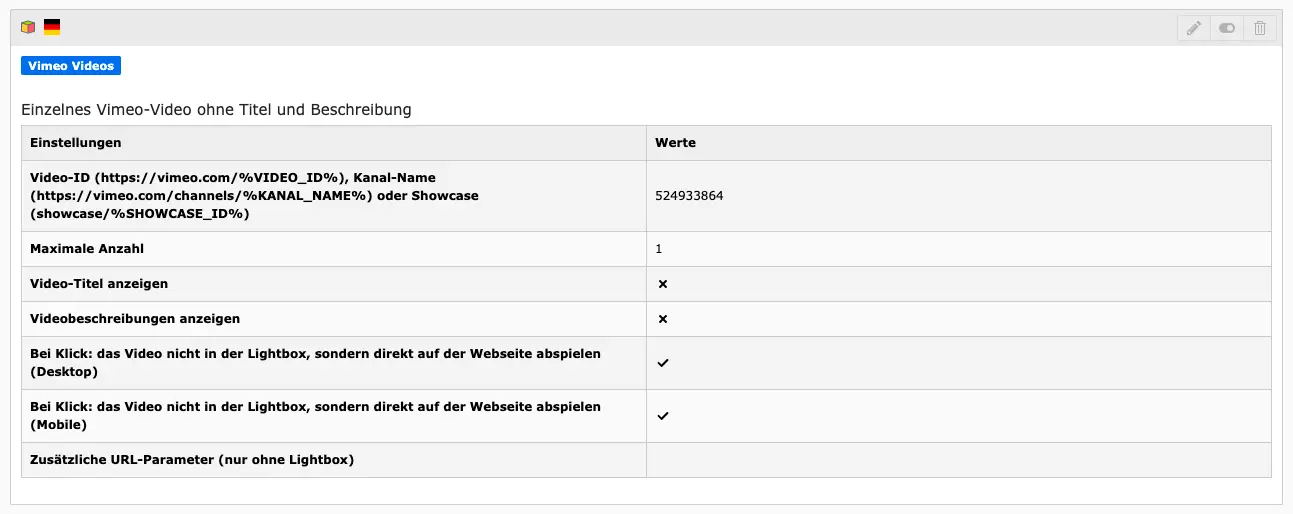
  • Video ID, channel name, showcase: In the Vimeo IDs section we show where to find the IDs.
  • IDs of the videos to exclude
  • Query string
  • Maximum Amount
  • Additional URL parameters: As with YouTube, you can use parameters for further customization. This only works when videos are played directly on the page. You can find more information about parameters at: https://help.vimeo.com/hc/en-us/articles/12426260232977-Player-parameters-overview.
  • Filters

Appearance

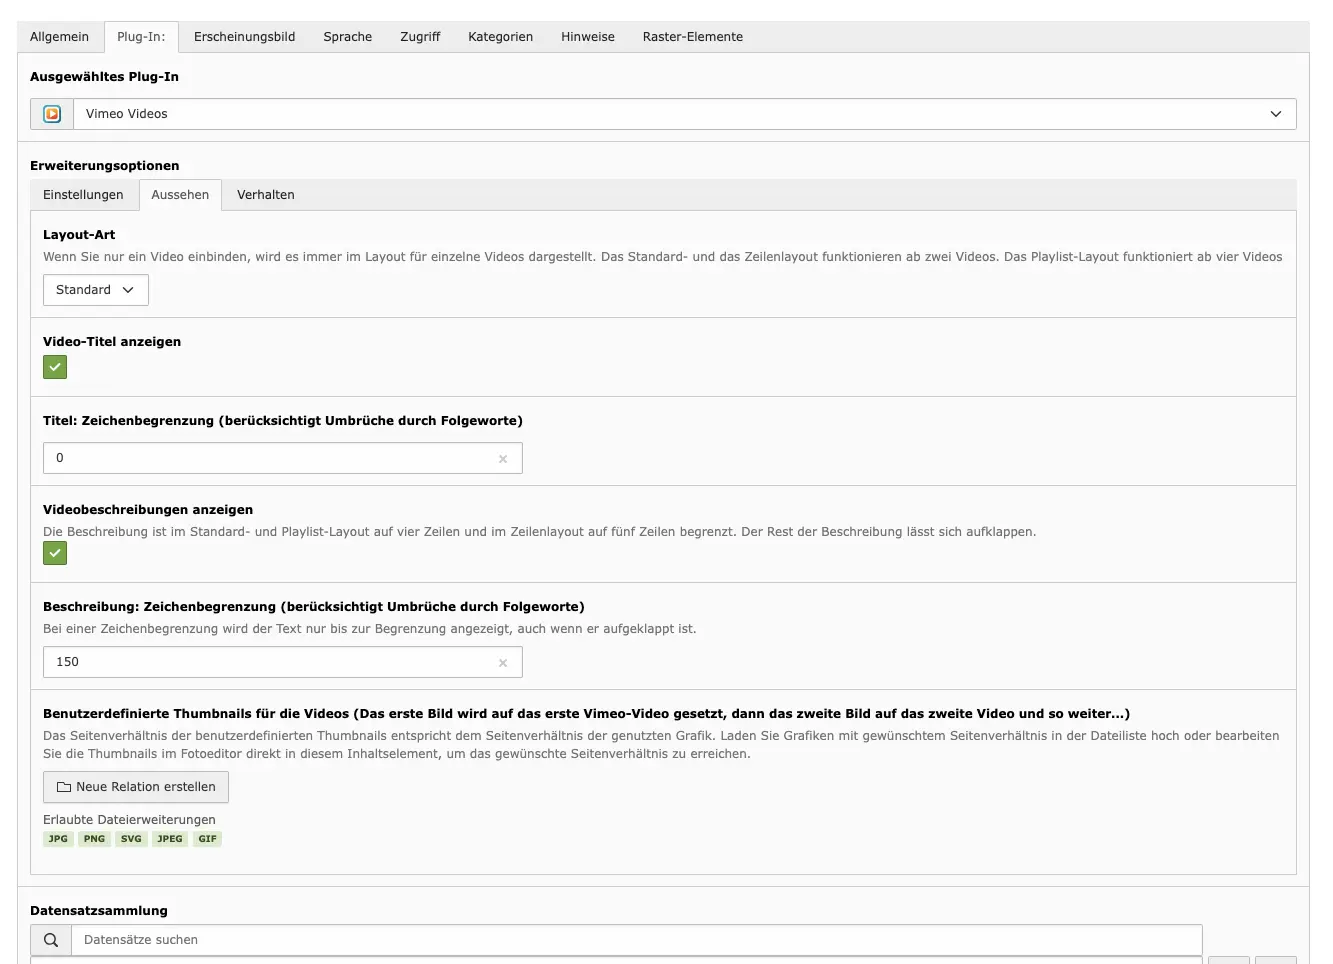
  • Layout Style
  • Show Videos Titles & Show Video Descriptions
  • Character Limit for Title & Description
  • Custom Thumbnail for the Videos

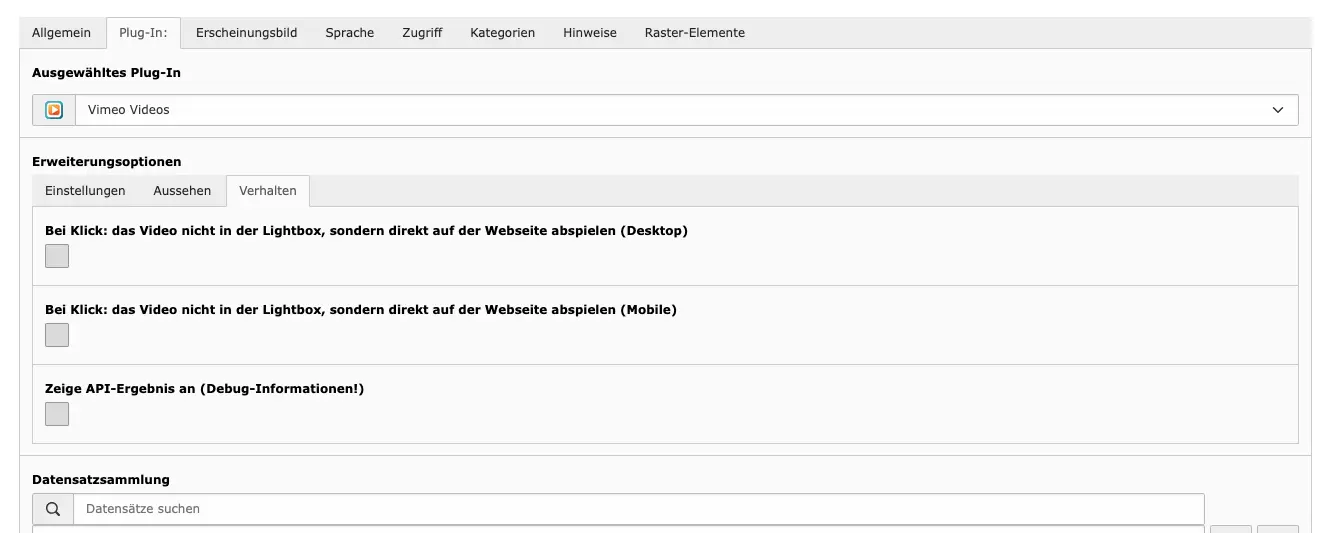
Behavior

  • Play video not in the lightbox, but directly on the web page
  • Show API Result

Vimeo Video IDs

Vimeo Channel Name

To add a channel name, copy from the link of the channel everything that comes after vimeo.com/channels/ and paste it into line for the ID/name.

  • Channel-Link: vimeo.com/channels/staffpicks
  • Channel Name: staffpicks

Vimeo Showcase ID

To add a video ID, copy from the link of the video everything that comes after vimeo.com/showcase/  and paste it into line for the ID.

  • Showcase Link: vimeo.com/showcase/vimeocanhelp
  • Showcase ID: vimeocanhelp
Vimeo Video ID

To add a video ID, copy from the link of the video everything that comes after vimeo.com/ and paste it into line for the ID.

  • Video Link: vimeo.com/246107487
  • Video ID: 24610748

IMPORTANT: You must make sure that the user associated with the clientId and clientSecret API keys has the right permissions to search in the channel where the filters are being used. Otherwise, searching for a query string will always result in an empty result set.

Content Area

In the content area you will see an overview of the settings you have made in the Vimeo plugin.

Vimeo im Frontend

Depending on the settings made, the result in the frontend can look very different. In our preview page you can see some examples of this.

FAQ

What is an embedded video?

An embedded video is a video that is integrated in a web page and played directly from there without the user having to switch to another website or external player. It is often provided by video sharing platforms such as YouTube or Vimeo and can be inserted on other websites through an embed code.

What is a media library?

A media library is a collection of media files such as videos, audio, images and documents that are stored and managed centrally. Media libraries are often used by organizations, companies, websites and social media platforms to manage and share their digital content. By using a media library, one can easily access all media files and use them in other contexts without having to upload them again each time.

What video sharing websites are there?

There are a variety of video portals, some of the most well-known include: YouTube, Vimeo, Dailymotion, Facebook Video, Twitch, TikTok, Instagram TV (IGTV), LinkedIn Video, Twitter Video.

However, this is just a short list, there are many other video portals that vary depending on the target audience and purpose.

What are quotas for YouTube videos?

YouTube video quotas are limits set on the number of views of a video or the number of calls to a playlist on a specific website or domain. These limits are established by YouTube to regulate and monitor the use of video and playlist content. Quotas can be used in various ways, such as limiting the use of content for commercial purposes or ensuring that a video is only used on specific websites. When a quota is reached, the video or playlist may no longer be displayed on the affected website.

Can you use Vimeo for free?

There is a free version of Vimeo that allows users to upload and share videos. However, certain features and options such as unlimited storage capacity, advanced analysis tools, and the ability to link videos with a custom domain are limited to the paid version.

What is an API?

An API (application programming interface) is an interface between software programs that enables communication and data exchange between them.

For example, if you want to create a media library with videos from YouTube or Vimeo, you can use their APIs. The API allows you to access and retrieve videos from the video platform without having to download them or host them yourself. The APIs also give access to information about the videos, such as title, bscription, and keywords. In addition, information about the channel that uploaded the video can be retrieved, and the number of views, likes, and comments on the video can be obtained.

Overall, an API is a useful tool for developers to leverage data and functionality from different systems without having to code everything from scratch.

What is an API key?

An API key, API key, or API token is a special code/access key used to gain access to an API. It is used to authorize and control access to the API.

Anyone who wants to use an API usually has to register with the API provider to obtain an API key. The API key is unique and is generated by the API platform. The key is used when a request is made to the API to authorize access to the data. API keys can also be used to restrict or extend access to specific functions or data within the API.

Overall, the API key is an important mechanism to ensure that only authorized users can access the API's data and functions, and to prevent unauthorized people or applications from using the API.

[1] There is no guarantee for permanent availability or support of the software. Licensees may use the software during the license period as long as it is officially supported and available.

Contact us

You are interested in the TYPO3 video extensions sg_youtube and sg_vimeo or in one of our other products? You would like to use our services? – Then simply contact us with your request. We are looking forward to your message!